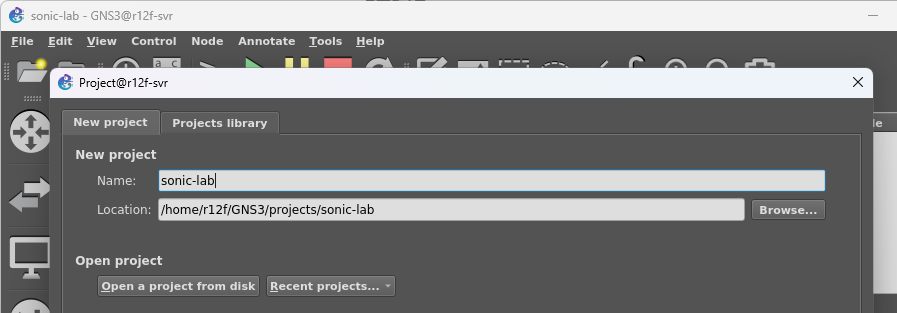
Getting Started with SONiC
为什么要做SONiC
We know that there is a operating system running inside every switches, no matter if it is complicated or not. It is used for configuring and checking the status of the switch. Since the first switch came out in 1986, with various manufacturers have been doing related development, nowadays, we have a lot of different OSes. However, there are still some problems, for example:
- 生态封闭,不开源,主要是为了支持自家的硬件,无法很好的兼容其他厂商的设备
- 支持的场景很有限,难以使用同一套系统去支撑大规模的数据中心中复杂多变的场景
- 升级可能会导致网络中断,难以实现无缝升级,这对于云提供商来说有时候是致命的
- 设备功能升级缓慢,难以很好的支持快速的产品迭代
Therefore, Microsoft initiated an open-source project in 2016 - SONiC, so that we can solve the problems above by building universal network operating system (NOS). Moreover, Microsoft is widely using SONiC in Azure, which ensures SONiC can indeed support large scale cloud environments. This is also an advantage of SONiC.
主体架构
SONiC is an open-source network operating system (NOS) based on Debian and developed by Microsoft. It is designed with three core principles:
- 硬件和软件解耦:通过SAI(Switch Abstraction Interface)将硬件的操作抽象出来,从而使得SONiC能够支持多种硬件平台。这一层抽象层由SONiC定义,由各个厂商来实现。
- 使用docker容器将软件微服务化:SONiC上的主要功能都被拆分成了一个个的docker容器,和传统的网络操作系统不同,升级系统可以只对其中的某个容器进行升级,而不需要整体升级和重启,这样就可以很方便的进行升级和维护,支持快速的开发和迭代。
- 使用redis作为中心数据库对服务进行解耦:绝大部分服务的配置和状态最后都被存储到中心的redis数据库中,这样不仅使得所有的服务可以很轻松的进行协作(数据存储和pubsub),也可以让我们很方便的在上面开发工具,使用统一的方法对各个服务进行操作和查询,而不用担心状态丢失和协议兼容问题,最后还可以很方便的进行状态的备份和恢复。
这让SONiC拥有了非常开放的生态(Community,Workgroups,Devices),总体而言,SONiC的架构如下图所示:

(Source: SONiC Wiki - Architecture)
Of course, such design also has some disadvantages, such as: the disk usage will increase. However, nowadays storage space is usually not a big issue, and it can also be solved or eased by various ways.
发展方向
Although switches have been developed for many years, with the development of the cloud nowadays, the demands of network becomes higher and higher. No matter it's intuitive features, such as larger bandwidth and larger capacity, or the latest research, such as in-band computing, end-network fusion, etc., all result in higher requirements and challenges to the development of switches, as well as continuous innovations from manufacturers and research institutions. The same goes for SONiC. As time goes on, the number of feature request has not decreased at all.
关于SONiC的发展方向,我们可以在它的Roadmap中看到。如果大家对最新的动态感兴趣,也可以关注它的Workshop,比如,最近的OCP Global Summit 2022 - SONiC Workshop。这里就不展开了。
感谢
Huge thanks to the following friends for their help and contributions! Without you there would be no way to get this book done!
License
This book uses the CC BY-NC-SA 4.0 License Agreement.
参考资料
- SONiC Wiki - Architecture
- SONiC Wiki - Roadmap Planning
- SONiC Landing Page
- SONiC Workgroups
- SONiC Supported Devices and Platforms
- SONiC User Manual
- OCP Global Summit 2022 - SONiC Workshop
Installation
If you own a switch yourself or plan to buy one, then install SONiC on it, please read this section carefully; otherwise, feel free skip it. :D
交换机选择和SONiC安装
首先,请确认你的交换机是否支持SONiC,SONiC目前支持的交换机型号可以在这里找到,如果你的交换机型号不在列表中,那么就需要联系厂商,看看是否有支持SONiC的计划。有很多交换机是不支持SONiC的,比如:
- 普通针对家用的交换机,这些交换机的硬件配置都比较低(即便支持的带宽很高,比如MikroTik CRS504-4XQ-IN,虽然它支持100GbE网络,但是它只有16MB的Flash存储和64MB的RAM,所以基本只能跑它自己的RouterOS了)。
- 有些虽然是数据中心用的交换机,但是可能由于型号老旧,厂商并没有计划支持SONiC。
Regarding the installation process, because different switches from different manufacturers might have very different design, the installation process can also be different. These differences show up in two major areas:
- 每个厂商都会有自己的SONiC Build,还有的厂商会在SONiC的基础之上进行扩展开发,为自己的交换机支持更多的功能,比如:Dell Enterprise SONiC,EdgeCore Enterprise SONiC,所以需要根据自己的交换机选择对应的版本。
- 每个厂商的交换机也会支持不同的安装方式,有一些是直接使用USB对ROM进行Flash,有一些是通过ONIE进行安装,这也需要根据自己的交换机来进行配置。
So, although the installation process may vary, in general, the installation steps are similar. Please contact your vendor for the detailed installation documentation, and then follow it through.
配置交换机
Once SONiC is installed, we need to do some basic settings, some of which are common, no matter which type of switch you are using, and we'll briefly summarize them here.
设置admin密码
The default SONiC account and password is admin:YourPaSsWoRd, using the default password is obviously not secure. So, please remember to change it:
sudo passwd admin
设置风扇转速
The switch fans in the data center are exceptionally loud! For example, the switch I use is Arista 7050QX-32S, which has 4 fans on it and can go up to 17,000 rpm. Although I put it in my garage, the high frequency whine can still be heard even on the second floor behind 3 walls, so if you are using it at home, it is recommended to change some settings to turn down the speed.
可惜,由于SONiC并没有cli对风扇转速的规则进行控制,所以我们需要通过手动修改pmon容器中的配置文件的方式来进行设置。
# Enter pmon container
sudo docker exec -it pmon bash

# Use pwmconfig to detect all pwm fans and create configuration file. The configuration file will be created at /etc/fancontrol.
pwmconfig

# Start fancontrol and make sure it works. If it doesn't work, you can run fancontrol directly to see what's wrong.
VERBOSE=1 /etc/init.d/fancontrol start
VERBOSE=1 /etc/init.d/fancontrol status

# Exit pmon container
exit

# Copy the configuration file from the container to the host, so that the configuration will not be lost after reboot.
# This command needs to know what is the model of your switch, for example, the command I need to run here is as follows. If your switch model is different, please modify it yourself.
sudo docker cp pmon:/etc/fancontrol /usr/share/sonic/device/x86_64-arista_7050_qx32s/fancontrol
设置交换机Management Port IP
The data center switches usually provides Serial Console connection, but its speed is too slow, so it is better for us to have the Management Port set up as soon as possible, then we can use SSH to manage it, which is way faster.
Generally, the device name of the management port is eth0, so we can set it by using the following SONiC command:
# sudo config interface ip add eth0 <ip-cidr> <gateway>
# IPv4
sudo config interface ip add eth0 192.168.1.2/24 192.168.1.1

# IPv6
sudo config interface ip add eth0 2001::8/64 2001::1
创建网络配置
The newly installed SONiC switch will have a default network configuration, which has many problems, such as for the use of the 10.0.0.0 IP, as follows:
admin@sonic:~$ show ip interfaces
Interface    Master    IPv4 address/mask    Admin/Oper    BGP Neighbor    Neighbor IP
-----------  --------  -------------------  ------------  --------------  -------------
Ethernet0              10.0.0.0/31          up/up         ARISTA01T2      10.0.0.1
Ethernet4              10.0.0.2/31          up/up         ARISTA02T2      10.0.0.3
Ethernet8              10.0.0.4/31          up/up         ARISTA03T2      10.0.0.5
So we need to update the network configuration of the ports we like to use. The easiest way is to create a VLAN, then put all the ports into the VLAN, so we can use VLAN Routing to route the packets:
# Create untagged vlan
sudo config vlan add 2

# Add IP to vlan
sudo config interface ip add Vlan2 10.2.0.0/24

# Remove all default IP settings
show ip interfaces | tail -n +3 | grep Ethernet | awk '{print "sudo config interface ip remove", $1, $2}' > oobe.sh; chmod +x oobe.sh; ./oobe.sh

# Add all ports to the new vlan
show interfaces status | tail -n +3 | grep Ethernet | awk '{print "sudo config vlan member add -u 2", $1}' > oobe.sh; chmod +x oobe.sh; ./oobe.sh

# Enable proxy arp, so switch can respond to arp requests from hosts
sudo config vlan proxy_arp 2 enabled

# Save config, so it will be persistent after reboot
sudo config save -y
That's it! Now, we can take a look at it by running show vlan brief:
admin@sonic:~$ show vlan brief
+-----------+--------------+-------------+----------------+-------------+-----------------------+
|   VLAN ID | IP Address   | Ports       | Port Tagging   | Proxy ARP   | DHCP Helper Address   |
+===========+==============+=============+================+=============+=======================+
|         2 | 10.2.0.0/24  | Ethernet0   | untagged       | enabled     |                       |
...
|           |              | Ethernet124 | untagged       |             |                       |
+-----------+--------------+-------------+----------------+-------------+-----------------------+
配置主机
If you only have one machine and try to connect a dual-port NIC to your switch for testing, then we will also need some changes on the machine to ensure that traffic will go through the NIC and switch, otherwise, feel free to skip this step.
There are many guidances on the internet here, such as using iptable DNAT and SNAT rules to create a virtual address, but the process is very tedious. After some experiments, I found that the easiest way is to simply move one of the nic into a new network namespace, even if you are using the IP of the same network segment.
For example, I uses Netronome Agilio CX 2x40GbE, which creates two interfaces: enp66s0np0 and enp66s0np1. With the following commands, we can move enp66s0np1 to a new network namespace and give it a ip address:
# Create a new network namespace
sudo ip netns add toy-ns-1

# Move the interface to the new namespace
sudo ip link set enp66s0np1 netns toy-ns-1

# Setting up IP and default routes
sudo ip netns exec toy-ns-1 ip addr add 10.2.0.11/24 dev enp66s0np1
sudo ip netns exec toy-ns-1 ip link set enp66s0np1 up
sudo ip netns exec toy-ns-1 ip route add default via 10.2.0.1
That's it! Now, we can now test our setup with iperf and confirm the traffic on switch:
# On the host (enp66s0np0 has ip 10.2.0.10 assigned)
$ iperf -s --bind 10.2.0.10

# Test within the new network namespace
$ sudo ip netns exec toy-ns-1 iperf -c 10.2.0.10 -i 1 -P 16
------------------------------------------------------------
Client connecting to 10.2.0.10, TCP port 5001
TCP window size: 85.0 KByte (default)
------------------------------------------------------------
...
[SUM] 0.0000-10.0301 sec  30.7 GBytes  26.3 Gbits/sec
[ CT] final connect times (min/avg/max/stdev) = 0.288/0.465/0.647/0.095 ms (tot/err) = 16/0

# Confirm on switch
admin@sonic:~$ show interfaces counters
      IFACE    STATE       RX_OK        RX_BPS    RX_UTIL    RX_ERR    RX_DRP    RX_OVR       TX_OK        TX_BPS    TX_UTIL    TX_ERR    TX_DRP    TX_OVR
-----------  -------  ----------  ------------  ---------  --------  --------  --------  ----------  ------------  ---------  --------  --------  --------
  Ethernet4        U   2,580,140  6190.34 KB/s      0.12%         0     3,783         0  51,263,535  2086.64 MB/s     41.73%         0         0         0
 Ethernet12        U  51,261,888  2086.79 MB/s     41.74%         0         1         0   2,580,317  6191.00 KB/s      0.12%         0         0         0
参考资料
- SONiC Supported Devices and Platforms
- SONiC Thermal Control Design
- Dell Enterprise SONiC Distribution
- Edgecore Enterprise SONiC Distribution
- Mikrotik CRS504-4XQ-IN
Hello World! Virtually!
Although SONiC is powerful, it is usually not cheap to get a switch that supports SONiC. If you would like to give SONiC a try, but don't want to spend too much money on getting a SONiC-supported device, then you are in the right place. This chapter will guide you on how to use GNS3 to build a virtual SONiC's Lab locally, so that you can quickly experience the basic functionalities of SONiC locally.
Despite there are multiple ways to run SONiC locally, such as docker + vswitch or p4 switch, for first time users, using GNS3 is probably the most convenient and fast way. So, we will be using GNS3 as an example in this chapter and introduce how to build your own SONiC lab locally. Now, let's get started!
安装GNS3
FIrst, to make it easy and intuitive to set up a virtual network for testing, let's get GNS3 installed.
GNS3,全称为Graphical Network Simulator 3,是一个图形化的网络仿真软件。它支持多种不同的虚拟化技术,比如:QEMU、VMware、VirtualBox等等。这样,我们在等会搭建虚拟网络的时候,就不需要手动的运行很多命令,或者写脚本了,大部分的工作都可以通过图形界面来完成了。
安装依赖
Before installing GNS3, we need to install several other softwares: docker, wireshark, putty, qemu, ubridge, libvirt and bridge-utils. Please feel free to skip this step, if you have already have them installed.
First is Docker, we can follow their official doc to get it installed: https://docs.docker.com/engine/install/
The rest softwares can be easy installed on ubuntu, by running the following commands. Note that the installation process of ubridge and Wireshark will ask if you want to create a wireshark user group to bypass sudo. Please be sure to select Yes here.
sudo apt-get install qemu-kvm libvirt-daemon-system libvirt-clients bridge-utils wireshark putty ubridge
Once it is done, we can start installing GNS3 now.
安装GNS3
On Ubuntu, the installation of GNS3 is very simple, just execute the following commands:
sudo add-apt-repository ppa:gns3/ppa
sudo apt update
sudo apt install gns3-gui gns3-server
Then add your user to the following groups so that GNS3 can go to access docker, wireshark, and other functions without sudo.
for g in ubridge libvirt kvm wireshark docker; do
    sudo usermod -aG $g <user-name>
done
如果你使用的不是Ubuntu,更详细的安装文档可以参考他们的官方文档。
准备SONiC的镜像
Before testing, we still need a SONiC image. Since SONiC needs to support various of platforms, and different platform has different underlying implementation, each platform will have their own image. Here, since we are creating a virtual environment, we need to use the image with VSwitch platform to create the virtual switch: sonic-vs.img.gz.
The project for building SONiC image is here. Although we can build it ourselves, the speed is really slow. To save time, we can directly [download the latest image from here](https://sonic- build.azurewebsites.net/ui/sonic/pipelines/142/builds?branchName=master). Simply look for the latest successful Build, find sonic-vs.img.gz in Artifacts, and download it.
Then, let's get the project prepared:
git clone --recurse-submodules https://github.com/sonic-net/sonic-buildimage.git
cd sonic-buildimage/platform/vs

# Download the image under this folder, then unzip the image with following commands。
gzip -d sonic-vs.img.gz

# Run the following command to generate the GNS3 image configuration file:
./sonic-gns3a.sh
Once it is done, we can see the image file we need by running ls command.
r12f@r12f-svr:~/code/sonic/sonic-buildimage/platform/vs
$ l
total 2.8G
...
-rw-rw-r--  1 r12f r12f 1.1K Apr 18 16:36 SONiC-latest.gns3a  # <= This is the GNS3 image configuration file
-rw-rw-r--  1 r12f r12f 2.8G Apr 18 16:32 sonic-vs.img        # <= This is the unzipped SONiC image file
...
导入镜像
Now, we can run gns3 in command line to start GNS3! If you are ssh into another machine, try enabling X11 forwarding, so that you can run GNS3 remotely, but with the GUI displayed locally. This is what I am did - running GNS3 on the remote server, but with the GUI displayed locally on the Windows machine via MobaXterm.
Once it's running, GNS3 will ask us to create a project, it's simple, just give it a directory path. If you are using X11 forwarding, please note that this directory is on your remote server, not your local machine.
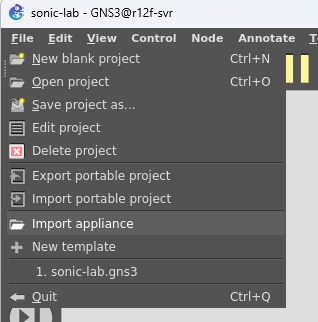
Then, we can import the image we just generated via File -> Import appliance.
Select the SONiC-latest.gns3a image configuration file we just generated, and click Next.
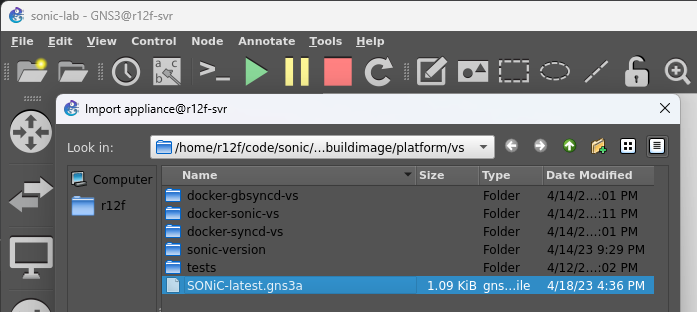
Now you can see our image file, click Next.
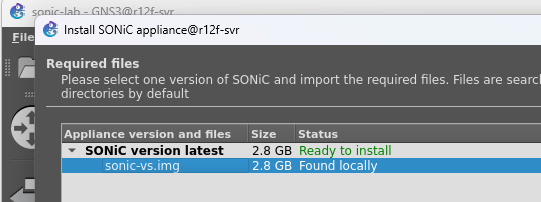
Now, it will start importing the image, this process may be slow because GNS3 needs to convert the image to qcow2 format and put it in our project directory. Once the import is complete, we will be able to see our image.
Great! Image is now imported!
创建网络
Great! Now we have everything is in place, let's create a virtual network for our testing!
The GNS3 GUI are really easy to use, Basically, simply open the sidebar, drag in the switch, drag in the VPC, and connect the wires. After everything is connected, click the Play button on top to start the network simulation. Then we should see the network starts running as below:
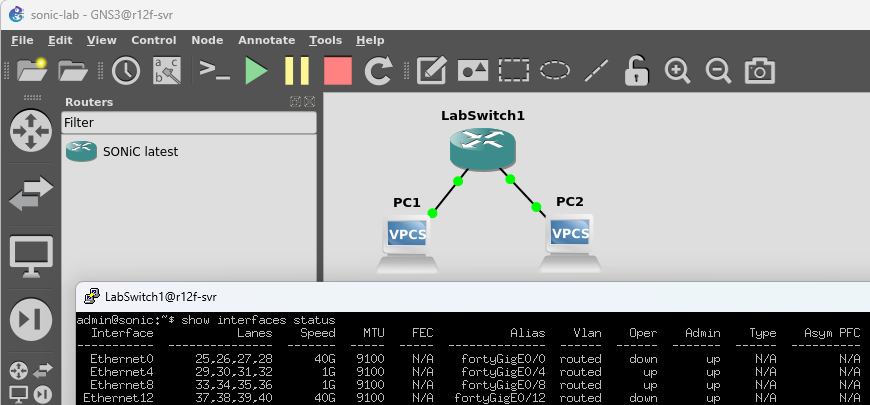
Next, right click on the switch and select Custom Console, then select Putty to open the console for our virtual switch. Here, the default username and password for SONiC are admin and YourPaSsWoRd. Once we are logged in, we can run any SONiC commands, such as show interfaces status or show ip interface to see the status of the network. As above shows, we can see the status of the two connected interfaces are both up!
配置网络
In the SONiC virtual switch, the default ports are all created as eth pairs and all uses the 10.0.0.x subnet (as follows):
admin@sonic:~$ show ip interfaces
Interface    Master    IPv4 address/mask    Admin/Oper    BGP Neighbor    Neighbor IP
-----------  --------  -------------------  ------------  --------------  -------------
Ethernet0              10.0.0.0/31          up/up         ARISTA01T2      10.0.0.1
Ethernet4              10.0.0.2/31          up/up         ARISTA02T2      10.0.0.3
Ethernet8              10.0.0.4/31          up/up         ARISTA03T2      10.0.0.5
To make everything work, the most convenient way is still creating a vlan and put all the ports in it (we use Ethernet4 and Ethernet8 here):
# Remove old config
sudo config interface ip remove Ethernet4 10.0.0.2/31
sudo config interface ip remove Ethernet8 10.0.0.4/31

# Create VLAN with id 2
sudo config vlan add 2

# Add ports to VLAN
sudo config vlan member add -u 2 Ethernet4
sudo config vlan member add -u 2 Ethernet8

# Add IP address to VLAN
sudo config interface ip add Vlan2 10.0.0.0/24
There you go! Our vlan is created, and we can check it out by show vlan brief:
admin@sonic:~$ show vlan brief
+-----------+--------------+-----------+----------------+-------------+-----------------------+
|   VLAN ID | IP Address   | Ports     | Port Tagging   | Proxy ARP   | DHCP Helper Address   |
+===========+==============+===========+================+=============+=======================+
|         2 | 10.0.0.0/24  | Ethernet4 | untagged       | disabled    |                       |
|           |              | Ethernet8 | untagged       |             |                       |
+-----------+--------------+-----------+----------------+-------------+-----------------------+
Then, we can assign a 10.0.0.x IP address to all the virtual host now:
# VPC1
ip 10.0.0.2 255.0.0.0 10.0.0.1

# VPC2
ip 10.0.0.3 255.0.0.0 10.0.0.1
Okay! Time to ping!
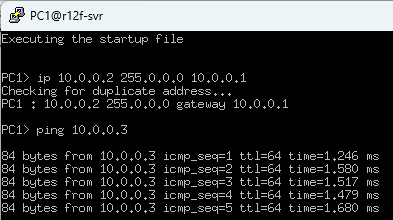
Tada!
抓包
As installation process shows above, before we installed GNS3, we purposely installed Wireshark so that we can directly capture packets inside GNS3. All we need to do is right click on the link we want to capture and select Start capture.
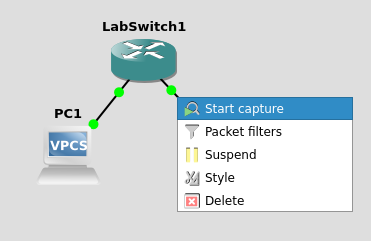
Very soon, Wireshark will be opened up and display all the network packets in real time, which is very convenient:
更多的网络
除了上面这种最简单的网络搭建,我们其实可以用GNS3搭建很多非常复杂的网络来进行测试,比如多层ECMP + eBGP等等。XFlow Research发布了一篇非常详细的文档来介绍这些内容,感兴趣的小伙伴可以去传送到这篇文档去看看:SONiC Deployment and Testing Using GNS3。
参考资料
常用命令
To help us view and configure the status of SONiC, SONiC provides a large number of CLI commands for us to invoke. Most of these commands fall into two categories: show and config, and they are basically similar in format, most of them conform to the following format:
show <object> [options]
config <object> [options]
SONiC的文档提供了非常详细的命令列表:SONiC Command Line Interface Guide,但是由于其命令众多,不便于我们初期的学习和使用,所以列出了一些平时最常用的命令和解释,供大家参考。
SONiC中的所有命令的子命令都可以只打前三个字母,来帮助我们有效的节约输入命令的时间,比如:
show interface transceiver error-status
和下面这条命令是等价的:
show int tra err
为了帮助大家记忆和查找,下面的命令列表都用的全名,但是大家在实际使用的时候,可以大胆的使用缩写来减少工作量。
如果遇到不熟悉的命令,都可以通过输入-h或者--help来查看帮助信息,比如:
show -h
show interface --help
show interface transceiver --help
General
show version

show uptime

show platform summary
Config
sudo config reload
sudo config load_minigraph
sudo config save -y
Docker相关
docker ps
docker top <container_id>|<container_name>
如果我们想对所有的docker container进行某个操作,我们可以通过docker ps命令来获取所有的container id,然后pipe到tail -n +2来去掉第一行的标题,从而实现批量调用。
比如,我们可以通过如下命令来查看所有container中正在运行的所有线程:
$ for id in `docker ps | tail -n +2 | awk '{print $1}'`; do docker top $id; done
UID                 PID                 PPID                C                   STIME               TTY                 TIME                CMD
root                7126                7103                0                   Jun09               pts/0               00:02:24            /usr/bin/python3 /usr/local/bin/supervisord
root                7390                7126                0                   Jun09               pts/0               00:00:24            python3 /usr/bin/supervisor-proc-exit-listener --container-name telemetry
...
Interfaces / IPs
show interface status
show interface counters
show interface portchannel
show interface transceiver info
show interface transceiver error-status
sonic-clear counters

TODO: config
MAC / ARP / NDP
# Show MAC (FDB) entries
show mac

# Show IP ARP table
show arp

# Show IPv6 NDP table
show ndp
BGP / Routes
show ip/ipv6 bgp summary
show ip/ipv6 bgp network

show ip/ipv6 bgp neighbors [IP]

show ip/ipv6 route

TODO: add
config bgp shutdown neighbor <IP>
config bgp shutdown all

TODO: IPv6
LLDP
# Show LLDP neighbors in table format
show lldp table

# Show LLDP neighbors details
show lldp neighbors
VLAN
show vlan brief
QoS相关
# Show PFC watchdog stats
show pfcwd stats
show queue counter
ACL
show acl table
show acl rule
MUXcable / Dual ToR
Muxcable mode
config muxcable mode {active} {<portname>|all} [--json]
config muxcable mode active Ethernet4 [--json]
Muxcable config
show muxcable config [portname] [--json]
Muxcable status
show muxcable status [portname] [--json]
Muxcable firmware
# Firmware version:
show muxcable firmware version <port>

# Firmware download
# config muxcable firmware download <firmware_file> <port_name>
sudo config muxcable firmware download AEC_WYOMING_B52Yb0_MS_0.6_20201218.bin Ethernet0

# Rollback:
# config muxcable firmware rollback <port_name>
sudo config muxcable firmware rollback Ethernet0
参考资料
Core Components Intro
We might think that a switch is a simple network device. However, in fact, there are many components in a switch. Furthermore, because SONiC decouples all components using Redis, Redis in SONiC, it is difficult to understand the relationships between services by simply tracing the code. This requires us to first establish a relatively abstract overall model, and then dive into the details of each component. Therefore, before diving into each individual parts, here we will introduce each component briefly to help establish a rough overall model.
Before reading this chapter, there are two terms that will frequently appear in this chapter and in official documents of SONiC: ASIC (Application-Specific Integrated Circuit) and ASIC State. They refer to the state of the pipeline used for packet processing in the switch, such as ACL, etc. This is different from other hardware states of switches, such as port states (port speed, interface type), IP address, etc.
If you are interested in more details, please feel free to check out two relevant materials first: [SAI (Switch Abstraction Interface) API][SAIAPI] and a paper on RMT (Reprogrammable Match Table) called "[Forwarding Metamorphosis: Fast Programmable Match-Action Processing in Hardware for SDN][PISA]".
These will be very helpful for us to read SONiC documentation.
In addition, for our convenience of understanding and reading, we also put the SONiC architecture diagram at the beginning of this chapter as a reference.
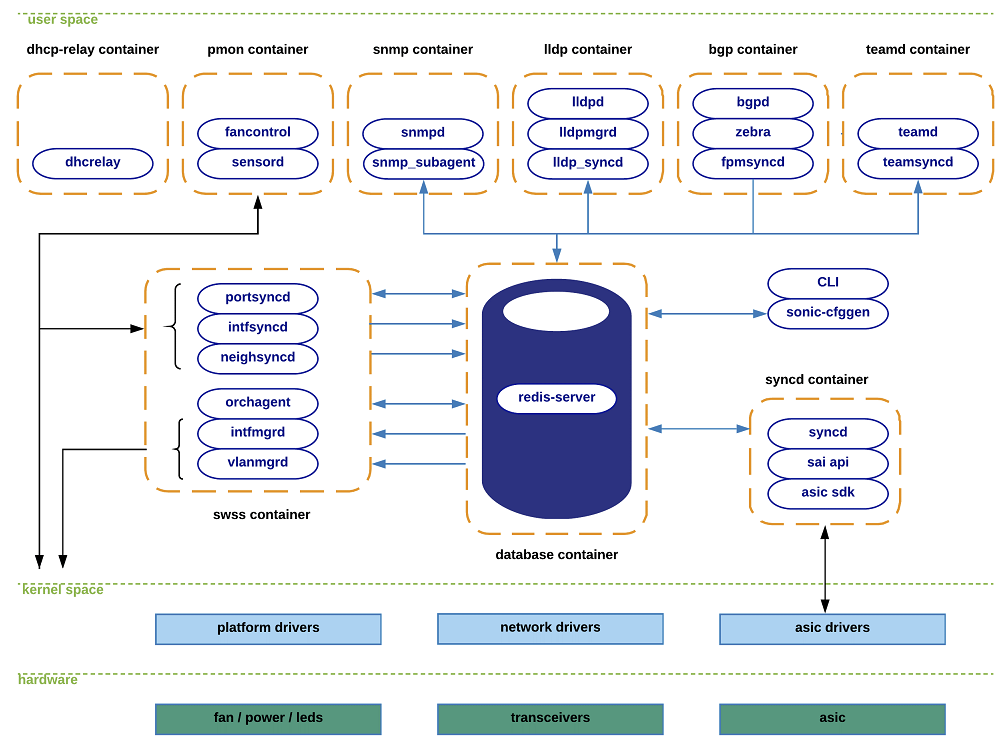
(Source: SONiC Wiki - Architecture)
参考资料
- SONiC Architecture
- SAI API
- Forwarding Metamorphosis: Fast Programmable Match-Action Processing in Hardware for SDN
Redis Database
First of all, the most important service in SONiC is undoubtedly the central database - Redis! It has 2 major purposes: to store the switch configuration and status of all services, as well as to provide a communication channel among all services.
In order to provide these features, SONiC will create a instance named sonic-db in Redis, and its configuration and sharding information can be found in /var/run/redis/sonic-db/database_config.json.
admin@sonic:~$ cat /var/run/redis/sonic-db/database_config.json
{
    "INSTANCES": {
        "redis": {
            "hostname": "127.0.0.1",
            "port": 6379,
            "unix_socket_path": "/var/run/redis/redis.sock",
            "persistence_for_warm_boot": "yes"
        }
    },
    "DATABASES": {
        "APPL_DB": { "id": 0, "separator": ":", "instance": "redis" },
        "ASIC_DB": { "id": 1, "separator": ":", "instance": "redis" },
        "COUNTERS_DB": { "id": 2, "separator": ":", "instance": "redis" },
        "LOGLEVEL_DB": { "id": 3, "separator": ":", "instance": "redis" },
        "CONFIG_DB": { "id": 4, "separator": "|", "instance": "redis" },
        "PFC_WD_DB": { "id": 5, "separator": ":", "instance": "redis" },
        "FLEX_COUNTER_DB": { "id": 5, "separator": ":", "instance": "redis" },
        "STATE_DB": { "id": 6, "separator": "|", "instance": "redis" },
        "SNMP_OVERLAY_DB": { "id": 7, "separator": "|", "instance": "redis" },
        "RESTAPI_DB": { "id": 8, "separator": "|", "instance": "redis" },
        "GB_ASIC_DB": { "id": 9, "separator": ":", "instance": "redis" },
        "GB_COUNTERS_DB": { "id": 10, "separator": ":", "instance": "redis" },
        "GB_FLEX_COUNTER_DB": { "id": 11, "separator": ":", "instance": "redis" },
        "APPL_STATE_DB": { "id": 14, "separator": ":", "instance": "redis" }
    },
    "VERSION": "1.0"
}
Although there are about ten databases in SONiC that we can see, most of the time we only need to focus on the following few most important databases:
- CONFIG_DB(ID = 4):存储所有服务的配置信息,比如端口配置,VLAN配置等等。它代表着用户想要交换机达到的状态的数据模型,这也是所有CLI和外部应用程序修改配置时的主要操作对象。
- APPL_DB(Application DB, ID = 0):存储所有服务的内部状态信息。这些信息有两种:一种是各个服务在读取了CONFIG_DB的配置信息后,自己计算出来的。我们可以理解为各个服务想要交换机达到的状态(Goal State),还有一种是当最终硬件状态发生变化被写回时,有些服务会直接写回到APPL_DB,而不是我们下面马上要介绍的STATE_DB。这些信息我们可以理解为各个服务认为交换机当前的状态(Current State)。
- STATE_DB(ID = 6):存储着交换机各个部件当前的状态(Current State)。当SONiC中的服务收到了STATE_DB的状态变化,但是发现和Goal State不一致的时候,SONiC就会重新下发配置,直到两者一致。(当然,对于那些回写到APPL_DB状态,服务就会监听APPL_DB的变化,而不是STATE_DB了。)
- ASIC_DB(ID = 1):存储着SONiC想要交换机ASIC达到状态信息,比如,ACL,路由等等。和APPL_DB不同,这个数据库里面的数据模型是面向ASIC设计的,而不是面向服务抽象的。这样做的目的是为了方便各个厂商进行SAI和ASIC驱动的开发。
Now, we will notice a very intuitive problem: with so many services in the switch, are all configurations and states stored in one database without isolation? What if two services use the same Redis Key? This is a very good question, and SONiC's solution is very direct: continue to partition the tables in each database!
We know that Redis does not have the concept of table in each database, but directly stores data using key-value pairs. Therefore, in order to further partition tables, SONiC's solution is to put the table name into the key and use a separator to separate the table from the key. The separator field in the above configuration file is for this purpose. For example, to retrieve the status of the Ethernet4 port in the PORT_TABLE table in the APPL_DB, we can use PORT_TABLE:Ethernet4 as the key, as follows:
127.0.0.1:6379> select 0
OK

127.0.0.1:6379> hgetall PORT_TABLE:Ethernet4
 1) "admin_status"
 2) "up"
 3) "alias"
 4) "Ethernet6/1"
 5) "index"
 6) "6"
 7) "lanes"
 8) "13,14,15,16"
 9) "mtu"
10) "9100"
11) "speed"
12) "40000"
13) "description"
14) ""
15) "oper_status"
16) "up"
Of course, in SONiC, not only data models but also communication mechanisms are implemented using similar methods to achieve "table-level" isolation.
参考资料
Service and Workflow Intro
There are very many services (resident processes) inside SONiC, 20 or 30 of them, and they will start as the switch starts up and stay running until the switch is shut down. If we want to quickly grasp SONiC, going through it service by service will easily get bogged down in details, so it is best to make a broad classification of these services and control flows to help us build a macro concept.
我们这里不会深入到某一个具体的服务中去,而是先从整体上来看看SONiC中的服务的结构,帮助我们建立一个整体的认识。关于具体的服务,我们会在工作流一章中,对常用的工作流进行介绍,而关于详细的技术细节,大家也可以查阅每个服务相关的设计文档。
服务分类
In general, the services in SONiC can be divided into the following categories: *syncd, *mgrd, feature implementations, orchagent and syncd.
*syncd服务
These services all end with syncd in their names. They all do similar things: they are responsible for synchronizing hardware state into Redis, and generally target either APPL_DB or STATE_DB.
For example, portsyncd is to synchronize the state of all the ports in the switch to STATE_DB by listening to the events of netlink, while natsyncd is to listen to the events of netlink and synchronize the state of all the NATs in the switch to APPL_DB.
*mgrd服务
These services have names that end with mgrd. As the name suggests, these services are so-called "Manager" services, meaning that they are responsible for the configuration of individual hardware, the exact opposite of *syncd. Their logic has two main parts:
- 配置下发:负责读取配置文件和监听Redis中的配置和状态改变(主要是CONFIG_DB,APPL_DB和STATE_DB),然后将这些修改推送到交换机硬件中去。推送的方法有多种,取决于更新的目标是什么,可以通过更新APPL_DB并发布更新消息,或者是直接调用linux下的命令行,对系统进行修改。比如:
nbrmgr就是监听CONFIG_DB,APPL_DB和STATE_DB中neighbor的变化,并调用netlink和command line来对neighbor和route进行修改,而intfmgr除了调用command line还会将一些状态更新到APPL_DB中去。 - 状态同步:对于需要Reconcile的服务,
*mgrd还会监听STATE_DB中的状态变化,如果发现硬件状态和当前期望状态不一致,就会重新发起配置流程,将硬件状态设置为期望状态。这些STATE_DB中的状态变化一般都是*syncd服务推送的。比如:intfmgr就会监听STATE_DB中,由portsyncd推送的,端口的Up/Down状态和MTU变化,一旦发现和其内存中保存的期望状态不一致,就会重新下发配置。
功能实现服务
There are some functions that do not rely on the OS itself, but are implemented by some specific processes, such as BGP, or some external interfaces. These services often have names ending in d for deamon, e.g.: bgpd, lldpd, snmpd, teamd, etc., or simply the name of this function, e.g.: fancontrol.
orchagent服务
This is one of the most important services in SONiC, unlike other services that are only responsible for one or two specific functions, orchagent, as the orchestrator (orchestrator) of the switch ASIC state, checks all the states in the database from the *syncd service, consolidates them and sends them down to the database used to store the switch ASIC configuration: ASIC_DB: This state is finally received by syncd` and calls the SAI API to interact with the ASIC SDK and the ASIC through the SAI implementations provided by each vendor, and finally sends the configuration down to the switch hardware.
syncd服务
The syncd service is downstream of orchagent, which is named syncd, but it is responsible for both *mgrd and *syncd of ASIC.
- 首先,作为
*mgrd,它会监听ASIC_DB的状态变化,一旦发现,就会获取其新的状态并调用SAI API,将配置下发到交换机硬件中。 - 然后,作为
*syncd,如果ASIC发送了任何的通知给SONiC,它也会将这些通知通过消息的方式发送到Redis中,以便orchagent和*mgrd服务获取到这些变化,并进行处理。这些通知的类型我们可以在SwitchNotifications.h中找到。
服务间控制流分类
With these categories, we can understand the services in SONiC more clearly, and it is very important to understand the control flow between services. With the above classification, we can also divide the main control flow here into two categories: configuration delivery and state synchronization.
配置下发
The flow of configuration issuance is generally as follows:
- 修改配置:用户可以通过CLI或者REST API修改配置,这些配置会被写入到CONFIG_DB中并通过Redis发送更新通知。或者外部程序可以通过特定的接口,比如BGP的API,来修改配置,这种配置会通过内部的TCP Socket发送给
*mgrd服务。 *mgrd下发配置:服务监听到CONFIG_DB中的配置变化,然后将这些配置推送到交换机硬件中。这里由两种主要情况(并且可以同时存在):- 直接下发:
*mgrd服务直接调用linux下的命令行,或者是通过netlink来修改系统配置*syncd服务会通过netlink或者其他方式监听到系统配置的变化,并将这些变化推送到STATE_DB或者APPL_DB中。*mgrd服务监听到STATE_DB或者APPL_DB中的配置变化,然后将这些配置和其内存中存储的配置进行比较,如果发现不一致,就会重新调用命令行或者netlink来修改系统配置,直到它们一致为止。
- 间接下发:
*mgrd将状态推送到APPL_DB并通过Redis发送更新通知。orchagent服务监听到配置变化,然后根据所有相关的状态,计算出此时ASIC应该达到的状态,并下发到ASIC_DB中。syncd服务监听到ASIC_DB的变化,然后将这些新的配置通过统一的SAI API接口,调用ASIC Driver更新交换机ASIC中的配置。
- 直接下发:
Configuration initialization is similar to configuration distribution, but the configuration file is read when the service is started, so we won't expand on that here.
状态同步
If at this time, something happens, such as a bad network port, the state in the ASIC changes, etc., this time we need to do a state update and synchronization. This process generally looks like this:
- 检测状态变化:这个状态变化主要来源于
*syncd服务(netlink等等)和syncd服务(SAI Switch Notification),这些服务在检测到变化后,会将它们发送给STATE_DB或者APPL_DB。 - 处理状态变化:
orchagent和*mgrd服务会监听到这些变化,然后开始处理,将新的配置重新通过命令行和netlink下发给系统,或者下发到ASIC_DB中,让syncd服务再次对ASIC进行更新。
具体例子
The official documentation of SONiC gives several examples of typical control flow, so I won't expand too much here, interested parties can go here: [SONiC Subsystem Interactions](https://github.com/sonic-net/SONiC/wiki/ Architecture#sonic-subsystems-interactions). We will also choose some very common workflows to expand on later in the workflow chapter.
参考资料
Core Containers
The most distinctive aspect of SONiC's design: containerization.
From the above design diagram of SONiC, we can see that in SONiC, all services are in the form of containers. After logging into the switch, we can view the currently running containers by using the docker ps command:
admin@sonic:~$ docker ps
CONTAINER ID   IMAGE                                COMMAND                  CREATED      STATUS        PORTS     NAMES
ddf09928ec58   docker-snmp:latest                   "/usr/local/bin/supe…"   2 days ago   Up 32 hours             snmp
c480f3cf9dd7   docker-sonic-mgmt-framework:latest   "/usr/local/bin/supe…"   2 days ago   Up 32 hours             mgmt-framework
3655aff31161   docker-lldp:latest                   "/usr/bin/docker-lld…"   2 days ago   Up 32 hours             lldp
78f0b12ed10e   docker-platform-monitor:latest       "/usr/bin/docker_ini…"   2 days ago   Up 32 hours             pmon
f9d9bcf6c9a6   docker-router-advertiser:latest      "/usr/bin/docker-ini…"   2 days ago   Up 32 hours             radv
2e5dbee95844   docker-fpm-frr:latest                "/usr/bin/docker_ini…"   2 days ago   Up 32 hours             bgp
bdfa58009226   docker-syncd-brcm:latest             "/usr/local/bin/supe…"   2 days ago   Up 32 hours             syncd
655e550b7a1b   docker-teamd:latest                  "/usr/local/bin/supe…"   2 days ago   Up 32 hours             teamd
1bd55acc181c   docker-orchagent:latest              "/usr/bin/docker-ini…"   2 days ago   Up 32 hours             swss
bd20649228c8   docker-eventd:latest                 "/usr/local/bin/supe…"   2 days ago   Up 32 hours             eventd
b2f58447febb   docker-database:latest               "/usr/local/bin/dock…"   2 days ago   Up 32 hours             database
Let's briefly introduce these containers here.
数据库容器:database
This container runs Redis, the central database in SONiC that we have mentioned many times, which holds the configuration and state information of all switches, and through which SONiC provides the underlying communication mechanism to each service.
We can see the running redis process inside this container by docker: the
admin@sonic:~$ sudo docker exec -it database bash

root@sonic:/# ps aux
USER         PID %CPU %MEM    VSZ   RSS TTY      STAT START   TIME COMMAND
...
root          82 13.7  1.7 130808 71692 pts/0    Sl   Apr26 393:27 /usr/bin/redis-server 127.0.0.1:6379
...

root@sonic:/# cat /var/run/redis/redis.pid
82
So how does another container access this Redis database? The answer is through a Unix socket, which we can see in the database container, which maps the /var/run/redis directory on the switch into the database container, allowing the database container to create the socket: /var/run/redis:
# In database container
root@sonic:/# ls /var/run/redis
redis.pid  redis.sock  sonic-db

# On host
admin@sonic:~$ ls /var/run/redis
redis.pid  redis.sock  sonic-db
Then map this socket to other containers, so that all containers can access the central database, for example, the swss container:
admin@sonic:~$ docker inspect swss
...
        "HostConfig": {
            "Binds": [
                ...
                "/var/run/redis:/var/run/redis:rw",
                ...
            ],
...
交换机状态管理容器:swss(Switch State Service)
This container is arguably the most critical container in SONiC, it is the brain of SONiC, which runs a large number of *syncd and *mgrd services to manage all aspects of the switch configuration, such as Port, neighbor, ARP, VLAN, Tunnel, etc., etc. Also running inside is the orchagent mentioned above, which is used to handle configuration and status changes related to the ASIC in a unified manner.
The approximate functions and processes of these services have already been mentioned above, so we won't go over them again. Here we can take a look at the services running in this container by using the ps command:
admin@sonic:~$ docker exec -it swss bash
root@sonic:/# ps aux
USER         PID %CPU %MEM    VSZ   RSS TTY      STAT START   TIME COMMAND
...
root          43  0.0  0.2  91016  9688 pts/0    Sl   Apr26   0:18 /usr/bin/portsyncd
root          49  0.1  0.6 558420 27592 pts/0    Sl   Apr26   4:31 /usr/bin/orchagent -d /var/log/swss -b 8192 -s -m 00:1c:73:f2:bc:b4
root          74  0.0  0.2  91240  9776 pts/0    Sl   Apr26   0:19 /usr/bin/coppmgrd
root          93  0.0  0.0   4400  3432 pts/0    S    Apr26   0:09 /bin/bash /usr/bin/arp_update
root          94  0.0  0.2  91008  8568 pts/0    Sl   Apr26   0:09 /usr/bin/neighsyncd
root          96  0.0  0.2  91168  9800 pts/0    Sl   Apr26   0:19 /usr/bin/vlanmgrd
root          99  0.0  0.2  91320  9848 pts/0    Sl   Apr26   0:20 /usr/bin/intfmgrd
root         103  0.0  0.2  91136  9708 pts/0    Sl   Apr26   0:19 /usr/bin/portmgrd
root         104  0.0  0.2  91380  9844 pts/0    Sl   Apr26   0:20 /usr/bin/buffermgrd -l /usr/share/sonic/hwsku/pg_profile_lookup.ini
root         107  0.0  0.2  91284  9836 pts/0    Sl   Apr26   0:20 /usr/bin/vrfmgrd
root         109  0.0  0.2  91040  8600 pts/0    Sl   Apr26   0:19 /usr/bin/nbrmgrd
root         110  0.0  0.2  91184  9724 pts/0    Sl   Apr26   0:19 /usr/bin/vxlanmgrd
root         112  0.0  0.2  90940  8804 pts/0    Sl   Apr26   0:09 /usr/bin/fdbsyncd
root         113  0.0  0.2  91140  9656 pts/0    Sl   Apr26   0:20 /usr/bin/tunnelmgrd
root         208  0.0  0.0   5772  1636 pts/0    S    Apr26   0:07 /usr/sbin/ndppd
...
ASIC管理容器:syncd
This container is mainly used to manage the ASICs on the switch, and it runs the syncd service. The SAI (Switch Abstraction Interface) and ASIC Driver provided by each vendor we mentioned before are placed in this container. It is the existence of this container that allows SONiC to support many different ASICs without modifying the upper layer services. In other words, without this container, the SONiC is a brain in a tank, except for some basic configuration, other than only by thinking, nothing can be done.
There are not many services running in the syncd container, namely syncd, which we can view with the ps command, and in the /usr/lib directory, where we can also find this immense and unbelievable SAI file compiled to support ASIC: the
admin@sonic:~$ docker exec -it syncd bash

root@sonic:/# ps aux
USER         PID %CPU %MEM    VSZ   RSS TTY      STAT START   TIME COMMAND
...
root          20  0.0  0.0  87708  1544 pts/0    Sl   Apr26   0:00 /usr/bin/dsserve /usr/bin/syncd --diag -u -s -p /etc/sai.d/sai.profile -b /tmp/break_before_make_objects
root          32 10.7 14.9 2724404 599408 pts/0  Sl   Apr26 386:49 /usr/bin/syncd --diag -u -s -p /etc/sai.d/sai.profile -b /tmp/break_before_make_objects
...

root@sonic:/# ls -lh /usr/lib
total 343M
...
lrwxrwxrwx 1 root root   13 Apr 25 04:38 libsai.so.1 -> libsai.so.1.0
-rw-r--r-- 1 root root 343M Feb  1 06:10 libsai.so.1.0
...
各种实现特定功能的容器
There are many more containers in SONiC that exist to implement some specific functionality. These containers generally have special external interfaces (non-SONiC CLI and REST API) and implementations (non-OS or ASIC), such as
- bgp:用来实现BGP协议(Border Gateway Protocol,边界网关协议)的容器
- lldp:用来实现LLDP协议(Link Layer Discovery Protocol,链路层发现协议)的容器
- teamd:用来实现Link Aggregation(链路聚合)的容器
- snmp:用来实现SNMP协议(Simple Network Management Protocol,简单网络管理协议)的容器
Similar to SWSS, in order to accommodate the SONiC architecture, they all run the same kinds of services we mentioned above in the middle:
- 配置管理和下发(类似
*mgrd):lldpmgrd,zebra(bgp) - 状态同步(类似
*syncd):lldpsyncd,fpmsyncd(bgp),teamsyncd - 服务实现或者外部接口(
*d):lldpd,bgpd,teamd,snmpd
管理服务容器:mgmt-framework
We have seen in previous sections how to use SONiC's CLI for some switch configuration, but in a real production environment, it is not practical to manually log into the switch to configure all the switches using the CLI, so SONiC provides a REST API to solve this problem. The implementation of this REST API is in the mgmt-framework container. We can view it with the ps command:
admin@sonic:~$ docker exec -it mgmt-framework bash
root@sonic:/# ps aux
USER         PID %CPU %MEM    VSZ   RSS TTY      STAT START   TIME COMMAND
...
root          16  0.3  1.2 1472804 52036 pts/0   Sl   16:20   0:02 /usr/sbin/rest_server -ui /rest_ui -logtostderr -cert /tmp/cert.pem -key /tmp/key.pem
...
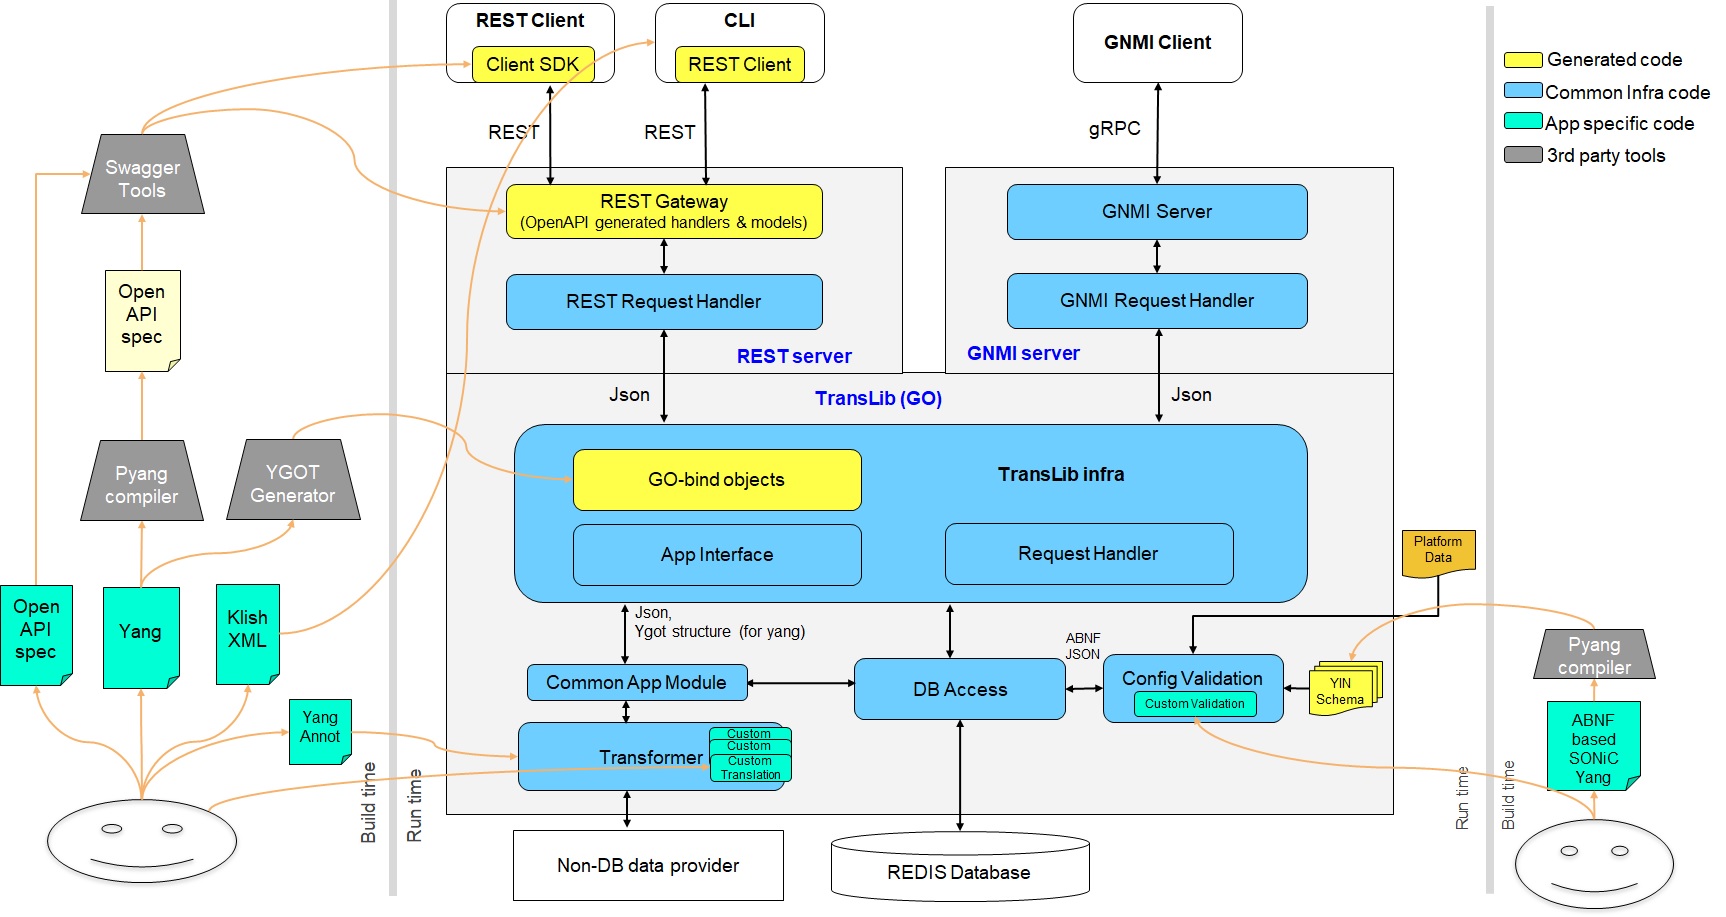
其实除了REST API,SONiC还可以通过其他方式来进行管理,如gNMI,这些也都是运行在这个容器中的。其整体架构如下图所示 [2]:

Here we can also find that we actually use the CLI, the underlying is also achieved by calling this REST API ~
平台监控容器:pmon(Platform Monitor)
The services inside this container are basically used to monitor the operational status of some basic hardware of the switch, such as temperature, power, fans, SFP events, etc. Again, we can use the ps command to view the services running in this container:
admin@sonic:~$ docker exec -it pmon bash
root@sonic:/# ps aux
USER         PID %CPU %MEM    VSZ   RSS TTY      STAT START   TIME COMMAND
...
root          28  0.0  0.8  49972 33192 pts/0    S    Apr26   0:23 python3 /usr/local/bin/ledd
root          29  0.9  1.0 278492 43816 pts/0    Sl   Apr26  34:41 python3 /usr/local/bin/xcvrd
root          30  0.4  1.0  57660 40412 pts/0    S    Apr26  18:41 python3 /usr/local/bin/psud
root          32  0.0  1.0  57172 40088 pts/0    S    Apr26   0:02 python3 /usr/local/bin/syseepromd
root          33  0.0  1.0  58648 41400 pts/0    S    Apr26   0:27 python3 /usr/local/bin/thermalctld
root          34  0.0  1.3  70044 53496 pts/0    S    Apr26   0:46 /usr/bin/python3 /usr/local/bin/pcied
root          42  0.0  0.0  55320  1136 ?        Ss   Apr26   0:15 /usr/sbin/sensord -f daemon
root          45  0.0  0.8  58648 32220 pts/0    S    Apr26   2:45 python3 /usr/local/bin/thermalctld
...
Most of these services we can guess what they do from the name, only xcvrd in the middle is not so obvious, here xcvr is the abbreviation of transceiver, it is used to monitor the optical modules of the switch, such as SFP, QSFP and so on.
参考资料
SAI
SAI(Switch Abstraction Interface,交换机抽象接口)是SONiC的基石,正因为有了它,SONiC才能支持多种硬件平台。我们在这个SAI API的文档中,可以看到它定义的所有接口。
在核心容器一节中我们提到,SAI运行在syncd容器中。不过和其他组件不同,它并不是一个服务,而是一组公共的头文件和动态链接库(.so)。其中,所有的抽象接口都以c语言头文件的方式定义在了OCP的SAI仓库中,而.so文件则由各个硬件厂商提供,用于实现SAI的接口。
SAI接口
To have a more intuitive understanding, let's take a small part of the code to show how the SAI interface is defined and initialized, as follows:
// File: meta/saimetadata.h
typedef struct _sai_apis_t {
    sai_switch_api_t* switch_api;
    sai_port_api_t* port_api;
    ...
} sai_apis_t;

// File: inc/saiswitch.h
typedef struct _sai_switch_api_t
{
    sai_create_switch_fn                   create_switch;
    sai_remove_switch_fn                   remove_switch;
    sai_set_switch_attribute_fn            set_switch_attribute;
    sai_get_switch_attribute_fn            get_switch_attribute;
    ...
} sai_switch_api_t;

// File: inc/saiport.h
typedef struct _sai_port_api_t
{
    sai_create_port_fn                     create_port;
    sai_remove_port_fn                     remove_port;
    sai_set_port_attribute_fn              set_port_attribute;
    sai_get_port_attribute_fn              get_port_attribute;
    ...
} sai_port_api_t;
where the sai_apis_t structure is a collection of interfaces for all SAI modules, where each member is a pointer to a list of interfaces for a particular module. Let's use sai_switch_api_t as an example, which defines all the interfaces of the SAI Switch module, which we can see defined in inc/saiswitch.h. Similarly, we can see the interface definitions for the SAI Port module in inc/saiport.h.
SAI初始化
The initialization of the SAI is actually figuring out how to get these function pointers above so that we can operate the ASIC through the SAI's interface.
There are two main functions involved in the initialization of the SAI, both of which are defined in inc/sai.h:
sai_api_initialize:初始化SAIsai_api_query:传入SAI的API的类型,获取对应的接口列表
While most vendors' SAI implementations are closed source, mellanox has open sourced its own SAI implementation, so here we can use it to understand more deeply how SAI works.
For example, the sai_api_initialize function actually simply sets sets two global variables and returns SAI_STATUS_SUCCESS:
// File: platform/mellanox/mlnx-sai/SAI-Implementation/mlnx_sai/src/mlnx_sai_interfacequery.c
sai_status_t sai_api_initialize(_In_ uint64_t flags, _In_ const sai_service_method_table_t* services)
{
    if (g_initialized) {
        return SAI_STATUS_FAILURE;
    }
    // Validate parameters here (code omitted)

    memcpy(&g_mlnx_services, services, sizeof(g_mlnx_services));
    g_initialized = true;
    return SAI_STATUS_SUCCESS;
}
After initialization, we can use the sai_api_query function to query the corresponding interface list by passing in the type of the API, and each interface list is actually a global variable: the
// File: platform/mellanox/mlnx-sai/SAI-Implementation/mlnx_sai/src/mlnx_sai_interfacequery.c
sai_status_t sai_api_query(_In_ sai_api_t sai_api_id, _Out_ void** api_method_table)
{
    if (!g_initialized) {
        return SAI_STATUS_UNINITIALIZED;
    }
    ...

    return sai_api_query_eth(sai_api_id, api_method_table);
}

// File: platform/mellanox/mlnx-sai/SAI-Implementation/mlnx_sai/src/mlnx_sai_interfacequery_eth.c
sai_status_t sai_api_query_eth(_In_ sai_api_t sai_api_id, _Out_ void** api_method_table)
{
    switch (sai_api_id) {
    case SAI_API_BRIDGE:
        *(const sai_bridge_api_t**)api_method_table = &mlnx_bridge_api;
        return SAI_STATUS_SUCCESS;
    case SAI_API_SWITCH:
        *(const sai_switch_api_t**)api_method_table = &mlnx_switch_api;
        return SAI_STATUS_SUCCESS;
    ...
    default:
        if (sai_api_id >= (sai_api_t)SAI_API_EXTENSIONS_RANGE_END) {
            return SAI_STATUS_INVALID_PARAMETER;
        } else {
            return SAI_STATUS_NOT_IMPLEMENTED;
        }
    }
}

// File: platform/mellanox/mlnx-sai/SAI-Implementation/mlnx_sai/src/mlnx_sai_bridge.c
const sai_bridge_api_t mlnx_bridge_api = {
    mlnx_create_bridge,
    mlnx_remove_bridge,
    mlnx_set_bridge_attribute,
    mlnx_get_bridge_attribute,
    ...
};


// File: platform/mellanox/mlnx-sai/SAI-Implementation/mlnx_sai/src/mlnx_sai_switch.c
const sai_switch_api_t mlnx_switch_api = {
    mlnx_create_switch,
    mlnx_remove_switch,
    mlnx_set_switch_attribute,
    mlnx_get_switch_attribute,
    ...
};
SAI的使用
In the syncd container, SONiC will start the syncd service at boot time, and the syncd service will load the SAI component currently on the system. This component is provided by individual vendors, who will implement the interface to the SAI shown above according to their own hardware platforms, thus allowing SONiC to control many different hardware platforms using a unified upper layer logic.
We can verify this simply by using the ps, ls and nm commands:
# Enter into syncd container
admin@sonic:~$ docker exec -it syncd bash

# List all processes. We will only see syncd process here.
root@sonic:/# ps aux
USER         PID %CPU %MEM    VSZ   RSS TTY      STAT START   TIME COMMAND
...
root          21  0.0  0.0  87708  1532 pts/0    Sl   16:20   0:00 /usr/bin/dsserve /usr/bin/syncd --diag -u -s -p /etc/sai.d/sai.profile -b /tmp/break_before_make_objects
root          33 11.1 15.0 2724396 602532 pts/0  Sl   16:20  36:30 /usr/bin/syncd --diag -u -s -p /etc/sai.d/sai.profile -b /tmp/break_before_make_objects
...

# Find all libsai*.so.* files.
root@sonic:/# find / -name libsai*.so.*
/usr/lib/x86_64-linux-gnu/libsaimeta.so.0
/usr/lib/x86_64-linux-gnu/libsaimeta.so.0.0.0
/usr/lib/x86_64-linux-gnu/libsaimetadata.so.0.0.0
/usr/lib/x86_64-linux-gnu/libsairedis.so.0.0.0
/usr/lib/x86_64-linux-gnu/libsairedis.so.0
/usr/lib/x86_64-linux-gnu/libsaimetadata.so.0
/usr/lib/libsai.so.1
/usr/lib/libsai.so.1.0

# Copy the file out of switch and check libsai.so on your own dev machine.
# We will see the most important SAI export functions here.
$ nm -C -D ./libsai.so.1.0 > ./sai-exports.txt
$ vim sai-exports.txt
...
0000000006581ae0 T sai_api_initialize
0000000006582700 T sai_api_query
0000000006581da0 T sai_api_uninitialize
...
参考资料
- SONiC Architecture
- SAI API
- Forwarding Metamorphosis: Fast Programmable Match-Action Processing in Hardware for SDN
- Github: sonic-net/sonic-sairedis
- Github: opencomputeproject/SAI
- Arista 7050QX Series 10/40G Data Center Switches Data Sheet
- Github repo: Nvidia (Mellanox) SAI implementation
Dev Guide
Code repo
SONiC的代码都托管在GitHub的sonic-net账号上,仓库数量有30几个之多,所以刚开始看SONiC的代码时,肯定是会有点懵的,不过不用担心,我们这里就来一起看看~
核心仓库
First are the two most important core repositories in SONiC: SONiC and sonic-buildimage.
Landing仓库:SONiC
https://github.com/sonic-net/SONiC
This repository stores SONiC's Landing Page and a lot of documentation, wiki, tutorials, Slides from previous Talks, etc. etc. This repository can be said to be the most common repository for every newcomer to get started, but note that there is no code in this repository, only documentation.
镜像构建仓库:sonic-buildimage
https://github.com/sonic-net/sonic-buildimage
Why is this build repository important to us? Unlike other projects, SONiC's build repository is actually its main repository! This repository contains:
- 所有的功能实现仓库,它们都以submodule的形式被加入到了这个仓库中(
src目录) - 所有设备厂商的支持文件(
device目录),比如每个型号的交换机的配置文件,用来访问硬件的支持脚本,等等等等,比如:我的交换机是Arista 7050 QX-32S,那么我就可以在device/arista/x86_64-arista_7050_qx32s目录中找到它的支持文件。 - 所有ASIC芯片厂商提供的支持文件(
platform目录),比如每个平台的驱动程序,BSP,底层支持的脚本等等。这里我们可以看到几乎所有的主流芯片厂商的支持文件,比如:Broadcom,Mellanox,等等,也有用来做模拟软交换机的实现,比如vs和p4。 - SONiC用来构建所有容器镜像的Dockerfile(
dockers目录) - 各种各样通用的配置文件和脚本(
files目录) - 用来做构建的编译容器的dockerfile(
sonic-slave-*目录) - 等等……
Because this repository has all the relevant resources put together, we basically only need to download this one source code repository when learning SONiC's code, no matter it is very convenient to search or jump!
功能实现仓库
In addition to the core repository, there are also many feature implementation repositories under SONiC, which are implementations of various containers and subservices. These repositories are placed under the src directory of sonic-buildimage in the form of submodule, which we also need to know if we want to make changes and contributions to SONiC.
SWSS(Switch State Service)相关仓库
As we introduced in the previous article, the SWSS container is the brain of SONiC. Under SONiC, it consists of two repo's: sonic-swss-common and sonic-swss.
SWSS公共库:sonic-swss-common
First is the public library: sonic-swss-common (https://github.com/sonic-net/sonic-swss-common).
This repository contains all the public functions required by the *mgrd and *syncd services, such as the encapsulation of logger, json, netlink, Redis operations and various Redis-based inter-service communication mechanisms. Although it can be seen that this repository was initially targeted specifically for use by the swss service, it is also referenced by many other repositories, such as swss-sairedis and swss-restapi, because of its many features.
SWSS主仓库:sonic-swss
Then there is the main SWSS repository, sonic-swss: https://github.com/sonic-net/sonic-swss.
We can find in this repository:
- 绝大部分的
*mgrd和*syncd服务:orchagent,portsyncd/portmgrd/intfmgrd,neighsyncd/nbrmgrd,natsyncd/natmgrd,buffermgrd,coppmgrd,macsecmgrd,sflowmgrd,tunnelmgrd,vlanmgrd,vrfmgrd,vxlanmgrd,等等。 swssconfig:在swssconfig目录下,用于在快速重启时(fast reboot)恢复FDB和ARP表。swssplayer:也在swssconfig目录下,用来记录所有通过SWSS进行的配置下发操作,这样我们就可以利用它来做replay,从而对问题进行重现和调试。- 甚至一些不在SWSS容器中的服务,比如
fpmsyncd(bgp容器)和teamsyncd/teammgrd(teamd容器)。
SAI/平台相关仓库
Next up is SAI as a switch abstraction interface, [although SAI was proposed by Microsoft and released in March 2015 as version 0.1](https://www.opencompute.org/documents/switch-abstraction-interface-ocp- specification-v0-2-pdf), [it was accepted by OCP and made a public standard in September 2015, before SONiC even released the first version](https://azure.microsoft.com/en-us/blog/switch- abstraction-interface-sai-officially-accepted-by-the-open-compute-project-ocp/), which is one of the reasons why SONiC has been able to get support from so many vendors in such a short time. And because of this, SAI's code repository has been divided into two parts:
- OCP下的OpenComputeProject/SAI:https://github.com/opencomputeproject/SAI。里面包含了有关SAI标准的所有代码,包括SAI的头文件,behavior model,测试用例,文档等等。
- SONiC下的sonic-sairedis:https://github.com/sonic-net/sonic-sairedis。里面包含了SONiC中用来和SAI交互的所有代码,比如syncd服务,和各种调试统计,比如用来做replay的
saiplayer和用来导出asic状态的saidump。
In addition to these two repositories, there is also a platform-related repository, for example: sonic-platform-vpp, which serves to implement data plane functions using vpp through SAI's interface, equivalent to a High-performance soft switch. I personally feel that it may be merged into the buildimage repository in the future, as part of the platform directory.
管理服务(mgmt)相关仓库
然后是SONiC中所有和管理服务相关的仓库:
| 名称 | 说明 |
|---|---|
| sonic-mgmt-common | 管理服务的基础库,里面包含着translib,yang model相关的代码 |
| sonic-mgmt-framework | 使用Go来实现的REST Server,是下方架构图中的REST Gateway(进程名:rest_server) |
| sonic-gnmi | 和sonic-mgmt-framework类似,是下方架构图中,基于gRPC的gNMI(gRPC Network Management Interface)Server |
| sonic-restapi | 这是SONiC使用go来实现的另一个配置管理的REST Server,和mgmt-framework不同,这个server在收到消息后会直接对CONFIG_DB进行操作,而不是走translib(下图中没有,进程名:go-server-server) |
| sonic-mgmt | 各种自动化脚本(ansible目录),测试(tests目录),用来搭建test bed和测试上报(test_reporting目录)之类的, |
这里还是附上SONiC管理服务的架构图,方便大家配合食用 [4]:
平台监控相关仓库:sonic-platform-common和sonic-platform-daemons
The following two warehouses are related to platform monitoring and control, such as LEDs, fans, power supplies, temperature control, etc.:
| 名称 | 说明 |
|---|---|
| sonic-platform-common | 这是给厂商们提供的基础包,用来定义访问风扇,LED,电源管理,温控等等模块的接口定义,这些接口都是用python来实现的 |
| sonic-platform-daemons | 这里包含了SONiC中pmon容器中运行的各种监控服务:chassisd,ledd,pcied,psud,syseepromd,thermalctld,xcvrd,ycabled,它们都使用python实现,通过和中心数据库Redis进行连接,和加载并调用各个厂商提供的接口实现来对各个模块进行监控和控制 |
其他功能实现仓库
In addition to these repositories above, SONiC has a number of repositories that implement various aspects of its functionality, some of which are one or more processes, and some of which are libraries that serve the following purposes:
| 仓库 | 介绍 |
|---|---|
| sonic-snmpagent | AgentX SNMP subagent的实现(sonic_ax_impl),用于连接Redis数据库,给snmpd提供所需要的各种信息,可以把它理解成snmpd的控制面,而snmpd是数据面,用于响应外部SNMP的请求 |
| sonic-frr | FRRouting,各种路由协议的实现,所以这个仓库中我们可以找到如bgpd,zebra这类的路由相关的进程实现 |
| sonic-linkmgrd | Dual ToR support,检查Link的状态,并且控制ToR的连接 |
| sonic-dhcp-relay | DHCP relay agent |
| sonic-dhcpmon | 监控DHCP的状态,并报告给中心数据库Redis |
| sonic-dbsyncd | lldp_syncd服务,但是repo的名字没取好,叫做dbsyncd |
| sonic-pins | Google开发的基于P4的网络栈支持(P4 Integrated Network Stack,PINS),更多信息可以参看PINS的官网。 |
| sonic-stp | STP(Spanning Tree Protocol)的支持 |
| sonic-ztp | Zero Touch Provisioning |
| DASH | Disaggregated API for SONiC Hosts |
| sonic-host-services | 运行在host上通过dbus用来为容器中的服务提供支持的服务,比如保存和重新加载配置,保存dump之类的非常有限的功能,类似一个host broker |
| sonic-fips | FIPS(Federal Information Processing Standards)的支持,里面有很多为了支持FIPS标准而加入的各种补丁文件 |
| sonic-wpa-supplicant | 各种无线网络协议的支持 |
工具仓库:sonic-utilities
https://github.com/sonic-net/sonic-utilities
This repository holds all of SONiC's tools under the command line:
config,show,clear目录:这是三个SONiC CLI的主命令的实现。需要注意的是,具体的命令实现并不一定在这几个目录里面,大量的命令是通过调用其他命令来实现的,这几个命令只是提供了一个入口。scripts,sfputil,psuutil,pcieutil,fwutil,ssdutil,acl_loader目录:这些目录下提供了大量的工具命令,但是它们大多并不是直接给用户使用的,而是被config,show和clear目录下的命令调用的,比如:show platform fan命令,就是通过调用scripts目录下的fanshow命令来实现的。utilities_common,flow_counter_util,syslog_util目录:这些目录和上面类似,但是提供的是基础类,可以直接在python中import调用。- 另外还有很多其他的命令:
fdbutil,pddf_fanutil,pddf_ledutil,pddf_psuutil,pddf_thermalutil,等等,用于查看和控制各个模块的状态。 connect和consutil目录:这两个目录下的命令是用来连接到其他SONiC设备并对其进行管理的。crm目录:用来配置和查看SONiC中的CRM(Critical Resource Monitoring)。这个命令并没有被包含在config和show命令中,所以用户可以直接使用。pfc目录:用来配置和查看SONiC中的[PFC(Priority-based Flow Control)][SONiCPFC]。pfcwd目录:用来配置和查看SONiC中的[PFC Watch Dog][SONiCPFCWD],比如启动,停止,修改polling interval之类的操作。
内核补丁:sonic-linux-kernel
https://github.com/sonic-net/sonic-linux-kernel
Although SONiC is based on debian, the default debian kernel is not always able to run SONiC, for example, a module is not started by default, or some old version of the driver has problems, so SONiC needs a more or less modified Linux kernel. And this repository is used to store all the kernel patches.
参考资料
- SONiC Architecture
- SONiC Source Repositories
- SONiC Management Framework
- SAI API
- SONiC Critical Resource Monitoring
- SONiC Zero Touch Provisioning
- SONiC Critical Resource Monitoring
- SONiC P4 Integrated Network Stack
- SONiC Disaggregated API for Switch Hosts
- SAI spec for OCP
Compile
编译环境
Since SONiC is based on debian, in order to ensure that we can successfully compile SONiC no matter what platform we are on, and that the compiled program can run on the corresponding platform, SONiC uses a containerized compilation environment -- it installs all the tools and dependencies in the corresponding This allows us to easily compile SONiC on any platform without worrying about dependency mismatches, such as packages that are higher in debian than in ubuntu, which may lead to some problems when the final program runs on This may lead to some unexpected errors when the final program is run on debian.
初始化编译环境
安装Docker
In order to support a containerized build environment, as a first step, we need to make sure that docker is installed on our machine.
Docker的安装方法可以参考官方文档,这里我们以Ubuntu为例,简单介绍一下安装方法。
First, we need to add the docker sources and certificates to the apt source list: the
sudo apt-get update
sudo apt-get install ca-certificates curl gnupg

sudo install -m 0755 -d /etc/apt/keyrings
curl -fsSL https://download.docker.com/linux/ubuntu/gpg | sudo gpg --dearmor -o /etc/apt/keyrings/docker.gpg
sudo chmod a+r /etc/apt/keyrings/docker.gpg

echo \
  "deb [arch="$(dpkg --print-architecture)" signed-by=/etc/apt/keyrings/docker.gpg] https://download.docker.com/linux/ubuntu \
  "$(. /etc/os-release && echo "$VERSION_CODENAME")" stable" | \
  sudo tee /etc/apt/sources.list.d/docker.list > /dev/null
Then, we can quickly install it via apt:
sudo apt-get update
sudo apt-get install docker-ce docker-ce-cli containerd.io docker-buildx-plugin docker-compose-plugin
After installing docker's program, we also need to add our current account to docker's user group, then quit and log back in as the current user so we can run docker commands without sudo! This is very important because subsequent builds of SONiC do not allow sudo.
sudo gpasswd -a ${USER} docker
Once the installation is complete, don't forget to verify that it was successful by using the following command (note that sudo is not required here!):
docker run hello-world
安装其他依赖
sudo apt install -y python3-pip
pip3 install --user j2cli
拉取代码
在3.1 代码仓库一章中,我们提到了SONiC的主仓库是sonic-buildimage。它也是我们目前为止唯一需要安装关注的repo。
Since this repository includes all other build-related repositories in the form of submodules, we need to be careful to add the -recuse-submodules option when pulling code via the git command:
git clone --recurse-submodules https://github.com/sonic-net/sonic-buildimage.git
If you forget to pull the submodule when pulling the code, you can fill it in with the following command:
git submodule update --init --recursive
Once the code has been downloaded, or for existing repo's, we can initialize the compilation environment with the following command. This command updates all current submodules to the required version to help us compile successfully:
sudo modprobe overlay
make init
了解并设置你的目标平台
SONiC虽然支持非常多种不同的交换机,但是由于不同型号的交换机使用的ASIC不同,所使用的驱动和SDK也会不同。SONiC通过SAI来封装这些变化,为上层提供统一的配置接口,但是在编译的时候,我们需要正确的设置好,这样才能保证我们编译出来的SONiC可以在我们的目标平台上运行。
Nowadays, SONiC mainly supports the following platforms:
- barefoot
- broadcom
- marvell
- mellanox
- cavium
- centec
- nephos
- innovium
- vs
After confirming the platform, we can run the following command to configure our compilation environment:
make PLATFORM=<platform> configure
# e.g.: make PLATFORM=mellanox configure
所有的make命令(除了make init)一开始都会检查并创建所有debian版本的docker builder:bullseye,stretch,jessie,buster。每个builder都需要几十分钟的时间才能创建完成,这对于我们平时开发而言实在完全没有必要,一般来说,我们只需要创建最新的版本即可(当前为bullseye,bookwarm暂时还没有支持),具体命令如下:
NOJESSIE=1 NOSTRETCH=1 NOBUSTER=1 make PLATFORM=<platform> configure
当然,为了以后开发更加方便,避免重复输入,我们可以将这个命令写入到~/.bashrc中,这样每次打开终端的时候,就会设置好这些环境变量了。
export NOJESSIE=1
export NOSTRETCH=1
export NOBUSTER=1
编译代码
编译全部代码
After setting up the platform, we can start compiling the code::
# The number of jobs can be the number of cores on your machine.
# Say, if you have 16 cores, then feel free to set it to 16 to speed up the build.
make SONIC_BUILD_JOBS=4 all
当然,对于开发而言,我们可以把SONIC_BUILD_JOBS和上面其他变量一起也加入~/.bashrc中,减少我们的输入。
export SONIC_BUILD_JOBS=<number of cores>
编译子项目代码
As we can see from SONiC's Build Pipeline, compiling the entire project is very time consuming, and most of the time, our code changes will only affect a small part of the code, so is there any way to reduce our compilation effort? The answer is yes, we can specify make target to compile only the subprojects we need.
The files generated by each subproject in SONiC can be found in the target directory, e.g:
- Docker containers: target/
.gz,比如: target/docker-orchagent.gz - Deb packages: target/debs/
/ .deb,比如: target/debs/bullseye/libswsscommon_1.0.0_amd64.deb - Python wheels: target/python-wheels/
/ .whl,比如: target/python-wheels/bullseye/sonic_utilities-1.2-py3-none-any.whl
Once we have found the subproject we need, we can delete its generated files and then re-invoke the make command, here we use libswsscommon as an example, as follows:
# Remove the deb package for bullseye
rm target/debs/bullseye/libswsscommon_1.0.0_amd64.deb

# Build the deb package for bullseye
NOJESSIE=1 NOSTRETCH=1 NOBUSTER=1 make target/debs/bullseye/libswsscommon_1.0.0_amd64.deb
检查和处理编译错误
If by chance an error occurs while compiling, we can check the exact cause by examining the log file of the failed project. In SONiC, each subcompiled project generates its associated log file, which we can easily find in the target directory, as follows:
$ ls -l
...
-rw-r--r--  1 r12f r12f 103M Jun  8 22:35 docker-database.gz
-rw-r--r--  1 r12f r12f  26K Jun  8 22:35 docker-database.gz.log      // Log file for docker-database.gz
-rw-r--r--  1 r12f r12f 106M Jun  8 22:44 docker-dhcp-relay.gz
-rw-r--r--  1 r12f r12f 106K Jun  8 22:44 docker-dhcp-relay.gz.log    // Log file for docker-dhcp-relay.gz
If we don't want to go to the root of the code and recompile it every time we update it and then check the log files, SONiC also provides a more convenient way to stop the build in the docker builder after it's done, so we can go directly to the corresponding directory and run the make command to recompile it:
# KEEP_SLAVE_ON=yes make <target>
KEEP_SLAVE_ON=yes make target/debs/bullseye/libswsscommon_1.0.0_amd64.deb
KEEP_SLAVE_ON=yes make all
有些仓库中的部分代码在全量编译的时候是不会编译的,比如,sonic-swss-common中的gtest,所以使用这种方法重编译的时候,请一定注意查看原仓库的编译指南,以避免出错,如:https://github.com/sonic-net/sonic-swss-common#build-from-source。
获取正确的镜像文件
Once compiled, we can find the image file we need in the target directory, but here's a question: which image do we use to install SONiC on our switch? Here it depends on what BootLoader or installer the switch is using, and the mapping is as follows:
| Bootloader | 后缀 |
|---|---|
| Aboot | .swi |
| ONIE | .bin |
| Grub | .img.gz |
部分升级
Obviously, when developing, it is quite inefficient to compile and install the image each time and then do a full install, so we can choose not to install the image and use the direct upgrade deb package to do a partial upgrade, thus improving our development efficiency.
We can upload the deb package to the /etc/sonic directory of the switch, the files in this directory will be mapped to the /etc/sonic directory of all containers, then we can enter the container and use the dpkg command to install the deb package as follows:
# Enter the docker container
docker exec -it <container> bash

# Install deb package
dpkg -i <deb-package>
参考资料
- SONiC Build Guide
- Install Docker Engine
- Github repo: sonic-buildimage
- SONiC Supported Devices and Platforms
- Wrapper for starting make inside sonic-slave container
测试
调试
SAI调试
Communication
There are three main communication mechanisms in SONiC: communication with the kernel, Redis-based and ZMQ-based inter-service communication.
- 与内核通信主要有两种方法:命令行调用和Netlink消息。
- 基于Redis的服务间通信主要有四种方法:SubscriberStateTable,NotificationProducer/Consumer,Producer/ConsumerTable,Producer/ConsumerStateTable。虽然它们都是基于Redis的,但是它们解决的问题和方法却非常不同。
- 基于ZMQ的服务间通信:现在只在
orchagent和syncd的通信中使用了这种通信机制。
虽然大部分的通信机制都支持多消费者的PubSub的模式,但是请特别注意:在SONiC中,所有的通信都是点对点的,即一个生产者对应一个消费者,绝对不会出现一个生产者对应多个消费者的情况!
一旦多消费者出现,那么一个消息的处理逻辑将可能发生在多个进程中,这将导致很大的问题,因为对于任何一种特定的消息,SONiC中只有一个地方来处理,所以这会导致部分消息不可避免的出错或者丢失。
所有这些基础的通信机制的实现都在sonic-swss-common这个repo中的common目录下。另外在其之上,为了方便各个服务使用,SONiC还在sonic-swss中封装了一层Orch,将常用的表放在其中。
In this chapter, let's focus on the implementation of these communication mechanisms!
参考资料
Command line call
The easiest way to communicate with the kernel in SONiC is to make a command line call, which is placed under the common/exec.h file and is very simple to implement The interface is as follows:
// File: common/exec.h
// Namespace: swss
int exec(const std::string &cmd, std::string &stdout);
Where cmd is the command to be executed and stdout is the output of the command execution. The exec function here is a synchronous call, and the caller blocks until the command is executed. Internally, it creates a child process by calling the popen function and gets the output by using the fgets function. However, although this function returns output, basically no one uses it, but only by the return value to determine whether it succeeded or not, and even the output is not written in the error log.
This function is crude but widely used, especially in the various *mgrd services, such as portmgrd where it is used to set the status of each port, etc.
// File: sonic-swss - cfgmgr/portmgr.cpp
bool PortMgr::setPortAdminStatus(const string &alias, const bool up)
{
    stringstream cmd;
    string res, cmd_str;

    // ip link set dev <port_name> [up|down]
    cmd << IP_CMD << " link set dev " << shellquote(alias) << (up ? " up" : " down");
    cmd_str = cmd.str();
    int ret = swss::exec(cmd_str, res);

    // ...
为什么说命令行调用是一种通信机制呢?
原因是当*mgrd服务调用exec函数对系统进行的修改,会触发下面马上会提到的netlink事件,从而通知其他服务进行相应的修改,比如*syncd,这样就间接的构成了一种通信。所以这里我们把命令行调用看作一种通信机制能帮助我们以后更好的理解SONiC的各种工作流。
参考资料
Netlink
Netlink is a message-based communication mechanism used in the Linux kernel between the kernel and user-space processes. It is implemented through a socket interface and a custom protocol family, and can be used to deliver various types of kernel messages, including network device status, routing table updates, firewall rule changes, system resource usage, and so on. SONiC's *sync service makes extensive use of Netlink's mechanism to listen for changes to network devices in the system, synchronize the latest state to Redis, and notify other services of the corresponding changes.
Netlink的实现主要在这几个文件中:common/netmsg.*、common/netlink.* 和 common/netdispatcher.*,具体类图如下:
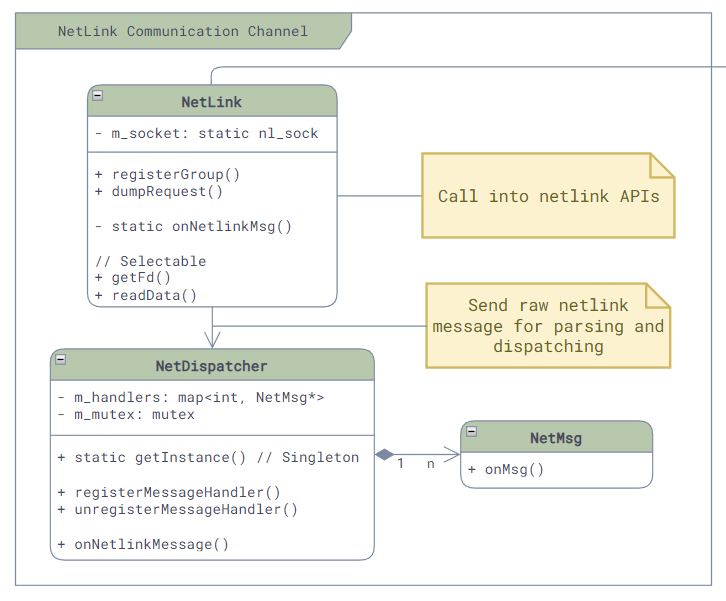
Among them:
- Netlink:封装了Netlink的套接字接口,提供了Netlink消息的接口和接收消息的回调。
- NetDispatcher:它是一个单例,提供了Handler注册的接口。当Netlink类接收到原始的消息后,就会调用NetDispatcher将其解析成nl_onject,并根据消息的类型调用相应的Handler。
- NetMsg:Netlink消息Handler的基类,仅提供了onMsg的接口,其中没有实现。
As an example, when portsyncd starts, it will create a Netlink object to listen for Link-related state changes and will implement the NetMsg interface to handle Link-related messages. The concrete implementation is as follows:
// File: sonic-swss - portsyncd/portsyncd.cpp
int main(int argc, char **argv)
{
    // ...

    // Create Netlink object to listen to link messages
    NetLink netlink;
    netlink.registerGroup(RTNLGRP_LINK);

    // Here SONiC request a fulldump of current state, so that it can get the current state of all links
    netlink.dumpRequest(RTM_GETLINK);
    cout << "Listen to link messages..." << endl;
    // ...

    // Register handler for link messages
    LinkSync sync(&appl_db, &state_db);
    NetDispatcher::getInstance().registerMessageHandler(RTM_NEWLINK, &sync);
    NetDispatcher::getInstance().registerMessageHandler(RTM_DELLINK, &sync);

    // ...
}
The above LinkSync, which is an implementation of NetMsg, implements the onMsg interface to handle Link-related messages::
// File: sonic-swss - portsyncd/linksync.h
class LinkSync : public NetMsg
{
public:
    LinkSync(DBConnector *appl_db, DBConnector *state_db);

    // NetMsg interface
    virtual void onMsg(int nlmsg_type, struct nl_object *obj);

    // ...
};

// File: sonic-swss - portsyncd/linksync.cpp
void LinkSync::onMsg(int nlmsg_type, struct nl_object *obj)
{
    // ...

    // Write link state to Redis DB
    FieldValueTuple fv("oper_status", oper ? "up" : "down");
    vector<FieldValueTuple> fvs;
    fvs.push_back(fv);
    m_stateMgmtPortTable.set(key, fvs);
    // ...
}
参考资料
Redis Ops
Redis数据库操作层
The first and lowest layer is the database operations layer of Redis, which encapsulates various basic commands, such as DB connection, command execution, callback interface for event notification, etc. The specific class diagram is as follows:
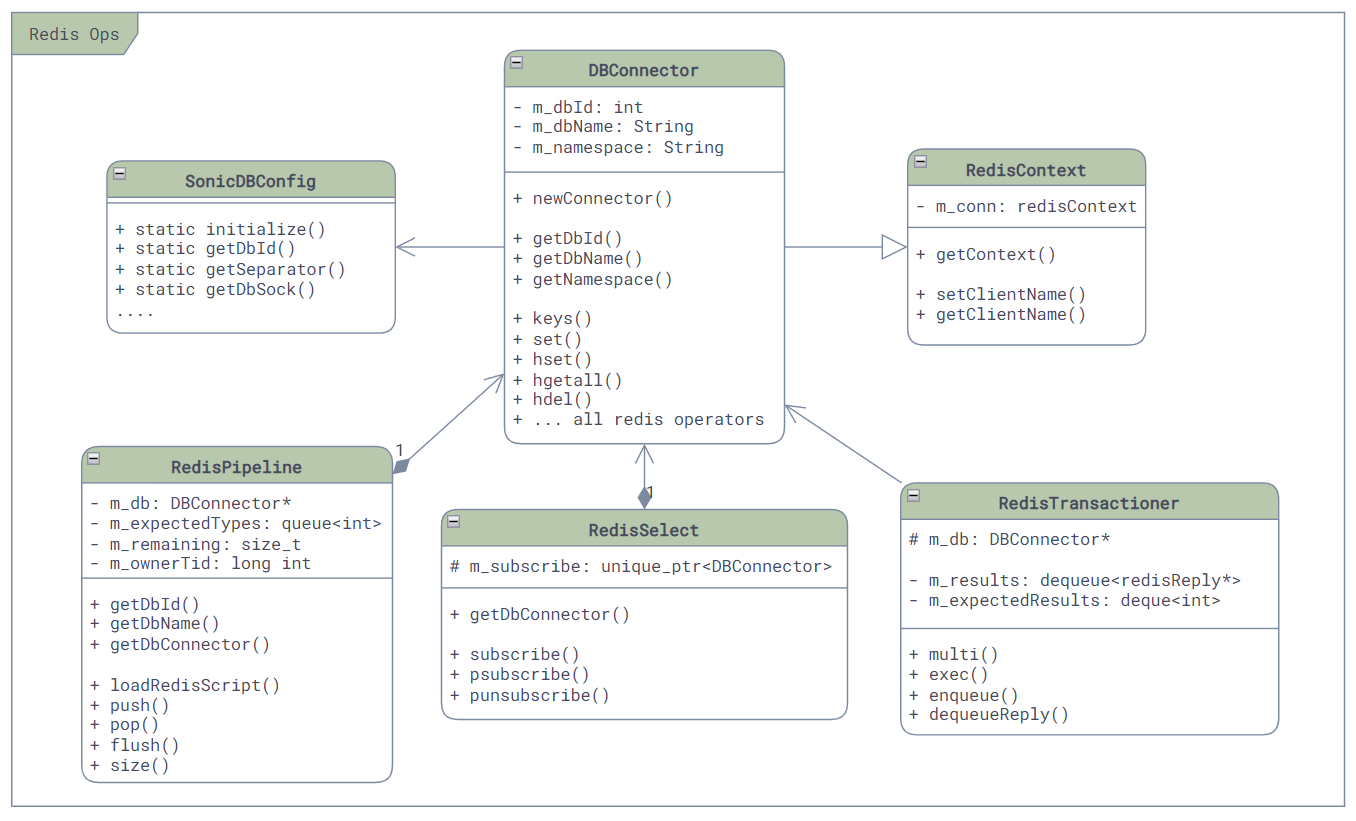
Among them:
- RedisContext:封装并保持着与Redis的连接,当其销毁时会将其连接关闭。
- DBConnector:封装了所有的底层使用到的Redis的命令,比如
SET、GET、DEL等等。 - RedisTransactioner:封装了Redis的事务操作,用于在一个事务中执行多个命令,比如
MULTI、EXEC等等。 - RedisPipeline:封装了hiredis的redisAppendFormattedCommand API,提供了一个类似队列的异步的执行Redis命令的接口(虽然大部分使用方法依然是同步的)。它也是少有的对
SCRIPT LOAD命令进行了封装的类,用于在Redis中加载Lua脚本实现存储过程。SONiC中绝大部分需要执行Lua脚本的类,都会使用这个类来进行加载和调用。 - RedisSelect:它实现了Selectable的接口,用来支持基于epoll的事件通知机制(Event Polling)。主要是在我们收到了Redis的回复,用来触发epoll进行回调(我们最后会更详细的介绍)。
- SonicDBConfig:这个类是一个“静态类”,它主要实现了SONiC DB的配置文件的读取和解析。其他的数据库操作类,如果需要任何的配置信息,都会通过这个类来获取。
表(Table)抽象层
On top of the Redis database operation layer is the abstraction of the Table that SONiC itself builds using the Redis intermediate Key, because the format of each Redis Key is <table-name><separator><key-name>, so SONiC needs to perform a conversion (for those who don't remember, you can move to my previous blog for more information).
The main class diagram of the related classes is as follows:
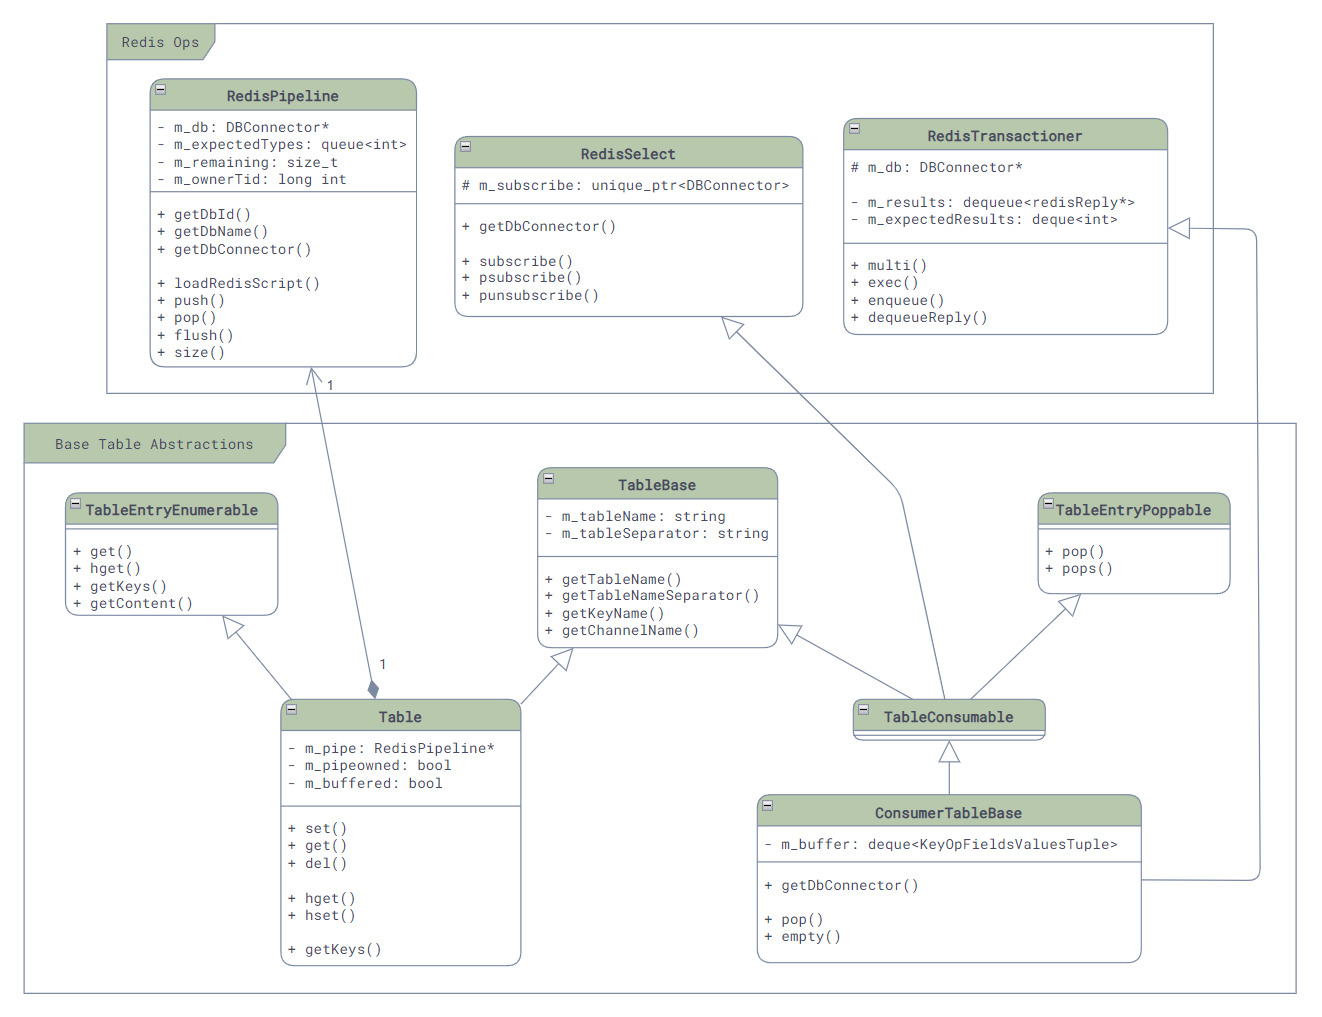
Three of the key classes are:
- TableBase:这个类是所有表的基类,它主要封装了表的基本信息,如表的名字,Redis Key的打包,每个表发生修改时用于通信的Channel的名字,等等。
- Table:这个类就是对于每个表增删改查的封装了,里面包含了表的名称和分隔符,这样就可以在调用时构造最终的key了。
- ConsumerTableBase:这个类是各种SubscriptionTable的基类,里面主要是封装了一个简单的队列和其pop操作(对,只有pop,没有push),用来给上层调用。
参考资料
Communication layer
On top of the Redis encapsulation and table abstraction is the SONiC communication layer, which provides four different PubSub encapsulations for inter-service communication, depending on the requirements.
SubscribeStateTable
最直接的就是SubscriberStateTable了。
它的原理是利用Redis数据库中自带的keyspace消息通知机制 [4] —— 当数据库中的任何一个key对应的值发生了变化,就会触发Redis发送两个keyspace的事件通知,一个是__keyspace@<db-id>__:<key>下的<op>事件,一个是__keyspace@<db-id>__:<op>下的<key>>事件,比如,在数据库0中删除了一个key,那么就会触发两个事件通知:
PUBLISH __keyspace@0__:foo del
PUBLISH __keyevent@0__:del foo
The SubscriberStateTable listens for the first event notification and then calls the corresponding callback function. The class diagram of the main class directly related to it is as follows, where you can see that it inherits from ConsumerTableBase, since it is the Consumer of Redis messages:
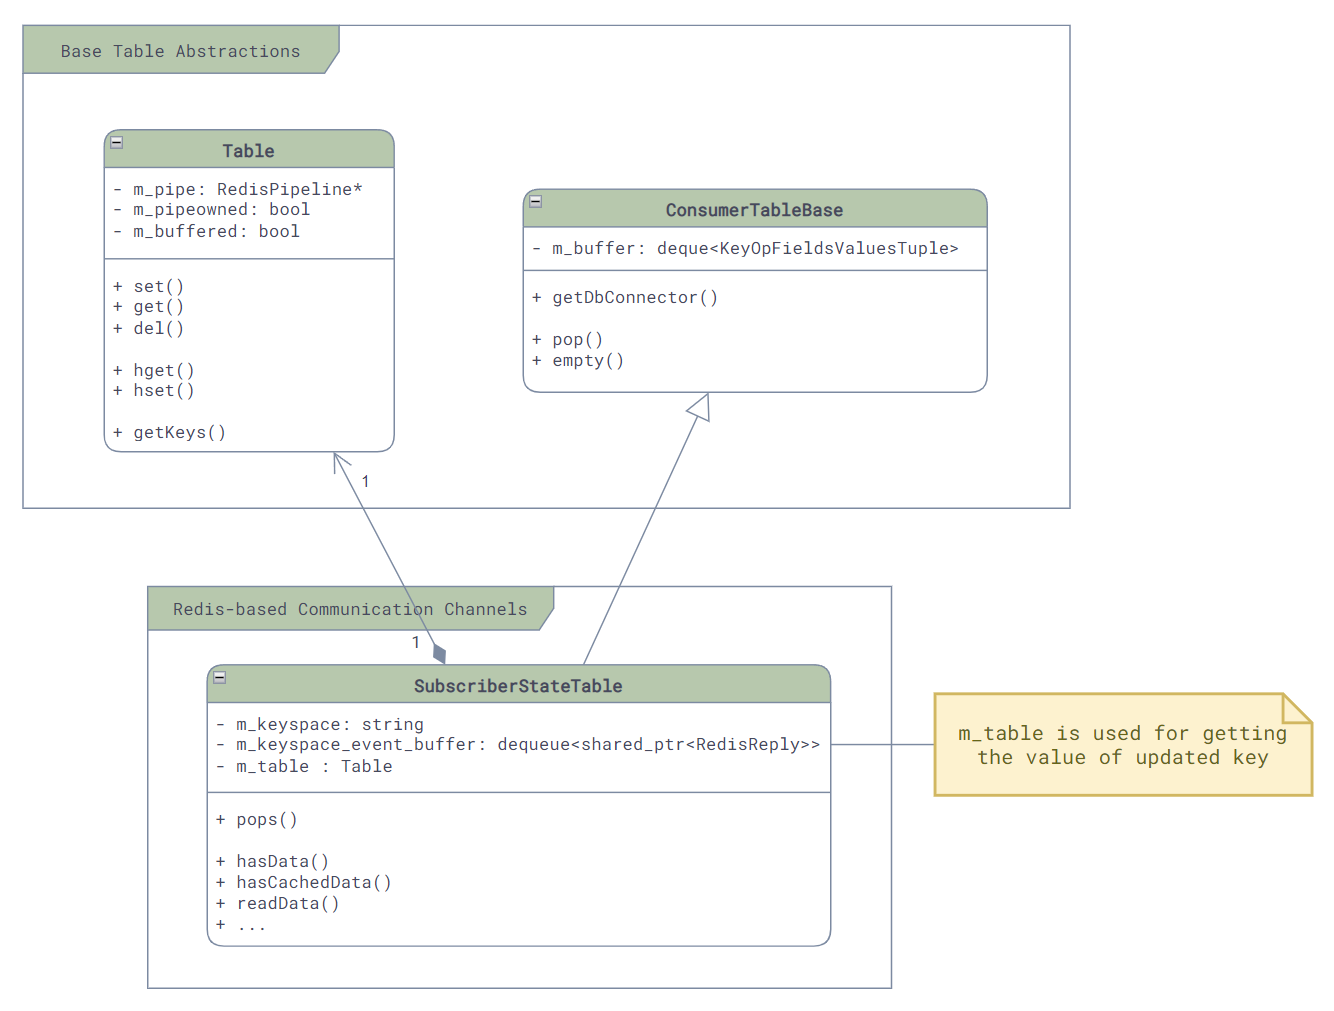
At initialization time, we can see how it subscribes to Redis event notifications: the
// File: sonic-swss-common - common/subscriberstatetable.cpp
SubscriberStateTable::SubscriberStateTable(DBConnector *db, const string &tableName, int popBatchSize, int pri)
    : ConsumerTableBase(db, tableName, popBatchSize, pri), m_table(db, tableName)
{
    m_keyspace = "__keyspace@";
    m_keyspace += to_string(db->getDbId()) + "__:" + tableName + m_table.getTableNameSeparator() + "*";
    psubscribe(m_db, m_keyspace);
    // ...
Its event reception and distribution are mainly handled by two functions:
readData()负责将redis中待读取的事件读取出来,并放入ConsumerTableBase中的队列中pops():负责将队列中的原始事件取出来,并且进行解析,然后通过函数参数传递给调用方
// File: sonic-swss-common - common/subscriberstatetable.cpp
uint64_t SubscriberStateTable::readData()
{
    // ...
    reply = nullptr;
    int status;
    do {
        status = redisGetReplyFromReader(m_subscribe->getContext(), reinterpret_cast<void**>(&reply));
        if(reply != nullptr && status == REDIS_OK) {
            m_keyspace_event_buffer.emplace_back(make_shared<RedisReply>(reply));
        }
    } while(reply != nullptr && status == REDIS_OK);
    // ...
    return 0;
}

void SubscriberStateTable::pops(deque<KeyOpFieldsValuesTuple> &vkco, const string& /*prefix*/)
{
    vkco.clear();
    // ...

    // Pop from m_keyspace_event_buffer, which is filled by readData()
    while (auto event = popEventBuffer()) {
        KeyOpFieldsValuesTuple kco;
        // Parsing here ...
        vkco.push_back(kco);
    }

    m_keyspace_event_buffer.clear();
}
NotificationProducer / NotificationConsumer
When it comes to message communication, it's easy to associate it with message queues, which is our second form of communication -- [NotificationProducer](https://github.com/sonic-net/sonic-swss-common /blob/master/common/notificationproducer.h) and [NotificationConsumer](https://github.com/sonic-net/sonic-swss-common/blob/master/ common/notificationconsumer.h).
This communication method is implemented through Redis' own PubSub, which is mainly a wrapper around the PUBLISH and SUBSCRIBE commands, and is very limited in the simplest notification scenarios, such as timeout check, restart check, etc. in orchagent, not for passing user configuration and data. Scenarios:
In this communication mode, the Producer, the sender of the message, does two main things: first, it packages the message into JSON format, and second, it calls Redis' PUBLISH command to send the message out. And since the PUBLISH command can only carry one message, the op and data fields in the request are placed at the top of the values, and then the buildJson function is called to package it into a JSON array format:
int64_t swss::NotificationProducer::send(const std::string &op, const std::string &data, std::vector<FieldValueTuple> &values)
{
    // Pack the op and data into values array, then pack everything into a JSON string as the message
    FieldValueTuple opdata(op, data);
    values.insert(values.begin(), opdata);
    std::string msg = JSon::buildJson(values);
    values.erase(values.begin());

    // Publish message to Redis channel
    RedisCommand command;
    command.format("PUBLISH %s %s", m_channel.c_str(), msg.c_str());
    // ...
    RedisReply reply = m_pipe->push(command);
    reply.checkReplyType(REDIS_REPLY_INTEGER);
    return reply.getReply<long long int>();
}
The receiver receives all notifications using the SUBSCRIBE command:
void swss::NotificationConsumer::subscribe()
{
    // ...
    m_subscribe = new DBConnector(m_db->getDbId(),
                                    m_db->getContext()->unix_sock.path,
                                    NOTIFICATION_SUBSCRIBE_TIMEOUT);
    // ...

    // Subscribe to Redis channel
    std::string s = "SUBSCRIBE " + m_channel;
    RedisReply r(m_subscribe, s, REDIS_REPLY_ARRAY);
}
ProducerTable / ConsumerTable
我们可以看到NotificationProducer/Consumer实现简单粗暴,但是由于API的限制 [8],它并不适合用来传递数据,所以,SONiC中提供了一种和它非常接近的另外一种基于消息队列的通信机制 —— ProducerTable和ConsumerTable。
The difference between this communication method and Notification is that the message published to the Channel is very simple (single character "G") and all the data is stored in the List, thus solving the problem of message size limitation in Notification. In SONiC, it is mainly used in the FlexCounter, syncd service and ASIC_DB:
-
消息格式:每条消息都是一个(Key, FieldValuePairs, Op)的三元组,如果用JSON来表达这个消息,那么它的格式如下:(这里的Key是Table中数据的Key,被操作的数据是Hash,所以Field就是Hash中的Field,Value就是Hash中的Value了,也就是说一个消息可以对很多个Field进行操作)
[ "Key", "[\"Field1\", \"Value1\", \"Field2", \"Value2\", ...]", "Op" ] -
Enqueue:ProducerTable通过Lua脚本将消息三元组原子的写入消息队列中(Key =
<table-name>_KEY_VALUE_OP_QUEUE,并且发布更新通知到特定的Channel(Key =<table-name>_CHANNEL)中。 -
Pop:ConsumerTable也通过Lua脚本从消息队列中原子的读取消息三元组,并在读取过程中将其中请求的改动真正的写入到数据库中。
注意:Redis中Lua脚本和MULTI/EXEC的原子性和通常说的数据库ACID中的原子性(Atomicity)不同,Redis中的原子性其实更接近于ACID中的隔离性(Isolation),他保证Lua脚本中所有的命令在执行的时候不会有其他的命令执行,但是并不保证Lua脚本中的所有命令都会执行成功,比如,如果Lua脚本中的第二个命令执行失败了,那么第一个命令依然会被提交,只是后面的命令就不会继续执行了。更多的细节可以参考Redis官方文档 [[5]][RedisTx] [[6]][RedisLuaAtomicity]。
The main class diagram is as follows. Here we can see m_shaEnqueue in the ProducerTable and m_shaPop in the ConsumerTable, which are the SHAs obtained by the two Lua scripts we mentioned above at load time, and we can then use Redis's EVALSHA command to make atomic calls to them: the
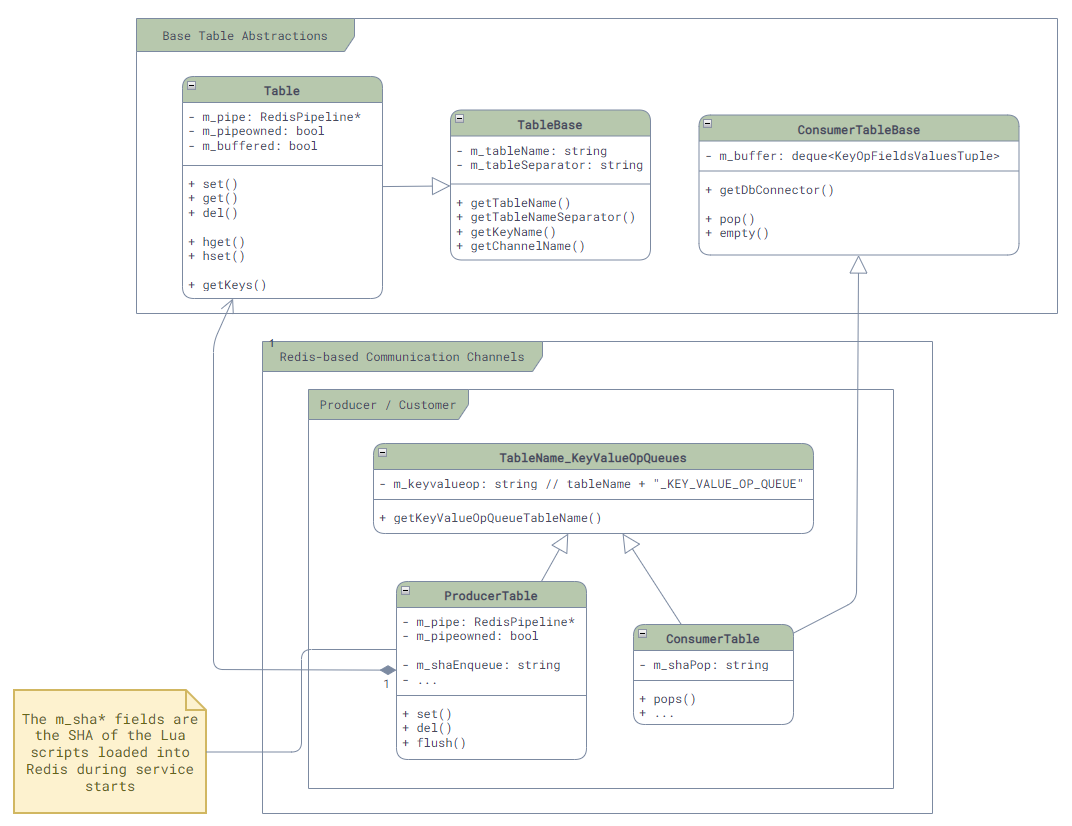
The core logic of the ProducerTable is as follows, we can see the JSON packaging of Values and the use of EVALSHA to make Lua script calls:
// File: sonic-swss-common - common/producertable.cpp
ProducerTable::ProducerTable(RedisPipeline *pipeline, const string &tableName, bool buffered)
    // ...
{
    string luaEnque =
        "redis.call('LPUSH', KEYS[1], ARGV[1], ARGV[2], ARGV[3]);"
        "redis.call('PUBLISH', KEYS[2], ARGV[4]);";

    m_shaEnque = m_pipe->loadRedisScript(luaEnque);
}

void ProducerTable::set(const string &key, const vector<FieldValueTuple> &values, const string &op, const string &prefix)
{
    enqueueDbChange(key, JSon::buildJson(values), "S" + op, prefix);
}

void ProducerTable::del(const string &key, const string &op, const string &prefix)
{
    enqueueDbChange(key, "{}", "D" + op, prefix);
}

void ProducerTable::enqueueDbChange(const string &key, const string &value, const string &op, const string& /* prefix */)
{
    RedisCommand command;

    command.format(
        "EVALSHA %s 2 %s %s %s %s %s %s",
        m_shaEnque.c_str(),
        getKeyValueOpQueueTableName().c_str(),
        getChannelName(m_pipe->getDbId()).c_str(),
        key.c_str(),
        value.c_str(),
        op.c_str(),
        "G");

    m_pipe->push(command, REDIS_REPLY_NIL);
}
The other side of the ConsumerTable is a little more complicated, because it supports many op types, so the logic is written in a separate file (common/consumer_table_pops.lua), we won't post the code here, interested students can see for themselves.
// File: sonic-swss-common - common/consumertable.cpp
ConsumerTable::ConsumerTable(DBConnector *db, const string &tableName, int popBatchSize, int pri)
    : ConsumerTableBase(db, tableName, popBatchSize, pri)
    , TableName_KeyValueOpQueues(tableName)
    , m_modifyRedis(true)
{
    std::string luaScript = loadLuaScript("consumer_table_pops.lua");
    m_shaPop = loadRedisScript(db, luaScript);
    // ...
}

void ConsumerTable::pops(deque<KeyOpFieldsValuesTuple> &vkco, const string &prefix)
{
    // Note that here we are processing the messages in bulk with POP_BATCH_SIZE!
    RedisCommand command;
    command.format(
        "EVALSHA %s 2 %s %s %d %d",
        m_shaPop.c_str(),
        getKeyValueOpQueueTableName().c_str(),
        (prefix+getTableName()).c_str(),
        POP_BATCH_SIZE,

    RedisReply r(m_db, command, REDIS_REPLY_ARRAY);
    vkco.clear();

    // Parse and pack the messages in bulk
    // ...
}
ProducerStateTable / ConsumerStateTable
Although Producer/ConsumerTable is intuitive and order-preserving, it can only handle one Key for one message and also requires JSON serialization, however, many times we do not use the order-preserving function, but rather need more throughput, so in order to optimize performance, SONiC introduces the fourth communication method, which is also the most commonly used communication method: the ProducerStateTable and ConsumerStateTable.
Unlike ProducerTable, ProducerStateTable uses Hash to store messages instead of List, which doesn't guarantee the order of messages, but is a great performance boost! First, we save the overhead of JSON serialization, and second, for the same Field under the same Key if it is changed several times, then only the last change needs to be kept, so that all the change messages about the Key are combined into one, reducing a lot of unnecessary message processing.
The underlying implementation of Producer/ConsumerStateTable is also a bit more complex than Producer/ConsumerTable. The main class diagram of its associated classes is as follows. Here we can still see that it is implemented by calling Lua scripts through EVALSHA, m_shaSet and m_shaDel are used to store modified and sent messages, while m_shaPop is used to get messages on the other side:
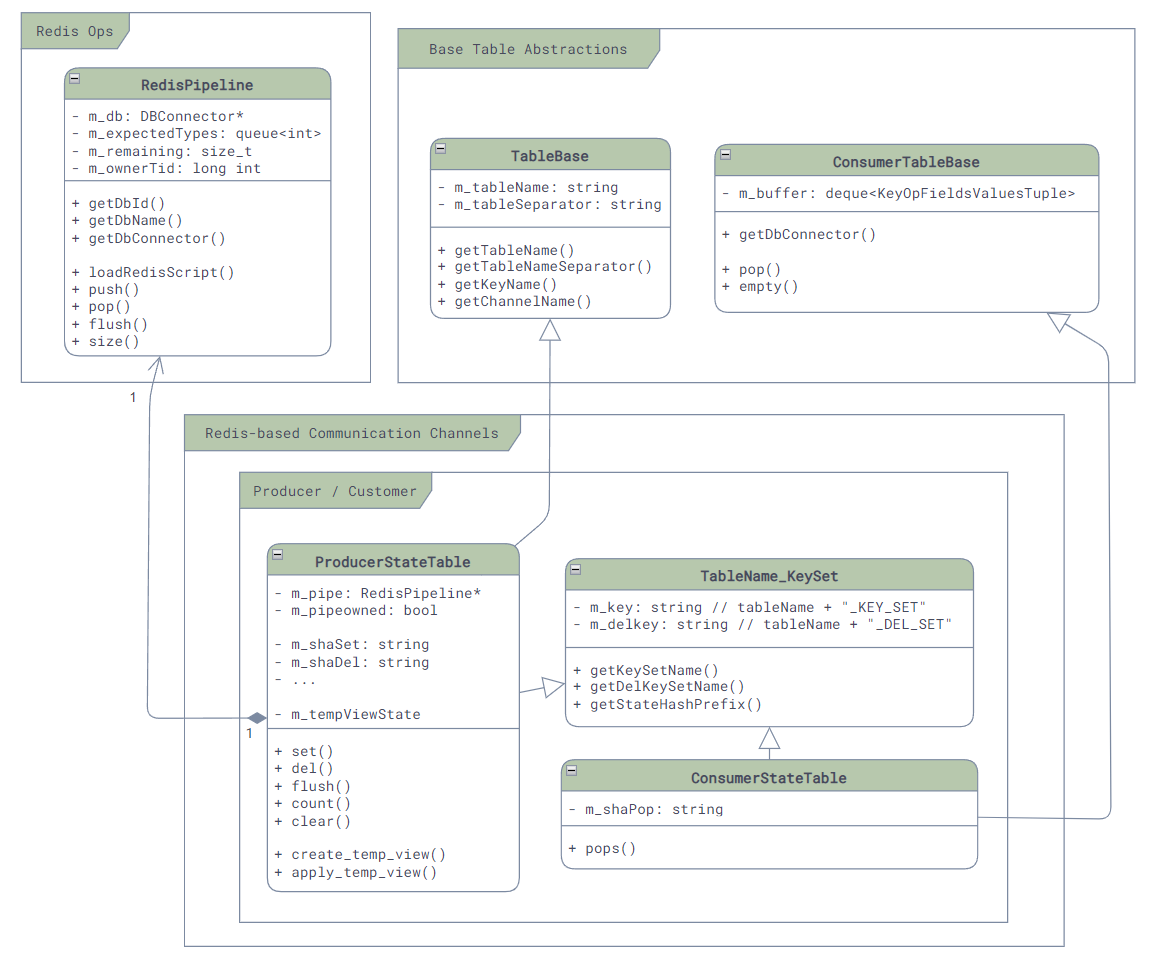
When delivering messages:
-
首先,每个消息会被存放成两个部分:一个是KEY_SET,用来保存当前有哪些Key发生了修改,它以Set的形式存放在
<table-name_KEY_SET>的key下,另一个是所有被修改的Key的内容,它以Hash的形式存放在_<redis-key-name>的key下。 -
然后,消息存放之后Producer如果发现是新的Key,那么就是调用
PUBLISH命令,来通知<table-name>_CHANNEL@<db-id>Channel,有新的Key出现了。// File: sonic-swss-common - common/producerstatetable.cpp ProducerStateTable::ProducerStateTable(RedisPipeline *pipeline, const string &tableName, bool buffered) : TableBase(tableName, SonicDBConfig::getSeparator(pipeline->getDBConnector())) , TableName_KeySet(tableName) // ... { string luaSet = "local added = redis.call('SADD', KEYS[2], ARGV[2])\n" "for i = 0, #KEYS - 3 do\n" " redis.call('HSET', KEYS[3 + i], ARGV[3 + i * 2], ARGV[4 + i * 2])\n" "end\n" " if added > 0 then \n" " redis.call('PUBLISH', KEYS[1], ARGV[1])\n" "end\n"; m_shaSet = m_pipe->loadRedisScript(luaSet); -
最后,Consumer会通过
SUBSCRIBE命令来订阅<table-name>_CHANNEL@<db-id>Channel,一旦有新的消息到来,就会使用Lua脚本调用HGETALL命令来获取所有的Key,并将其中的值读取出来并真正的写入到数据库中去。ConsumerStateTable::ConsumerStateTable(DBConnector *db, const std::string &tableName, int popBatchSize, int pri) : ConsumerTableBase(db, tableName, popBatchSize, pri) , TableName_KeySet(tableName) { std::string luaScript = loadLuaScript("consumer_state_table_pops.lua"); m_shaPop = loadRedisScript(db, luaScript); // ... subscribe(m_db, getChannelName(m_db->getDbId())); // ...
For ease of understanding, let's take an example here: Enabling Port Ethernet0:
-
首先,我们在命令行下调用
config interface startup Ethernet0来启用Ethernet0,这会导致portmgrd通过ProducerStateTable向APP_DB发送状态更新消息,如下:EVALSHA "<hash-of-set-lua>" "6" "PORT_TABLE_CHANNEL@0" "PORT_TABLE_KEY_SET" "_PORT_TABLE:Ethernet0" "_PORT_TABLE:Ethernet0" "_PORT_TABLE:Ethernet0" "_PORT_TABLE:Ethernet0" "G" "Ethernet0" "alias" "Ethernet5/1" "index" "5" "lanes" "9,10,11,12" "speed" "40000"这个命令会在其中调用如下的命令来创建和发布消息:
SADD "PORT_TABLE_KEY_SET" "_PORT_TABLE:Ethernet0"
HSET "_PORT_TABLE:Ethernet0" "alias" "Ethernet5/1"
HSET "_PORT_TABLE:Ethernet0" "index" "5"
HSET "_PORT_TABLE:Ethernet0" "lanes" "9,10,11,12"
HSET "_PORT_TABLE:Ethernet0" "speed" "40000"
PUBLISH "PORT_TABLE_CHANNEL@0" "_PORT_TABLE:Ethernet0"
所以最终这个消息会在APPL_DB中被存放成如下的形式:
PORT_TABLE_KEY_SET: _PORT_TABLE:Ethernet0 _PORT_TABLE:Ethernet0: alias: Ethernet5/1 index: 5 lanes: 9,10,11,12 speed: 40000 -
当ConsumerStateTable收到消息后,也会调用
EVALSHA命令来执行Lua脚本,如下:EVALSHA "<hash-of-pop-lua>" "3" "PORT_TABLE_KEY_SET" "PORT_TABLE:" "PORT_TABLE_DEL_SET" "8192" "_"和Producer类似,这个脚本会执行如下命令,将
PORT_TABLE_KEY_SET中的key,也就是_PORT_TABLE:Ethernet0读取出来,然后再将其对应的Hash读取出来,并更新到PORT_TABLE:Ethernet0去,同时将_PORT_TABLE:Ethernet0从数据库和PORT_TABLE_KEY_SET中删除。SPOP "PORT_TABLE_KEY_SET" "_PORT_TABLE:Ethernet0" HGETALL "_PORT_TABLE:Ethernet0" HSET "PORT_TABLE:Ethernet0" "alias" "Ethernet5/1" HSET "PORT_TABLE:Ethernet0" "index" "5" HSET "PORT_TABLE:Ethernet0" "lanes" "9,10,11,12" HSET "PORT_TABLE:Ethernet0" "speed" "40000" DEL "_PORT_TABLE:Ethernet0"到这里,数据的更新才算是完成了。
参考资料
- SONiC Architecture
- Github repo: sonic-swss
- Github repo: sonic-swss-common
- Redis keyspace notifications
- Redis Transactions
- Redis Atomicity with Lua
- Redis hashes
- Redis client handling
基于ZMQ的通信
服务层 - Orch
Finally, to facilitate the use of the individual services, SONiC has further encapsulated the communication layer by providing a base class for each service: [Orch](https://github.com/sonic-net/sonic-swss/blob/master/src/orchagent/orch. hcommon/consumertatetable.h).
Thanks to these above encapsulations, the encapsulation of message communication in Orch is relatively simple, and the main class diagram is as follows:
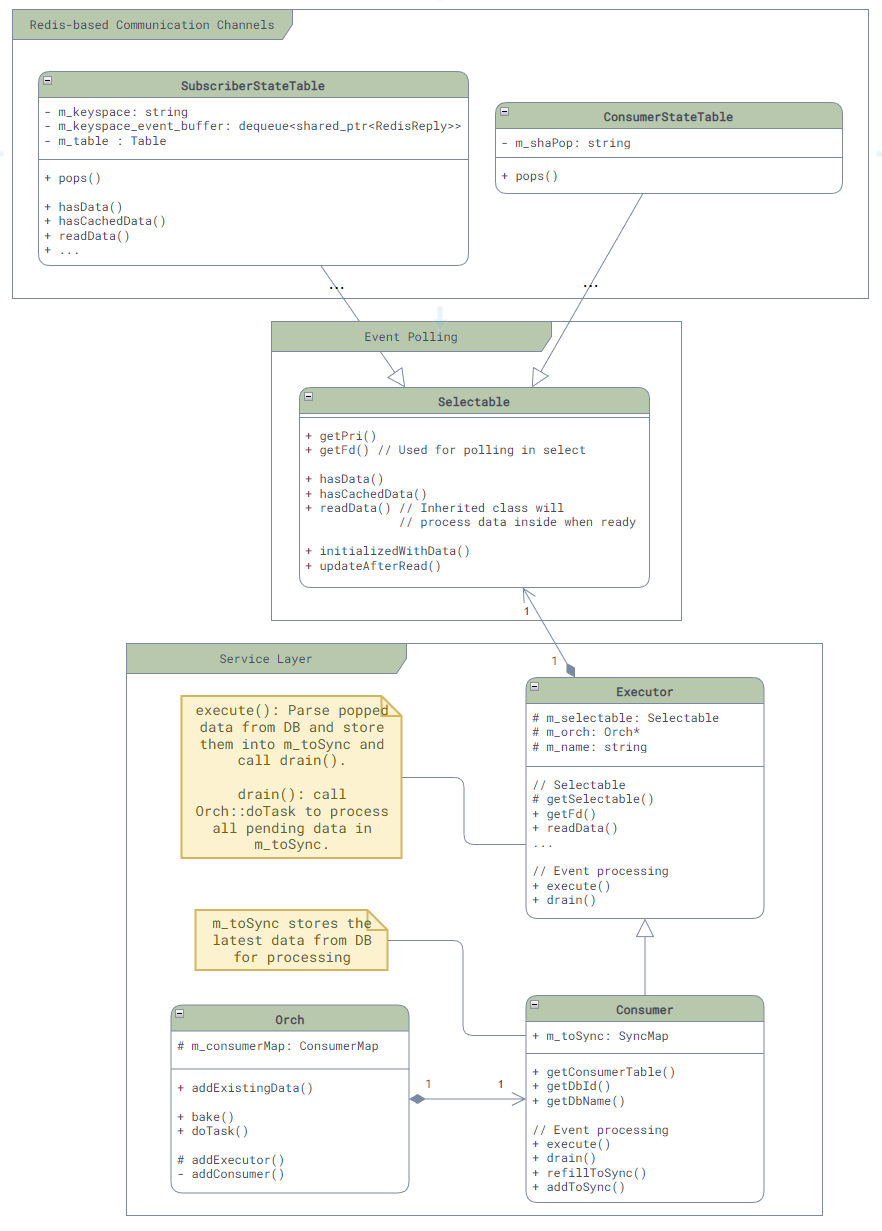
As you can see, Orch mainly encapsulates SubscriberStateTable and ConsumerStateTable to simplify and unify the subscription of messages. The core code is very simple, which is to create different Consumers according to different database types, as follows:
void Orch::addConsumer(DBConnector *db, string tableName, int pri)
{
    if (db->getDbId() == CONFIG_DB || db->getDbId() == STATE_DB || db->getDbId() == CHASSIS_APP_DB) {
        addExecutor(
            new Consumer(
                new SubscriberStateTable(db, tableName, TableConsumable::DEFAULT_POP_BATCH_SIZE, pri),
                this,
                tableName));
    } else {
        addExecutor(
            new Consumer(
                new ConsumerStateTable(db, tableName, gBatchSize, pri),
                this,
                tableName));
    }
}
参考资料
Event Dispatching and Error Handling
基于epoll的事件分发机制
As with many Linux services, SONiC uses epoll as the event distribution mechanism at the bottom:
- 所有需要支持事件分发的类都需要继承
Selectable类,并实现两个最核心的函数:int getFd();(用于返回epoll能用来监听事件的fd)和uint64_t readData()(用于在监听到事件到来之后进行读取)。而对于一般服务而言,这个fd就是redis通信使用的fd,所以getFd()函数的调用,都会被最终转发到Redis的库中。 - 所有需要参与事件分发的对象,都需要注册到
Select类中,这个类会将所有的Selectable对象的fd注册到epoll中,并在事件到来时调用Selectable的readData()函数。
The class diagram is as follows:
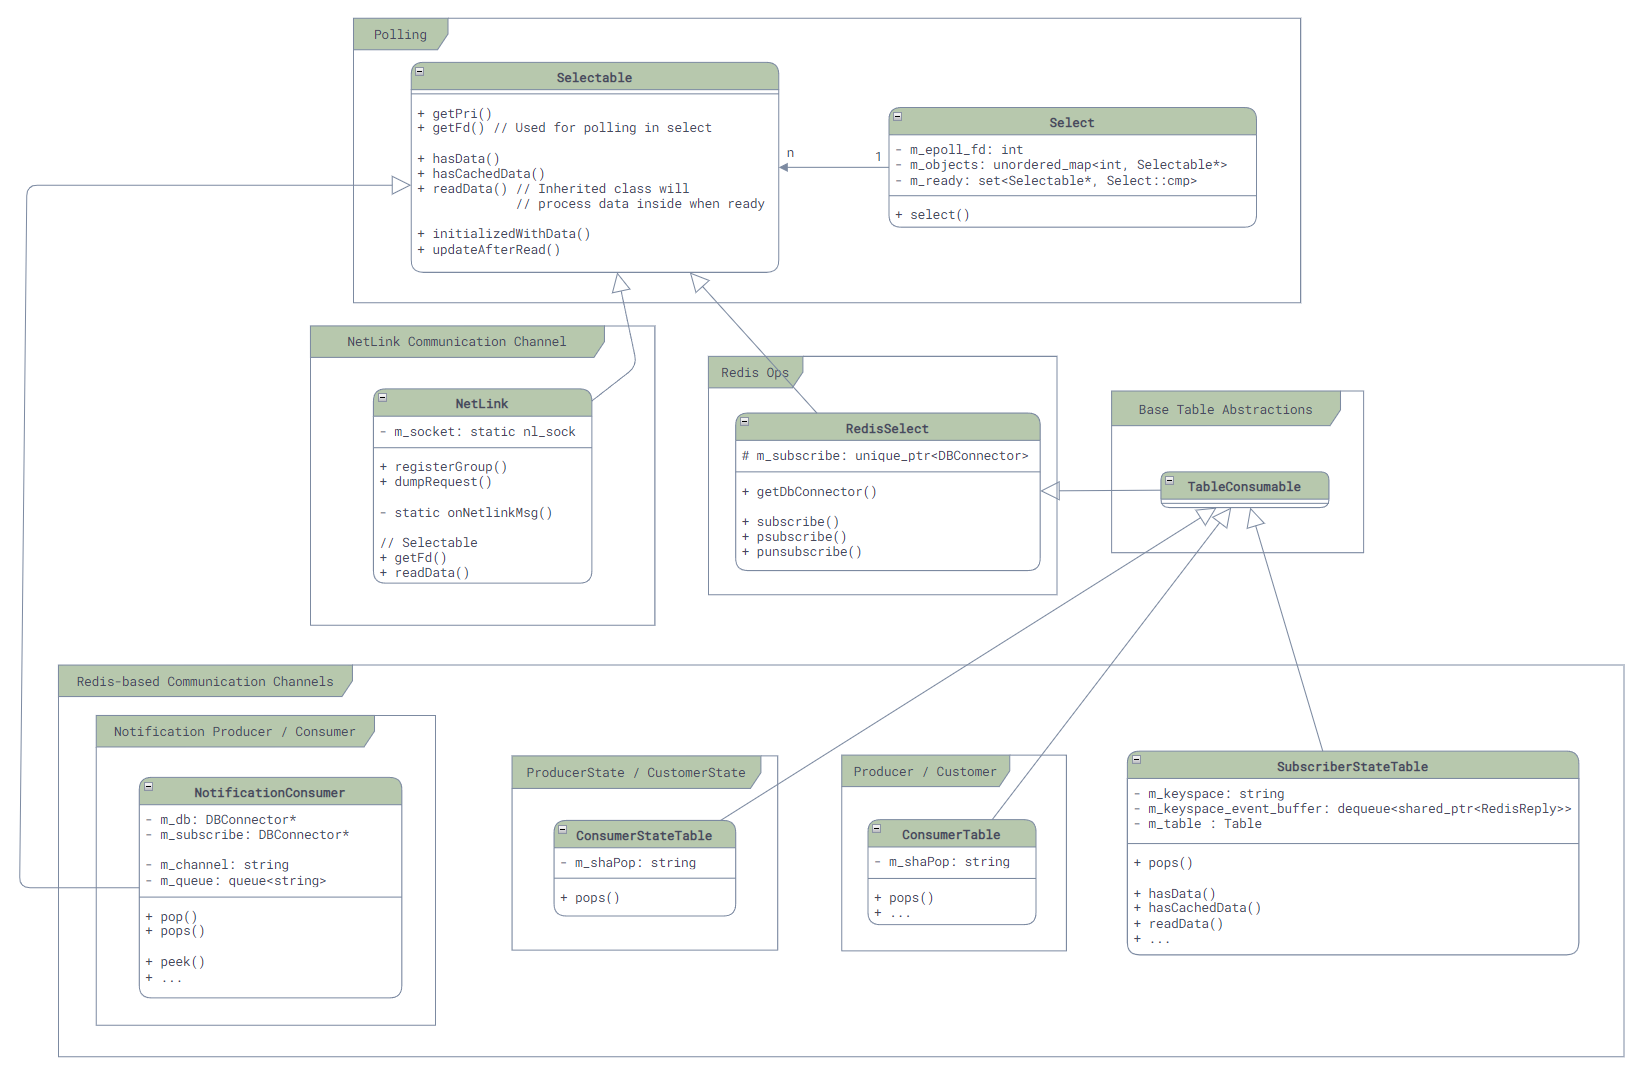
In the Select class, we can easily find its most core code, and the implementation is very simple:
int Select::poll_descriptors(Selectable **c, unsigned int timeout, bool interrupt_on_signal = false)
{
    int sz_selectables = static_cast<int>(m_objects.size());
    std::vector<struct epoll_event> events(sz_selectables);
    int ret;

    while(true) {
        ret = ::epoll_wait(m_epoll_fd, events.data(), sz_selectables, timeout);
        // ...
    }
    // ...

    for (int i = 0; i < ret; ++i)
    {
        int fd = events[i].data.fd;
        Selectable* sel = m_objects[fd];

        sel->readData();
        // error handling here ...

        m_ready.insert(sel);
    }

    while (!m_ready.empty())
    {
        auto sel = *m_ready.begin();
        m_ready.erase(sel);

        // After update callback ...
        return Select::OBJECT;
    }

    return Select::TIMEOUT;
}
However, the question arises ...... What about callbacks? As we mentioned above, readData() just reads the message out and puts it in a pending queue, it doesn't really process the message, the real message processing needs to call the pops() function to take the message out and process it, so where does it call each of the upper level wrapped message processing?
Here we still find the main function of our old friend portmgrd. From the following simplified code, we can see that unlike the general Event Loop implementation, the final event handling in SONiC is not achieved through callbacks, but requires the outermost Event Loop to be actively called to complete:
int main(int argc, char **argv)
{
    // ...

    // Create PortMgr, which implements Orch interface.
    PortMgr portmgr(&cfgDb, &appDb, &stateDb, cfg_port_tables);
    vector<Orch *> cfgOrchList = {&portmgr};

    // Create Select object for event loop and add PortMgr to it.
    swss::Select s;
    for (Orch *o : cfgOrchList) {
        s.addSelectables(o->getSelectables());
    }

    // Event loop
    while (true)
    {
        Selectable *sel;
        int ret;

        // When anyone of the selectables gets signaled, select() will call
        // into readData() and fetch all events, then return.
        ret = s.select(&sel, SELECT_TIMEOUT);
        // ...

        // Then, we call into execute() explicitly to process all events.
        auto *c = (Executor *)sel;
        c->execute();
    }
    return -1;
}
错误处理
Another issue we have with Event Loop is error handling. For example, what happens to our service if a Redis command is executed incorrectly, a connection is broken, a fault occurs, etc.?
From the code point of view, the error handling in SONiC is very simple, that is, it just throws an exception (for example, the code to get the result of command execution, as follows), then catches the exception in the Event Loop, prints the log, and then continues the execution.
RedisReply::RedisReply(RedisContext *ctx, const RedisCommand& command)
{
    int rc = redisAppendFormattedCommand(ctx->getContext(), command.c_str(), command.length());
    if (rc != REDIS_OK)
    {
        // The only reason of error is REDIS_ERR_OOM (Out of memory)
        // ref: https://github.com/redis/hiredis/blob/master/hiredis.c
        throw bad_alloc();
    }

    rc = redisGetReply(ctx->getContext(), (void**)&m_reply);
    if (rc != REDIS_OK)
    {
        throw RedisError("Failed to redisGetReply with " + string(command.c_str()), ctx->getContext());
    }
    guard([&]{checkReply();}, command.c_str());
}
Regarding the types of exceptions and errors and their causes, there is no code seen inside the code for statistics and Telemetry, so monitoring is said to be weak. Also need to consider data error scenarios, such as dirty data due to sudden disconnection halfway through writing the database, but a simple restart of the related *syncd and *mgrd services may solve such problems, as the full amount of synchronization will be performed at startup.
参考资料
核心组件解析
In this chapter, we will take a deeper look at some of the more representative workflows in SONiC from the code level.
为了方便阅读和理解,所有的代码都只是列出了最核心的代码来展现流程,并不是完整的代码,如果需要查看完整代码,请参考仓库中的原始代码。
另外,每个代码块的开头都给出了相关文件的路径,其使用的是仓库均为SONiC的主仓库:sonic-buildimage。
Syncd和SAI
The [Syncd container](. /2-3-key-containers.html#asic management container syncd) is a container in SONiC dedicated to managing ASICs, where the core process syncd is responsible for communicating with the Redis database, loading SAIs and interacting with them to complete ASIC initialization, configuration and status reporting processing, and so on.
Since a large number of workflows in SONiC end up needing to interact with ASIC through Syncd and SAI, this part becomes a common part of these workflows, so let's take a look at how Syncd and SAI work before we expand on other workflows.
Syncd启动流程
The entry point of the syncd process is in the syncd_main.cpp function, and the overall process of its startup is roughly divided into two parts.
The first part is the creation of individual objects and their initialization:
sequenceDiagram
    autonumber
    participant SDM as syncd_main
    participant SD as Syncd
    participant SAI as VendorSai

    SDM->>+SD: 调用构造函数
    SD->>SD: 加载和解析命令行参数和配置文件
    SD->>SD: 创建数据库相关对象,如:<br/>ASIC_DB Connector和FlexCounterManager
    SD->>SD: 创建MDIO IPC服务器
    SD->>SD: 创建SAI上报处理逻辑
    SD->>SD: 创建RedisSelectableChannel用于接收Redis通知
    SD->>-SAI: 初始化SAI
The second part starts the main loop and handles the initialization events:
sequenceDiagram
    autonumber
    box purple 主线程
    participant SDM as syncd_main
    participant SD as Syncd
    participant SAI as VendorSai
    end
    box darkblue 通知处理线程
    participant NP as NotificationProcessor
    end
    box darkgreen MDIO IPC服务器线程
    participant MIS as MdioIpcServer
    end

    SDM->>+SD: 启动主线程循环
    SD->>NP: 启动SAI上报处理线程
    NP->>NP: 开始通知处理循环
    SD->>MIS: 启动MDIO IPC服务器线程
    MIS->>MIS: 开始MDIO IPC服务器事件循环
    SD->>SD: 初始化并启动事件分发机制,开始主循环

    loop 处理事件
        alt 如果是创建Switch的事件或者是WarmBoot
            SD->>SAI: 创建Switch对象,设置通知回调
        else 如果是其他事件
            SD->>SD: 处理事件
        end
    end

    SD->>-SDM: 退出主循环返回
Then let's take a closer look at the process from a code perspective.
syncd_main函数
The syncd_main function itself is very simple, the main logic is to create the Syncd object and then call its run method:
// File: src/sonic-sairedis/syncd/syncd_main.cpp
int syncd_main(int argc, char **argv)
{
    auto vendorSai = std::make_shared<VendorSai>();
    auto syncd = std::make_shared<Syncd>(vendorSai, commandLineOptions, isWarmStart);
    syncd->run();
    return EXIT_SUCCESS;
}
The constructor of the Syncd object is responsible for initializing the various functions in Syncd, while the run method is responsible for starting the main loop of Syncd.
Syncd构造函数
The constructor of the Syncd object is responsible for creating or initializing various functions in Syncd, such as objects for connecting to the database, statistics management, and ASIC notification processing logic, etc. The main code is as follows:
// File: src/sonic-sairedis/syncd/Syncd.cpp
Syncd::Syncd(
        _In_ std::shared_ptr<sairedis::SaiInterface> vendorSai,
        _In_ std::shared_ptr<CommandLineOptions> cmd,
        _In_ bool isWarmStart):
    m_vendorSai(vendorSai),
    ...
{
    ...

    // Load context config
    auto ccc = sairedis::ContextConfigContainer::loadFromFile(m_commandLineOptions->m_contextConfig.c_str());
    m_contextConfig = ccc->get(m_commandLineOptions->m_globalContext);
    ...

    // Create FlexCounter manager
    m_manager = std::make_shared<FlexCounterManager>(m_vendorSai, m_contextConfig->m_dbCounters);

    // Create DB related objects
    m_dbAsic = std::make_shared<swss::DBConnector>(m_contextConfig->m_dbAsic, 0);
    m_mdioIpcServer = std::make_shared<MdioIpcServer>(m_vendorSai, m_commandLineOptions->m_globalContext);
    m_selectableChannel = std::make_shared<sairedis::RedisSelectableChannel>(m_dbAsic, ASIC_STATE_TABLE, REDIS_TABLE_GETRESPONSE, TEMP_PREFIX, modifyRedis);

    // Create notification processor and handler
    m_notifications = std::make_shared<RedisNotificationProducer>(m_contextConfig->m_dbAsic);
    m_client = std::make_shared<RedisClient>(m_dbAsic);
    m_processor = std::make_shared<NotificationProcessor>(m_notifications, m_client, std::bind(&Syncd::syncProcessNotification, this, _1));

    m_handler = std::make_shared<NotificationHandler>(m_processor);
    m_sn.onFdbEvent = std::bind(&NotificationHandler::onFdbEvent, m_handler.get(), _1, _2);
    m_sn.onNatEvent = std::bind(&NotificationHandler::onNatEvent, m_handler.get(), _1, _2);
    // Init many other event handlers here
    m_handler->setSwitchNotifications(m_sn.getSwitchNotifications());
    ...

    // Initialize SAI
    sai_status_t status = vendorSai->initialize(0, &m_test_services);
    ...
}
SAI的初始化与VendorSai
The last and most important step in the initialization of Syncd is the initialization of the SAI. [In the SAI introduction for the core component, we briefly showed the initialization of SAI, the implementation, and how it provides support for different platforms for SONiC](. /2-4-sai-intro.html), so here we will mainly look at how Syncd wraps and calls SAI.
Syncd uses VendorSai to encapsulate all the APIs of SAI, making it easy for the upper layers to call. Its initialization process is also very straightforward, basically a direct call to the above two functions and error handling, as follows:
// File: src/sonic-sairedis/syncd/VendorSai.cpp
sai_status_t VendorSai::initialize(
        _In_ uint64_t flags,
        _In_ const sai_service_method_table_t *service_method_table)
{
    ...

    // Initialize SAI
    memcpy(&m_service_method_table, service_method_table, sizeof(m_service_method_table));
    auto status = sai_api_initialize(flags, service_method_table);

    // If SAI is initialized successfully, query all SAI API methods.
    // sai_metadata_api_query will also update all extern global sai_*_api variables, so we can also use
    // sai_metadata_get_object_type_info to get methods for a specific SAI object type.
    if (status == SAI_STATUS_SUCCESS) {
        memset(&m_apis, 0, sizeof(m_apis));
        int failed = sai_metadata_apis_query(sai_api_query, &m_apis);
        ...
    }
    ...

    return status;
}
Once all the SAI APIs are obtained, we can call the SAI APIs through the VendorSai object. Currently there are two main ways to call the SAI API.
The first one is called by sai_object_type_into_t, which is similar to implementing a dummy table for all SAI Objects, as follows:
// File: src/sonic-sairedis/syncd/VendorSai.cpp
sai_status_t VendorSai::set(
        _In_ sai_object_type_t objectType,
        _In_ sai_object_id_t objectId,
        _In_ const sai_attribute_t *attr)
{
    ...

    auto info = sai_metadata_get_object_type_info(objectType);
    sai_object_meta_key_t mk = { .objecttype = objectType, .objectkey = { .key = { .object_id = objectId } } };
    return info->set(&mk, attr);
}
The other way is to call through m_apis saved in the VendorSai object. This way is more direct, but before calling it, you need to call different APIs according to the type of SAI Object.
sai_status_t VendorSai::getStatsExt(
        _In_ sai_object_type_t object_type,
        _In_ sai_object_id_t object_id,
        _In_ uint32_t number_of_counters,
        _In_ const sai_stat_id_t *counter_ids,
        _In_ sai_stats_mode_t mode,
        _Out_ uint64_t *counters)
{
    sai_status_t (*ptr)(
            _In_ sai_object_id_t port_id,
            _In_ uint32_t number_of_counters,
            _In_ const sai_stat_id_t *counter_ids,
            _In_ sai_stats_mode_t mode,
            _Out_ uint64_t *counters);

    switch ((int)object_type)
    {
        case SAI_OBJECT_TYPE_PORT:
            ptr = m_apis.port_api->get_port_stats_ext;
            break;
        case SAI_OBJECT_TYPE_ROUTER_INTERFACE:
            ptr = m_apis.router_interface_api->get_router_interface_stats_ext;
            break;
        case SAI_OBJECT_TYPE_POLICER:
            ptr = m_apis.policer_api->get_policer_stats_ext;
            break;
        ...

        default:
            SWSS_LOG_ERROR("not implemented, FIXME");
            return SAI_STATUS_FAILURE;
    }

    return ptr(object_id, number_of_counters, counter_ids, mode, counters);
}
As you can clearly see, the code of the first call is much more concise and intuitive.
Syncd主循环
The main loop of Syncd is also using the standard [event distribution] in SONiC (. /4-3-event-polling-and-error-handling.html) mechanism: at startup, Syncd registers all Selectable objects used for event handling into the Select object used to fetch events, and then calls Select's select method in the main loop and wait for the event to occur. The core code is as follows:
// File: src/sonic-sairedis/syncd/Syncd.cpp
void Syncd::run()
{
    volatile bool runMainLoop = true;
    std::shared_ptr<swss::Select> s = std::make_shared<swss::Select>();
    onSyncdStart(m_commandLineOptions->m_startType == SAI_START_TYPE_WARM_BOOT);

    // Start notification processing thread
    m_processor->startNotificationsProcessingThread();

    // Start MDIO threads
    for (auto& sw: m_switches) { m_mdioIpcServer->setSwitchId(sw.second->getRid()); }
    m_mdioIpcServer->startMdioThread();

    // Registering selectable for event polling
    s->addSelectable(m_selectableChannel.get());
    s->addSelectable(m_restartQuery.get());
    s->addSelectable(m_flexCounter.get());
    s->addSelectable(m_flexCounterGroup.get());

    // Main event loop
    while (runMainLoop)
    {
        swss::Selectable *sel = NULL;
        int result = s->select(&sel);

        ...
        if (sel == m_restartQuery.get()) {
            // Handling switch restart event and restart switch here.
        } else if (sel == m_flexCounter.get()) {
            processFlexCounterEvent(*(swss::ConsumerTable*)sel);
        } else if (sel == m_flexCounterGroup.get()) {
            processFlexCounterGroupEvent(*(swss::ConsumerTable*)sel);
        } else if (sel == m_selectableChannel.get()) {
            // Handle redis updates here.
            processEvent(*m_selectableChannel.get());
        } else {
            SWSS_LOG_ERROR("select failed: %d", result);
        }
        ...
    }
    ...
}
One of them, m_selectableChannel, is the object that is primarily responsible for handling events in the Redis database. It uses the [ProducerTable / ConsumerTable](. /4-2-2-redis-messaging-layer.md#producertable--consumertable) to interact with the Redis database, so all operations sent by the orchagent are stored in a list in Redis in the form of a triple, waiting for Syncd for processing. The core definition is as follows:
// File: src/sonic-sairedis/meta/RedisSelectableChannel.h
class RedisSelectableChannel: public SelectableChannel
{
    public:
        RedisSelectableChannel(
                _In_ std::shared_ptr<swss::DBConnector> dbAsic,
                _In_ const std::string& asicStateTable,
                _In_ const std::string& getResponseTable,
                _In_ const std::string& tempPrefix,
                _In_ bool modifyRedis);

    public: // SelectableChannel overrides
        virtual bool empty() override;
        ...

    public: // Selectable overrides
        virtual int getFd() override;
        virtual uint64_t readData() override;
        ...

    private:
        std::shared_ptr<swss::DBConnector> m_dbAsic;
        std::shared_ptr<swss::ConsumerTable> m_asicState;
        std::shared_ptr<swss::ProducerTable> m_getResponse;
        ...
};
In addition, when the main loop is started, Syncd starts two additional threads:
- 用于接收ASIC上报通知的通知处理线程:
m_processor->startNotificationsProcessingThread(); - 用于处理MDIO通信的MDIO IPC处理线程:
m_mdioIpcServer->startMdioThread();
We won't expand too much on their details in the initialization section, but will come back to them later when we introduce the relevant workflows.
创建Switch对象,初始化通知机制
After the main loop starts, Syncd will start calling the SAI API to create Switch objects. There are two entry points here, one is when ASIC_DB receives a notification to create a Switch, and the other is when Warm Boot, Syncd comes to initiate the call, but the internal flow of this step of creating a Switch is similar.
In the middle of this step, there is an important step to initialize the notification callbacks in the SAI's internal implementation to pass the notification handling logic we have created before to the SAI's implementation, such as FDB's events and so on. These callbacks will be passed as Attributes of the Switch to the SAI's create_switch method as parameters, and the SAI implementation will save them so that the callbacks can be called to notify Syncd when an event occurs. The core code here is as follows:
// File: src/sonic-sairedis/syncd/Syncd.cpp
sai_status_t Syncd::processQuadEvent(
        _In_ sai_common_api_t api,
        _In_ const swss::KeyOpFieldsValuesTuple &kco)
{
    // Parse event into SAI object
    sai_object_meta_key_t metaKey;
    ...

    SaiAttributeList list(metaKey.objecttype, values, false);
    sai_attribute_t *attr_list = list.get_attr_list();
    uint32_t attr_count = list.get_attr_count();

    // Update notifications pointers in attribute list
    if (metaKey.objecttype == SAI_OBJECT_TYPE_SWITCH && (api == SAI_COMMON_API_CREATE || api == SAI_COMMON_API_SET))
    {
        m_handler->updateNotificationsPointers(attr_count, attr_list);
    }

    if (isInitViewMode())
    {
        // ProcessQuadEventInInitViewMode will eventually call into VendorSai, which calls create_swtich function in SAI.
        sai_status_t status = processQuadEventInInitViewMode(metaKey.objecttype, strObjectId, api, attr_count, attr_list);
        syncUpdateRedisQuadEvent(status, api, kco);
        return status;
    }
    ...
}

// File: src/sonic-sairedis/syncd/NotificationHandler.cpp
void NotificationHandler::updateNotificationsPointers(_In_ uint32_t attr_count, _In_ sai_attribute_t *attr_list) const
{
    for (uint32_t index = 0; index < attr_count; ++index) {
        ...

        sai_attribute_t &attr = attr_list[index];
        switch (attr.id) {
            ...

            case SAI_SWITCH_ATTR_SHUTDOWN_REQUEST_NOTIFY:
                attr.value.ptr = (void*)m_switchNotifications.on_switch_shutdown_request;
                break;

            case SAI_SWITCH_ATTR_FDB_EVENT_NOTIFY:
                attr.value.ptr = (void*)m_switchNotifications.on_fdb_event;
                break;
            ...
        }
        ...
    }
}

// File: src/sonic-sairedis/syncd/Syncd.cpp
// Call stack: processQuadEvent
//          -> processQuadEventInInitViewMode
//          -> processQuadInInitViewModeCreate
//          -> onSwitchCreateInInitViewMode
void Syncd::onSwitchCreateInInitViewMode(_In_ sai_object_id_t switchVid, _In_ uint32_t attr_count, _In_ const sai_attribute_t *attr_list)
{
    if (m_switches.find(switchVid) == m_switches.end()) {
        sai_object_id_t switchRid;
        sai_status_t status;
        status = m_vendorSai->create(SAI_OBJECT_TYPE_SWITCH, &switchRid, 0, attr_count, attr_list);
        ...

        m_switches[switchVid] = std::make_shared<SaiSwitch>(switchVid, switchRid, m_client, m_translator, m_vendorSai);
        m_mdioIpcServer->setSwitchId(switchRid);
        ...
    }
    ...
}
From Mellanox's SAI implementation, we can see its specific approach to preservation:
static sai_status_t mlnx_create_switch(_Out_ sai_object_id_t     * switch_id,
                                       _In_ uint32_t               attr_count,
                                       _In_ const sai_attribute_t *attr_list)
{
    ...

    status = find_attrib_in_list(attr_count, attr_list, SAI_SWITCH_ATTR_SWITCH_STATE_CHANGE_NOTIFY, &attr_val, &attr_idx);
    if (!SAI_ERR(status)) {
        g_notification_callbacks.on_switch_state_change = (sai_switch_state_change_notification_fn)attr_val->ptr;
    }

    status = find_attrib_in_list(attr_count, attr_list, SAI_SWITCH_ATTR_SHUTDOWN_REQUEST_NOTIFY, &attr_val, &attr_idx);
    if (!SAI_ERR(status)) {
        g_notification_callbacks.on_switch_shutdown_request =
            (sai_switch_shutdown_request_notification_fn)attr_val->ptr;
    }

    status = find_attrib_in_list(attr_count, attr_list, SAI_SWITCH_ATTR_FDB_EVENT_NOTIFY, &attr_val, &attr_idx);
    if (!SAI_ERR(status)) {
        g_notification_callbacks.on_fdb_event = (sai_fdb_event_notification_fn)attr_val->ptr;
    }

    status = find_attrib_in_list(attr_count, attr_list, SAI_SWITCH_ATTR_PORT_STATE_CHANGE_NOTIFY, &attr_val, &attr_idx);
    if (!SAI_ERR(status)) {
        g_notification_callbacks.on_port_state_change = (sai_port_state_change_notification_fn)attr_val->ptr;
    }

    status = find_attrib_in_list(attr_count, attr_list, SAI_SWITCH_ATTR_PACKET_EVENT_NOTIFY, &attr_val, &attr_idx);
    if (!SAI_ERR(status)) {
        g_notification_callbacks.on_packet_event = (sai_packet_event_notification_fn)attr_val->ptr;
    }
    ...
}
ASIC状态更新
ASIC status update is one of the most important workflows in Syncd, which is triggered when orchagent finds any change and starts modifying ASIC_DB to update ASIC via SAI. After understanding the main loop of Syncd, it is easy to understand the workflow of ASIC state update.
All steps occur in one thread in the main thread and are executed sequentially, summarized in a timing diagram as follows:
sequenceDiagram
    autonumber
    participant SD as Syncd
    participant RSC as RedisSelectableChannel
    participant SAI as VendorSai
    participant R as Redis

    loop 主线程循环
        SD->>RSC: 收到epoll通知,通知获取所有到来的消息
        RSC->>R: 通过ConsumerTable获取所有到来的消息

        critical 给Syncd加锁
            loop 所有收到的消息
                SD->>RSC: 获取一个消息
                SD->>SD: 解析消息,获取操作类型和操作对象
                SD->>SAI: 调用对应的SAI API,更新ASIC
                SD->>RSC: 发送调用结果给Redis
                RSC->>R: 将调用结果写入Redis
            end
        end
    end
First, the operation sent by orchagent through Redis is received by the RedisSelectableChannel object and then processed in the main loop. When Syncd processes to m_selectableChannel, it calls the processEvent method to process the operation. The core code for these steps has been described above when we introduced the main loop, so we won't go over it here.
Then, processEvent will call the corresponding SAI's API to update the ASIC according to the type of operation in it. The logic is a giant switch-case statement, as follows:
// File: src/sonic-sairedis/syncd/Syncd.cpp
void Syncd::processEvent(_In_ sairedis::SelectableChannel& consumer)
{
    // Loop all operations in the queue
    std::lock_guard<std::mutex> lock(m_mutex);
    do {
        swss::KeyOpFieldsValuesTuple kco;
        consumer.pop(kco, isInitViewMode());
        processSingleEvent(kco);
    } while (!consumer.empty());
}

sai_status_t Syncd::processSingleEvent(_In_ const swss::KeyOpFieldsValuesTuple &kco)
{
    auto& op = kfvOp(kco);
    ...

    if (op == REDIS_ASIC_STATE_COMMAND_CREATE)
        return processQuadEvent(SAI_COMMON_API_CREATE, kco);

    if (op == REDIS_ASIC_STATE_COMMAND_REMOVE)
        return processQuadEvent(SAI_COMMON_API_REMOVE, kco);

    ...
}

sai_status_t Syncd::processQuadEvent(
        _In_ sai_common_api_t api,
        _In_ const swss::KeyOpFieldsValuesTuple &kco)
{
    // Parse operation
    const std::string& key = kfvKey(kco);
    const std::string& strObjectId = key.substr(key.find(":") + 1);

    sai_object_meta_key_t metaKey;
    sai_deserialize_object_meta_key(key, metaKey);

    auto& values = kfvFieldsValues(kco);
    SaiAttributeList list(metaKey.objecttype, values, false);
    sai_attribute_t *attr_list = list.get_attr_list();
    uint32_t attr_count = list.get_attr_count();
    ...

    auto info = sai_metadata_get_object_type_info(metaKey.objecttype);

    // Process the operation
    sai_status_t status;
    if (info->isnonobjectid) {
        status = processEntry(metaKey, api, attr_count, attr_list);
    } else {
        status = processOid(metaKey.objecttype, strObjectId, api, attr_count, attr_list);
    }

    // Send response
    if (api == SAI_COMMON_API_GET) {
        sai_object_id_t switchVid = VidManager::switchIdQuery(metaKey.objectkey.key.object_id);
        sendGetResponse(metaKey.objecttype, strObjectId, switchVid, status, attr_count, attr_list);
        ...
    } else {
        sendApiResponse(api, status);
    }

    syncUpdateRedisQuadEvent(status, api, kco);
    return status;
}

sai_status_t Syncd::processEntry(_In_ sai_object_meta_key_t metaKey, _In_ sai_common_api_t api,
                                 _In_ uint32_t attr_count, _In_ sai_attribute_t *attr_list)
{
    ...

    switch (api)
    {
        case SAI_COMMON_API_CREATE:
            return m_vendorSai->create(metaKey, SAI_NULL_OBJECT_ID, attr_count, attr_list);

        case SAI_COMMON_API_REMOVE:
            return m_vendorSai->remove(metaKey);
        ...

        default:
            SWSS_LOG_THROW("api %s not supported", sai_serialize_common_api(api).c_str());
    }
}
ASIC状态变更上报
In turn, when any change in ASIC status occurs or data needs to be reported, it will also notify us via SAI, at which point Syncd will listen for these notifications and then report them to the orchagent via ASIC_DB. its main workflow is as follows:
sequenceDiagram
    box purple SAI实现事件处理线程
    participant SAI as SAI Impl
    end
    box darkblue 通知处理线程
    participant NP as NotificationProcessor
    participant SD as Syncd
    participant RNP as RedisNotificationProducer
    participant R as Redis
    end

    loop SAI实现事件处理消息循环
        SAI->>SAI: 通过ASIC SDK获取事件
        SAI->>SAI: 解析事件,并转换成SAI通知对象
        SAI->>NP: 将通知对象序列化,<br/>并发送给通知处理线程的队列中
    end

    loop 通知处理线程消息循环
        NP->>NP: 从队列中获取通知
        NP->>SD: 获取Syncd锁
        critical 给Syncd加锁
            NP->>NP: 反序列化通知对象,并做一些处理
            NP->>RNP: 重新序列化通知对象,并请求发送
            RNP->>R: 将通知以NotificationProducer<br/>的形式写入ASIC_DB
        end
    end
Here we also look at the specific implementation. For a more in-depth understanding, we still analyze it with the help of the open source Mellanox SAI implementation.
At the very beginning, the SAI implementation needs to receive notifications from ASIC, this step is implemented through the ASIC SDK. Mellanox's SAI creates an event handling thread (event_thread) and then uses the select function to get and process the notifications sent from ASIC, the core code is as follows:
// File: platform/mellanox/mlnx-sai/SAI-Implementation/mlnx_sai/src/mlnx_sai_switch.c
static void event_thread_func(void *context)
{
#define MAX_PACKET_SIZE MAX(g_resource_limits.port_mtu_max, SX_HOST_EVENT_BUFFER_SIZE_MAX)

    sx_status_t                         status;
    sx_api_handle_t                     api_handle;
    sx_user_channel_t                   port_channel, callback_channel;
    fd_set                              descr_set;
    int                                 ret_val;
    sai_object_id_t                     switch_id = (sai_object_id_t)context;
    sai_port_oper_status_notification_t port_data;
    sai_fdb_event_notification_data_t  *fdb_events = NULL;
    sai_attribute_t                    *attr_list = NULL;
    ...

    // Init SDK API
    if (SX_STATUS_SUCCESS != (status = sx_api_open(sai_log_cb, &api_handle))) {
        if (g_notification_callbacks.on_switch_shutdown_request) {
            g_notification_callbacks.on_switch_shutdown_request(switch_id);
        }
        return;
    }

    if (SX_STATUS_SUCCESS != (status = sx_api_host_ifc_open(api_handle, &port_channel.channel.fd))) {
        goto out;
    }
    ...

    // Register for port and channel notifications
    port_channel.type = SX_USER_CHANNEL_TYPE_FD;
    if (SX_STATUS_SUCCESS != (status = sx_api_host_ifc_trap_id_register_set(api_handle, SX_ACCESS_CMD_REGISTER, DEFAULT_ETH_SWID, SX_TRAP_ID_PUDE, &port_channel))) {
        goto out;
    }
    ...
    for (uint32_t ii = 0; ii < (sizeof(mlnx_trap_ids) / sizeof(*mlnx_trap_ids)); ii++) {
        status = sx_api_host_ifc_trap_id_register_set(api_handle, SX_ACCESS_CMD_REGISTER, DEFAULT_ETH_SWID, mlnx_trap_ids[ii], &callback_channel);
    }

    while (!event_thread_asked_to_stop) {
        FD_ZERO(&descr_set);
        FD_SET(port_channel.channel.fd.fd, &descr_set);
        FD_SET(callback_channel.channel.fd.fd, &descr_set);
        ...

        ret_val = select(FD_SETSIZE, &descr_set, NULL, NULL, &timeout);
        if (ret_val > 0) {
            // Port state change event
            if (FD_ISSET(port_channel.channel.fd.fd, &descr_set)) {
                // Parse port state event here ...
                if (g_notification_callbacks.on_port_state_change) {
                    g_notification_callbacks.on_port_state_change(1, &port_data);
                }
            }

            if (FD_ISSET(callback_channel.channel.fd.fd, &descr_set)) {
                // Receive notification event.
                packet_size = MAX_PACKET_SIZE;
                if (SX_STATUS_SUCCESS != (status = sx_lib_host_ifc_recv(&callback_channel.channel.fd, p_packet, &packet_size, receive_info))) {
                    goto out;
                }

                // BFD packet event
                if (SX_TRAP_ID_BFD_PACKET_EVENT == receive_info->trap_id) {
                    const struct bfd_packet_event *event = (const struct bfd_packet_event*)p_packet;
                    // Parse and check event valid here ...
                    status = mlnx_switch_bfd_packet_handle(event);
                    continue;
                }

                // Same way to handle BFD timeout event, Bulk counter ready event. Emiited.

                // FDB event and packet event handling
                if (receive_info->trap_id == SX_TRAP_ID_FDB_EVENT) {
                    trap_name = "FDB event";
                } else if (SAI_STATUS_SUCCESS != (status = mlnx_translate_sdk_trap_to_sai(receive_info->trap_id, &trap_name, &trap_oid))) {
                    continue;
                }

                if (SX_TRAP_ID_FDB_EVENT == receive_info->trap_id) {
                    // Parse FDB events here ...

                    if (g_notification_callbacks.on_fdb_event) {
                        g_notification_callbacks.on_fdb_event(event_count, fdb_events);
                    }

                    continue;
                }

                // Packet event handling
                status = mlnx_get_hostif_packet_data(receive_info, &attrs_num, callback_data);
                if (g_notification_callbacks.on_packet_event) {
                    g_notification_callbacks.on_packet_event(switch_id, packet_size, p_packet, attrs_num, callback_data);
                }
            }
        }
    }

out:
    ...
}
Next, let's use the FDB event as an example. When ASIC receives an FDB event, it will be fetched by the event handling loop above and the g_notification_callbacks.on_fdb_event function will be called to handle it. This function then calls the NotificationHandler::onFdbEvent function that was set up when Syncd was initialized, which serializes the event and forwards it through the message queue to the notification handler thread for processing:
// File: src/sonic-sairedis/syncd/NotificationHandler.cpp
void NotificationHandler::onFdbEvent(_In_ uint32_t count, _In_ const sai_fdb_event_notification_data_t *data)
{
    std::string s = sai_serialize_fdb_event_ntf(count, data);
    enqueueNotification(SAI_SWITCH_NOTIFICATION_NAME_FDB_EVENT, s);
}
And then the notification handler thread is woken up, takes the event out of the message queue, and then gets a lock on Syncd via Syncd and starts processing the notification again: the
// File: src/sonic-sairedis/syncd/NotificationProcessor.cpp
void NotificationProcessor::ntf_process_function()
{
    std::mutex ntf_mutex;
    std::unique_lock<std::mutex> ulock(ntf_mutex);

    while (m_runThread) {
        // When notification arrives, it will signal this condition variable.
        m_cv.wait(ulock);

        // Process notifications in the queue.
        swss::KeyOpFieldsValuesTuple item;
        while (m_notificationQueue->tryDequeue(item)) {
            processNotification(item);
        }
    }
}

// File: src/sonic-sairedis/syncd/Syncd.cpp
// Call from NotificationProcessor::processNotification
void Syncd::syncProcessNotification(_In_ const swss::KeyOpFieldsValuesTuple& item)
{
    std::lock_guard<std::mutex> lock(m_mutex);
    m_processor->syncProcessNotification(item);
}
The next step is the distribution and processing of events. The syncProcessNotification function is a series of if-else statements that, depending on the type of event, call different handler functions to process the event:
// File: src/sonic-sairedis/syncd/NotificationProcessor.cpp
void NotificationProcessor::syncProcessNotification( _In_ const swss::KeyOpFieldsValuesTuple& item)
{
    std::string notification = kfvKey(item);
    std::string data = kfvOp(item);

    if (notification == SAI_SWITCH_NOTIFICATION_NAME_SWITCH_STATE_CHANGE) {
        handle_switch_state_change(data);
    } else if (notification == SAI_SWITCH_NOTIFICATION_NAME_FDB_EVENT) {
        handle_fdb_event(data);
    } else if ...
    } else {
        SWSS_LOG_ERROR("unknown notification: %s", notification.c_str());
    }
}
And each event handling function is similar in that they deserialize the events sent to them and then call the real processing logic to send notifications, for example, the handle_fdb_event function and process_on_fdb_event corresponding to the fdb event:
// File: src/sonic-sairedis/syncd/NotificationProcessor.cpp
void NotificationProcessor::handle_fdb_event(_In_ const std::string &data)
{
    uint32_t count;
    sai_fdb_event_notification_data_t *fdbevent = NULL;
    sai_deserialize_fdb_event_ntf(data, count, &fdbevent);

    process_on_fdb_event(count, fdbevent);

    sai_deserialize_free_fdb_event_ntf(count, fdbevent);
}

void NotificationProcessor::process_on_fdb_event( _In_ uint32_t count, _In_ sai_fdb_event_notification_data_t *data)
{
    for (uint32_t i = 0; i < count; i++) {
        sai_fdb_event_notification_data_t *fdb = &data[i];
        // Check FDB event notification data here

        fdb->fdb_entry.switch_id = m_translator->translateRidToVid(fdb->fdb_entry.switch_id, SAI_NULL_OBJECT_ID);
        fdb->fdb_entry.bv_id = m_translator->translateRidToVid(fdb->fdb_entry.bv_id, fdb->fdb_entry.switch_id, true);
        m_translator->translateRidToVid(SAI_OBJECT_TYPE_FDB_ENTRY, fdb->fdb_entry.switch_id, fdb->attr_count, fdb->attr, true);

        ...
    }

    // Send notification
    std::string s = sai_serialize_fdb_event_ntf(count, data);
    sendNotification(SAI_SWITCH_NOTIFICATION_NAME_FDB_EVENT, s);
}
The logic for sending specific events is pretty straightforward, and ultimately it's all about sending notifications to ASIC_DB via [NotificationProducer](. /4-2-2-redis-messaging-layer.html#notificationproducer--notificationconsumer) to send notifications to the ASIC_DB:
// File: src/sonic-sairedis/syncd/NotificationProcessor.cpp
void NotificationProcessor::sendNotification(_In_ const std::string& op, _In_ const std::string& data)
{
    std::vector<swss::FieldValueTuple> entry;
    sendNotification(op, data, entry);
}

void NotificationProcessor::sendNotification(_In_ const std::string& op, _In_ const std::string& data, _In_ std::vector<swss::FieldValueTuple> entry)
{
    m_notifications->send(op, data, entry);
}

// File: src/sonic-sairedis/syncd/RedisNotificationProducer.cpp
void RedisNotificationProducer::send(_In_ const std::string& op, _In_ const std::string& data, _In_ const std::vector<swss::FieldValueTuple>& values)
{
    std::vector<swss::FieldValueTuple> vals = values;

    // The m_notificationProducer is created in the ctor of RedisNotificationProducer as below:
    // m_notificationProducer = std::make_shared<swss::NotificationProducer>(m_db.get(), REDIS_TABLE_NOTIFICATIONS_PER_DB(dbName));
    m_notificationProducer->send(op, data, vals);
}
At this point, the process of notification upload in Syncd is finished.
参考资料
BGP
BGP可能是交换机里面最常用,最重要,或者线上使用的最多的功能了。这一节,我们就来深入的看一下BGP相关的工作流。
BGP相关进程
SONiC使用FRRouting作为BGP的实现,用于负责BGP的协议处理。FRRouting是一个开源的路由软件,支持多种路由协议,包括BGP,OSPF,IS-IS,RIP,PIM,LDP等等。当FRR发布新版本后,SONiC会将其同步到SONiC的FRR实现仓库:sonic-frr中,每一个版本都对应这一个分支,比如frr/8.2。
FRR consists of two main parts, the first part is the implementation of each protocol, these processes are named *d, and when they receive notification of routing updates, they tell the second part, which is the zebra process, and then the zebra process will make the route selection and synchronize the optimal routing information to the kernel, the main structure of which is shown in the following figure The main structure is as follows
+----+  +----+  +-----+  +----+  +----+  +----+  +-----+
|bgpd|  |ripd|  |ospfd|  |ldpd|  |pbrd|  |pimd|  |.....|
+----+  +----+  +-----+  +----+  +----+  +----+  +-----+
     |       |        |       |       |       |        |
+----v-------v--------v-------v-------v-------v--------v
|                                                      |
|                         Zebra                        |
|                                                      |
+------------------------------------------------------+
       |                    |                   |
       |                    |                   |
+------v------+   +---------v--------+   +------v------+
|             |   |                  |   |             |
| *NIX Kernel |   | Remote dataplane |   | ........... |
|             |   |                  |   |             |
+-------------+   +------------------+   +-------------+
在SONiC中,这些FRR的进程都跑在bgp的容器中。另外,为了将FRR和Redis连接起来,SONiC在bgp容器中还会运行一个叫做fpgsyncd的进程(Forwarding Plane Manager syncd),它的主要功能是监听kernel的路由更新,然后将其同步到APP_DB中。但是因为这个进程不是FRR的一部分,所以它的实现被放在了sonic-swss仓库中。
参考资料
- SONiC Architecture
- Github repo: sonic-swss
- Github repo: sonic-frr
- RFC 4271: A Border Gateway Protocol 4 (BGP-4)
- FRRouting
BGP CLI Commands
Since BGP is implemented using FRR, it is natural that the show command will forward direct requests to vtysh in FRR, with the following core code:
# file: src/sonic-utilities/show/bgp_frr_v4.py
# 'summary' subcommand ("show ip bgp summary")
@bgp.command()
@multi_asic_util.multi_asic_click_options
def summary(namespace, display):
    bgp_summary = bgp_util.get_bgp_summary_from_all_bgp_instances(
        constants.IPV4, namespace, display)
    bgp_util.display_bgp_summary(bgp_summary=bgp_summary, af=constants.IPV4)

# file: src/sonic-utilities/utilities_common/bgp_util.py
def get_bgp_summary_from_all_bgp_instances(af, namespace, display):
    # IPv6 case is omitted here for simplicity
    vtysh_cmd = "show ip bgp summary json"

    for ns in device.get_ns_list_based_on_options():
        cmd_output = run_bgp_show_command(vtysh_cmd, ns)

def run_bgp_command(vtysh_cmd, bgp_namespace=multi_asic.DEFAULT_NAMESPACE, vtysh_shell_cmd=constants.VTYSH_COMMAND):
    cmd = ['sudo', vtysh_shell_cmd] + bgp_instance_id + ['-c', vtysh_cmd]
    output, ret = clicommon.run_command(cmd, return_cmd=True)
Here, we can also verify by running vtysh directly as follows:
root@7260cx3:/etc/sonic/frr# which vtysh
/usr/bin/vtysh

root@7260cx3:/etc/sonic/frr# vtysh

Hello, this is FRRouting (version 7.5.1-sonic).
Copyright 1996-2005 Kunihiro Ishiguro, et al.

7260cx3# show ip bgp summary

IPv4 Unicast Summary:
BGP router identifier 10.1.0.32, local AS number 65100 vrf-id 0
BGP table version 6410
RIB entries 12809, using 2402 KiB of memory
Peers 4, using 85 KiB of memory
Peer groups 4, using 256 bytes of memory

Neighbor        V         AS   MsgRcvd   MsgSent   TblVer  InQ OutQ  Up/Down State/PfxRcd   PfxSnt
10.0.0.57       4      64600      3702      3704        0    0    0 08:15:03         6401     6406
10.0.0.59       4      64600      3702      3704        0    0    0 08:15:03         6401     6406
10.0.0.61       4      64600      3705      3702        0    0    0 08:15:03         6401     6406
10.0.0.63       4      64600      3702      3702        0    0    0 08:15:03         6401     6406

Total number of neighbors 4
The config command, on the other hand, is implemented by directly manipulating CONFIG_DB with the following core code:
# file: src/sonic-utilities/config/main.py

@bgp.group(cls=clicommon.AbbreviationGroup)
def remove():
    "Remove BGP neighbor configuration from the device"
    pass

@remove.command('neighbor')
@click.argument('neighbor_ip_or_hostname', metavar='<neighbor_ip_or_hostname>', required=True)
def remove_neighbor(neighbor_ip_or_hostname):
    """Deletes BGP neighbor configuration of given hostname or ip from devices
       User can specify either internal or external BGP neighbor to remove
    """
    namespaces = [DEFAULT_NAMESPACE]
    removed_neighbor = False
    ...

    # Connect to CONFIG_DB in linux host (in case of single ASIC) or CONFIG_DB in all the
    # namespaces (in case of multi ASIC) and do the sepcified "action" on the BGP neighbor(s)
    for namespace in namespaces:
        config_db = ConfigDBConnector(use_unix_socket_path=True, namespace=namespace)
        config_db.connect()
        if _remove_bgp_neighbor_config(config_db, neighbor_ip_or_hostname):
            removed_neighbor = True
    ...
参考资料
- SONiC Architecture
- Github repo: sonic-frr
- Github repo: sonic-utilities
- RFC 4271: A Border Gateway Protocol 4 (BGP-4)
- FRRouting
BGP route update
Routing changes are almost the most important workflow in SONiC. The whole process starts from the bgpd process to the final arrival of the ASIC chip through the SAI, and there are more processes involved in the middle and the process is more complicated. So this section, we will come together to analyze its overall process in depth.
To facilitate our understanding and to show it from the code level, we present this flow in two big chunks, how FRR handles route changes, and SONiC's route change workflow and how it is integrated with FRR.
FRR处理路由变更
sequenceDiagram
    autonumber
    participant N as 邻居节点
    box purple bgp容器
    participant B as bgpd
    participant ZH as zebra<br/>(请求处理线程)
    participant ZF as zebra<br/>(路由处理线程)
    participant ZD as zebra<br/>(数据平面处理线程)
    participant ZFPM as zebra<br/>(FPM转发线程)
    participant FPM as fpmsyncd
    end
    participant K as Linux Kernel

    N->>B: 建立BGP会话,<br/>发送路由变更
    B->>B: 选路,变更本地路由表(RIB)
    alt 如果路由发生变化
    B->>N: 通知其他邻居节点路由变化
    end
    B->>ZH: 通过zlient本地Socket<br/>通知Zebra更新路由表
    ZH->>ZH: 接受bgpd发送的请求
    ZH->>ZF: 将路由请求放入<br/>路由处理线程的队列中
    ZF->>ZF: 更新本地路由表(RIB)
    ZF->>ZD: 将路由表更新请求放入<br/>数据平面处理线程<br/>的消息队列中
    ZF->>ZFPM: 请求FPM处理线程转发路由变更
    ZFPM->>FPM: 通过FPM协议通知<br/>fpmsyncd下发<br/>路由变更
    ZD->>K: 发送Netlink消息更新内核路由表
关于FRR的实现,这里更多的是从代码的角度来阐述其工作流的过程,而不是其对BGP的实现细节,如果想要了解FRR的BGP实现细节,可以参考官方文档。
bgpd处理路由变更
bgpd is a process in the FRR dedicated to handling BGP sessions. It opens TCP port 179 to establish BGP connections with neighboring nodes and handles routing table update requests. It is also used by FRR to notify other neighboring nodes when a route has changed.
After a request comes to bgpd, it first comes to its io thread: bgp_io. As the name implies, the network reads and writes in bgpd are done on this thread: bgp_io:
// File: src/sonic-frr/frr/bgpd/bgp_io.c
static int bgp_process_reads(struct thread *thread)
{
    ...

    while (more) {
        // Read packets here
        ...

        // If we have more than 1 complete packet, mark it and process it later.
        if (ringbuf_remain(ibw) >= pktsize) {
            ...
            added_pkt = true;
        } else break;
    }
    ...

    if (added_pkt)
        thread_add_event(bm->master, bgp_process_packet, peer, 0, &peer->t_process_packet);

    return 0;
}
When the packet has been read, bgpd sends it to the main thread for routing. Here, bgpd distributes the packets according to their type, where requests for routing updates are given to bpg_update_receive for parsing:
// File: src/sonic-frr/frr/bgpd/bgp_packet.c
int bgp_process_packet(struct thread *thread)
{
    ...
    unsigned int processed = 0;
    while (processed < rpkt_quanta_old) {
        uint8_t type = 0;
        bgp_size_t size;
        ...

        /* read in the packet length and type */
        size = stream_getw(peer->curr);
        type = stream_getc(peer->curr);
        size -= BGP_HEADER_SIZE;

        switch (type) {
        case BGP_MSG_OPEN:
            ...
            break;
        case BGP_MSG_UPDATE:
            ...
            mprc = bgp_update_receive(peer, size);
            ...
            break;
        ...
}

// Process BGP UPDATE message for peer.
static int bgp_update_receive(struct peer *peer, bgp_size_t size)
{
    struct stream *s;
    struct attr attr;
    struct bgp_nlri nlris[NLRI_TYPE_MAX];
    ...

    // Parse attributes and NLRI
    memset(&attr, 0, sizeof(struct attr));
    attr.label_index = BGP_INVALID_LABEL_INDEX;
    attr.label = MPLS_INVALID_LABEL;
    ...

    memset(&nlris, 0, sizeof(nlris));
    ...

    if ((!update_len && !withdraw_len && nlris[NLRI_MP_UPDATE].length == 0)
        || (attr_parse_ret == BGP_ATTR_PARSE_EOR)) {
        // More parsing here
        ...

        if (afi && peer->afc[afi][safi]) {
            struct vrf *vrf = vrf_lookup_by_id(peer->bgp->vrf_id);

            /* End-of-RIB received */
            if (!CHECK_FLAG(peer->af_sflags[afi][safi], PEER_STATUS_EOR_RECEIVED)) {
                ...
                if (gr_info->eor_required == gr_info->eor_received) {
                    ...
                    /* Best path selection */
                    if (bgp_best_path_select_defer( peer->bgp, afi, safi) < 0)
                        return BGP_Stop;
                }
            }
            ...
        }
    }
    ...

    return Receive_UPDATE_message;
}
Then, bgpd will start checking if a better path appears and update its own local routing table (RIB, Routing Information Base)::
// File: src/sonic-frr/frr/bgpd/bgp_route.c
/* Process the routes with the flag BGP_NODE_SELECT_DEFER set */
int bgp_best_path_select_defer(struct bgp *bgp, afi_t afi, safi_t safi)
{
    struct bgp_dest *dest;
    int cnt = 0;
    struct afi_safi_info *thread_info;
    ...

    /* Process the route list */
    for (dest = bgp_table_top(bgp->rib[afi][safi]);
         dest && bgp->gr_info[afi][safi].gr_deferred != 0;
         dest = bgp_route_next(dest))
    {
        ...
        bgp_process_main_one(bgp, dest, afi, safi);
        ...
    }
    ...

    return 0;
}

static void bgp_process_main_one(struct bgp *bgp, struct bgp_dest *dest, afi_t afi, safi_t safi)
{
    struct bgp_path_info *new_select;
    struct bgp_path_info *old_select;
    struct bgp_path_info_pair old_and_new;
    ...

    const struct prefix *p = bgp_dest_get_prefix(dest);
    ...

    /* Best path selection. */
    bgp_best_selection(bgp, dest, &bgp->maxpaths[afi][safi], &old_and_new, afi, safi);
    old_select = old_and_new.old;
    new_select = old_and_new.new;
    ...

    /* FIB update. */
    if (bgp_fibupd_safi(safi) && (bgp->inst_type != BGP_INSTANCE_TYPE_VIEW)
        && !bgp_option_check(BGP_OPT_NO_FIB)) {

        if (new_select && new_select->type == ZEBRA_ROUTE_BGP
            && (new_select->sub_type == BGP_ROUTE_NORMAL
            || new_select->sub_type == BGP_ROUTE_AGGREGATE
            || new_select->sub_type == BGP_ROUTE_IMPORTED)) {
            ...

            if (old_select && is_route_parent_evpn(old_select))
                bgp_zebra_withdraw(p, old_select, bgp, safi);

            bgp_zebra_announce(dest, p, new_select, bgp, afi, safi);
        } else {
            /* Withdraw the route from the kernel. */
            ...
        }
    }

    /* EVPN route injection and clean up */
    ...

    UNSET_FLAG(dest->flags, BGP_NODE_PROCESS_SCHEDULED);
    return;
}
Finally, bgp_zebra_announce will notify zebra via zclient to update the kernel routing table.
// File: src/sonic-frr/frr/bgpd/bgp_zebra.c
void bgp_zebra_announce(struct bgp_node *rn, struct prefix *p, struct bgp_path_info *info, struct bgp *bgp, afi_t afi, safi_t safi)
{
    ...
    zclient_route_send(valid_nh_count ? ZEBRA_ROUTE_ADD : ZEBRA_ROUTE_DELETE, zclient, &api);
}
zclient uses a local socket to communicate with zebra and provides a series of callback functions for receiving notifications from zebra, with the following core code:
// File: src/sonic-frr/frr/bgpd/bgp_zebra.c
void bgp_zebra_init(struct thread_master *master, unsigned short instance)
{
    zclient_num_connects = 0;

    /* Set default values. */
    zclient = zclient_new(master, &zclient_options_default);
    zclient_init(zclient, ZEBRA_ROUTE_BGP, 0, &bgpd_privs);
    zclient->zebra_connected = bgp_zebra_connected;
    zclient->router_id_update = bgp_router_id_update;
    zclient->interface_add = bgp_interface_add;
    zclient->interface_delete = bgp_interface_delete;
    zclient->interface_address_add = bgp_interface_address_add;
    ...
}

int zclient_socket_connect(struct zclient *zclient)
{
    int sock;
    int ret;

    sock = socket(zclient_addr.ss_family, SOCK_STREAM, 0);
    ...

    /* Connect to zebra. */
    ret = connect(sock, (struct sockaddr *)&zclient_addr, zclient_addr_len);
    ...

    zclient->sock = sock;
    return sock;
}
In the bgpd container, we can find the socket file used by zebra communication in the /run/frr directory for a simple verification:
root@7260cx3:/run/frr# ls -l
total 12
...
srwx------ 1 frr frr    0 Jun 16 09:16 zserv.api
zebra更新路由表
Since FRR supports many routing protocols, if each routing protocol process operates separately on the kernel, there will be conflicts and it is difficult to coordinate and cooperate.
In zebra, kernel updates happen in a separate data-plane processing thread: dplane_thread. All requests are sent to zebra via zclient, processed and finally forwarded to dplane_thread for processing, so that the routing is ordered and no conflicts arise.
When zebra is started, all request handling functions will be registered, and when the request arrives, the corresponding handling function can be called according to the type of request, and the core code is as follows:
// File: src/sonic-frr/frr/zebra/zapi_msg.c
void (*zserv_handlers[])(ZAPI_HANDLER_ARGS) = {
    [ZEBRA_ROUTER_ID_ADD] = zread_router_id_add,
    [ZEBRA_ROUTER_ID_DELETE] = zread_router_id_delete,
    [ZEBRA_INTERFACE_ADD] = zread_interface_add,
    [ZEBRA_INTERFACE_DELETE] = zread_interface_delete,
    [ZEBRA_ROUTE_ADD] = zread_route_add,
    [ZEBRA_ROUTE_DELETE] = zread_route_del,
    [ZEBRA_REDISTRIBUTE_ADD] = zebra_redistribute_add,
    [ZEBRA_REDISTRIBUTE_DELETE] = zebra_redistribute_delete,
    ...
Let's take adding a route zread_route_add as an example here to continue the analysis of the subsequent process. As we can see from the following code, zebra will start looking at and updating its own internal routing table when a new route arrives:
// File: src/sonic-frr/frr/zebra/zapi_msg.c
static void zread_route_add(ZAPI_HANDLER_ARGS)
{
    struct stream *s;
    struct route_entry *re;
    struct nexthop_group *ng = NULL;
    struct nhg_hash_entry nhe;
    ...

    // Decode zclient request
    s = msg;
    if (zapi_route_decode(s, &api) < 0) {
        return;
    }
    ...

    // Allocate new route entry.
    re = XCALLOC(MTYPE_RE, sizeof(struct route_entry));
    re->type = api.type;
    re->instance = api.instance;
    ...

    // Init nexthop entry, if we have an id, then add route.
    if (!re->nhe_id) {
        zebra_nhe_init(&nhe, afi, ng->nexthop);
        nhe.nhg.nexthop = ng->nexthop;
        nhe.backup_info = bnhg;
    }
    ret = rib_add_multipath_nhe(afi, api.safi, &api.prefix, src_p, re, &nhe);

    // Update stats. IPv6 is omitted here for simplicity.
    if (ret > 0) client->v4_route_add_cnt++;
    else if (ret < 0) client->v4_route_upd8_cnt++;
}

// File: src/sonic-frr/frr/zebra/zebra_rib.c
int rib_add_multipath_nhe(afi_t afi, safi_t safi, struct prefix *p,
              struct prefix_ipv6 *src_p, struct route_entry *re,
              struct nhg_hash_entry *re_nhe)
{
    struct nhg_hash_entry *nhe = NULL;
    struct route_table *table;
    struct route_node *rn;
    int ret = 0;
    ...

    /* Find table and nexthop entry */
    table = zebra_vrf_get_table_with_table_id(afi, safi, re->vrf_id, re->table);
    if (re->nhe_id > 0) nhe = zebra_nhg_lookup_id(re->nhe_id);
    else nhe = zebra_nhg_rib_find_nhe(re_nhe, afi);

    /* Attach the re to the nhe's nexthop group. */
    route_entry_update_nhe(re, nhe);

    /* Make it sure prefixlen is applied to the prefix. */
    /* Set default distance by route type. */
    ...

    /* Lookup route node.*/
    rn = srcdest_rnode_get(table, p, src_p);
    ...

    /* If this route is kernel/connected route, notify the dataplane to update kernel route table. */
    if (RIB_SYSTEM_ROUTE(re)) {
        dplane_sys_route_add(rn, re);
    }

    /* Link new re to node. */
    SET_FLAG(re->status, ROUTE_ENTRY_CHANGED);
    rib_addnode(rn, re, 1);

    /* Clean up */
    ...
    return ret;
}
rib_addnode forwards this route add request to the rib's processing thread, and it sequentially processes:
static void rib_addnode(struct route_node *rn, struct route_entry *re, int process)
{
    ...
    rib_link(rn, re, process);
}

static void rib_link(struct route_node *rn, struct route_entry *re, int process)
{
    rib_dest_t *dest = rib_dest_from_rnode(rn);
    if (!dest) dest = zebra_rib_create_dest(rn);
    re_list_add_head(&dest->routes, re);
    ...

    if (process) rib_queue_add(rn);
}
The request comes to the RIB's processing thread: rib_process, which performs further routing and then adds the best route to zebra's internal routing table (RIB):
/* Core function for processing routing information base. */
static void rib_process(struct route_node *rn)
{
    struct route_entry *re;
    struct route_entry *next;
    struct route_entry *old_selected = NULL;
    struct route_entry *new_selected = NULL;
    struct route_entry *old_fib = NULL;
    struct route_entry *new_fib = NULL;
    struct route_entry *best = NULL;
    rib_dest_t *dest;
    ...

    dest = rib_dest_from_rnode(rn);
    old_fib = dest->selected_fib;
    ...

    /* Check every route entry and select the best route. */
    RNODE_FOREACH_RE_SAFE (rn, re, next) {
        ...

        if (CHECK_FLAG(re->flags, ZEBRA_FLAG_FIB_OVERRIDE)) {
            best = rib_choose_best(new_fib, re);
            if (new_fib && best != new_fib)
                UNSET_FLAG(new_fib->status, ROUTE_ENTRY_CHANGED);
            new_fib = best;
        } else {
            best = rib_choose_best(new_selected, re);
            if (new_selected && best != new_selected)
                UNSET_FLAG(new_selected->status, ROUTE_ENTRY_CHANGED);
            new_selected = best;
        }

        if (best != re)
            UNSET_FLAG(re->status, ROUTE_ENTRY_CHANGED);
    } /* RNODE_FOREACH_RE */
    ...

    /* Update fib according to selection results */
    if (new_fib && old_fib)
        rib_process_update_fib(zvrf, rn, old_fib, new_fib);
    else if (new_fib)
        rib_process_add_fib(zvrf, rn, new_fib);
    else if (old_fib)
        rib_process_del_fib(zvrf, rn, old_fib);

    /* Remove all RE entries queued for removal */
    /* Check if the dest can be deleted now.  */
    ...
}
For new routes, rib_process_add_fib is called to add them to zebra's internal routing table, and then dplane is notified of the kernel routing table update at
static void rib_process_add_fib(struct zebra_vrf *zvrf, struct route_node *rn, struct route_entry *new)
{
    hook_call(rib_update, rn, "new route selected");
    ...

    /* If labeled-unicast route, install transit LSP. */
    if (zebra_rib_labeled_unicast(new))
        zebra_mpls_lsp_install(zvrf, rn, new);

    rib_install_kernel(rn, new, NULL);
    UNSET_FLAG(new->status, ROUTE_ENTRY_CHANGED);
}

void rib_install_kernel(struct route_node *rn, struct route_entry *re,
            struct route_entry *old)
{
    struct rib_table_info *info = srcdest_rnode_table_info(rn);
    enum zebra_dplane_result ret;
    rib_dest_t *dest = rib_dest_from_rnode(rn);
    ...

    /* Install the resolved nexthop object first. */
    zebra_nhg_install_kernel(re->nhe);

    /* If this is a replace to a new RE let the originator of the RE know that they've lost */
    if (old && (old != re) && (old->type != re->type))
        zsend_route_notify_owner(rn, old, ZAPI_ROUTE_BETTER_ADMIN_WON, info->afi, info->safi);

    /* Update fib selection */
    dest->selected_fib = re;

    /* Make sure we update the FPM any time we send new information to the kernel. */
    hook_call(rib_update, rn, "installing in kernel");

    /* Send add or update */
    if (old) ret = dplane_route_update(rn, re, old);
    else ret = dplane_route_add(rn, re);
    ...
}
There are two important operations here, one is naturally the call to the dplane_route_* function to perform kernel routing table updates, and the other is the hook_call that appears twice, where the fpm hook function is hung to receive and forward routing table update notifications. Here we look at them one by one:
dplane更新内核路由表
First is the dplane_route_* function of dplane, which does the same thing: it packs the request and puts it in the dplane_thread message queue, without doing anything of substance: the
// File: src/sonic-frr/frr/zebra/zebra_dplane.c
enum zebra_dplane_result dplane_route_add(struct route_node *rn, struct route_entry *re) {
    return dplane_route_update_internal(rn, re, NULL, DPLANE_OP_ROUTE_INSTALL);
}

enum zebra_dplane_result dplane_route_update(struct route_node *rn, struct route_entry *re, struct route_entry *old_re) {
    return dplane_route_update_internal(rn, re, old_re, DPLANE_OP_ROUTE_UPDATE);
}

enum zebra_dplane_result dplane_sys_route_add(struct route_node *rn, struct route_entry *re) {
    return dplane_route_update_internal(rn, re, NULL, DPLANE_OP_SYS_ROUTE_ADD);
}

static enum zebra_dplane_result
dplane_route_update_internal(struct route_node *rn, struct route_entry *re, struct route_entry *old_re, enum dplane_op_e op)
{
    enum zebra_dplane_result result = ZEBRA_DPLANE_REQUEST_FAILURE;
    int ret = EINVAL;

    /* Create and init context */
    struct zebra_dplane_ctx *ctx = ...;

    /* Enqueue context for processing */
    ret = dplane_route_enqueue(ctx);

    /* Update counter */
    atomic_fetch_add_explicit(&zdplane_info.dg_routes_in, 1, memory_order_relaxed);

    if (ret == AOK)
        result = ZEBRA_DPLANE_REQUEST_QUEUED;

    return result;
}
Then, we come to the dataface processing thread dplane_thread, whose message loop is simple: it takes messages one by one from the queue and then calls its processing function by
// File: src/sonic-frr/frr/zebra/zebra_dplane.c
static int dplane_thread_loop(struct thread *event)
{
    ...

    while (prov) {
        ...

        /* Process work here */
        (*prov->dp_fp)(prov);

        /* Check for zebra shutdown */
        /* Dequeue completed work from the provider */
        ...

        /* Locate next provider */
        DPLANE_LOCK();
        prov = TAILQ_NEXT(prov, dp_prov_link);
        DPLANE_UNLOCK();
    }
}
By default, dplane_thread uses kernel_dplane_process_func for message processing, and internally distributes the kernel operations according to the type of request:
static int kernel_dplane_process_func(struct zebra_dplane_provider *prov)
{
    enum zebra_dplane_result res;
    struct zebra_dplane_ctx *ctx;
    int counter, limit;
    limit = dplane_provider_get_work_limit(prov);

    for (counter = 0; counter < limit; counter++) {
        ctx = dplane_provider_dequeue_in_ctx(prov);
        if (ctx == NULL) break;

        /* A previous provider plugin may have asked to skip the kernel update.  */
        if (dplane_ctx_is_skip_kernel(ctx)) {
            res = ZEBRA_DPLANE_REQUEST_SUCCESS;
            goto skip_one;
        }

        /* Dispatch to appropriate kernel-facing apis */
        switch (dplane_ctx_get_op(ctx)) {
        case DPLANE_OP_ROUTE_INSTALL:
        case DPLANE_OP_ROUTE_UPDATE:
        case DPLANE_OP_ROUTE_DELETE:
            res = kernel_dplane_route_update(ctx);
            break;
        ...
        }
        ...
    }
    ...
}

static enum zebra_dplane_result
kernel_dplane_route_update(struct zebra_dplane_ctx *ctx)
{
    enum zebra_dplane_result res;
    /* Call into the synchronous kernel-facing code here */
    res = kernel_route_update(ctx);
    return res;
}
And kernel_route_update is a real kernel operation, which notifies the kernel of routing updates via netlink: kernel_route_update:
// File: src/sonic-frr/frr/zebra/rt_netlink.c
// Update or delete a prefix from the kernel, using info from a dataplane context.
enum zebra_dplane_result kernel_route_update(struct zebra_dplane_ctx *ctx)
{
    int cmd, ret;
    const struct prefix *p = dplane_ctx_get_dest(ctx);
    struct nexthop *nexthop;

    if (dplane_ctx_get_op(ctx) == DPLANE_OP_ROUTE_DELETE) {
        cmd = RTM_DELROUTE;
    } else if (dplane_ctx_get_op(ctx) == DPLANE_OP_ROUTE_INSTALL) {
        cmd = RTM_NEWROUTE;
    } else if (dplane_ctx_get_op(ctx) == DPLANE_OP_ROUTE_UPDATE) {
        cmd = RTM_NEWROUTE;
    }

    if (!RSYSTEM_ROUTE(dplane_ctx_get_type(ctx)))
        ret = netlink_route_multipath(cmd, ctx);
    ...

    return (ret == 0 ? ZEBRA_DPLANE_REQUEST_SUCCESS : ZEBRA_DPLANE_REQUEST_FAILURE);
}

// Routing table change via netlink interface, using a dataplane context object
static int netlink_route_multipath(int cmd, struct zebra_dplane_ctx *ctx)
{
    // Build netlink request.
    struct {
        struct nlmsghdr n;
        struct rtmsg r;
        char buf[NL_PKT_BUF_SIZE];
    } req;

    req.n.nlmsg_len = NLMSG_LENGTH(sizeof(struct rtmsg));
    req.n.nlmsg_flags = NLM_F_CREATE | NLM_F_REQUEST;
    ...

    /* Talk to netlink socket. */
    return netlink_talk_info(netlink_talk_filter, &req.n, dplane_ctx_get_ns(ctx), 0);
}
FPM路由更新转发
FPM (Forwarding Plane Manager) is a protocol used in FRR to notify other processes of routing changes, and its main logic code is in src/sonic-frr/frr/zebra/zebra_fpm.c. It has two protocol implementations by default: protobuf and netlink, and SONiC is using the netlink protocol.
As we have already mentioned above, it is implemented through a hook function that listens for routing changes in the RIB and forwards them to other processes via local sockets. This hook will be registered at startup, the most relevant one to what we are looking at is the rib_update hook, as follows:
static int zebra_fpm_module_init(void)
{
    hook_register(rib_update, zfpm_trigger_update);
    hook_register(zebra_rmac_update, zfpm_trigger_rmac_update);
    hook_register(frr_late_init, zfpm_init);
    hook_register(frr_early_fini, zfpm_fini);
    return 0;
}

FRR_MODULE_SETUP(.name = "zebra_fpm", .version = FRR_VERSION,
         .description = "zebra FPM (Forwarding Plane Manager) module",
         .init = zebra_fpm_module_init,
);
When the rib_update hook is called, the zfpm_trigger_update function is invoked, which puts the route change information into the fpm forwarding queue again and triggers a write operation: the
static int zfpm_trigger_update(struct route_node *rn, const char *reason)
{
    rib_dest_t *dest;
    ...

    // Queue the update request
    dest = rib_dest_from_rnode(rn);
    SET_FLAG(dest->flags, RIB_DEST_UPDATE_FPM);
    TAILQ_INSERT_TAIL(&zfpm_g->dest_q, dest, fpm_q_entries);
    ...

    zfpm_write_on();
    return 0;
}

static inline void zfpm_write_on(void) {
    thread_add_write(zfpm_g->master, zfpm_write_cb, 0, zfpm_g->sock, &zfpm_g->t_write);
}
The callback for this write operation then takes it out of the queue and converts it into the FPM message format, which is then forwarded to other processes via the local socket: the
static int zfpm_write_cb(struct thread *thread)
{
    struct stream *s;

    do {
        int bytes_to_write, bytes_written;
        s = zfpm_g->obuf;

        // Convert route info to buffer here.
        if (stream_empty(s)) zfpm_build_updates();

        // Write to socket until we don' have anything to write or cannot write anymore (partial write).
        bytes_to_write = stream_get_endp(s) - stream_get_getp(s);
        bytes_written = write(zfpm_g->sock, stream_pnt(s), bytes_to_write);
        ...
    } while (1);

    if (zfpm_writes_pending()) zfpm_write_on();
    return 0;
}

static void zfpm_build_updates(void)
{
    struct stream *s = zfpm_g->obuf;
    do {
        /* Stop processing the queues if zfpm_g->obuf is full or we do not have more updates to process */
        if (zfpm_build_mac_updates() == FPM_WRITE_STOP) break;
        if (zfpm_build_route_updates() == FPM_WRITE_STOP) break;
    } while (zfpm_updates_pending());
}
At this point, FRR's work is complete.
SONiC路由变更工作流
When the FRR changes the kernel routing configuration, SONiC receives a notification from Netlink and FPM, and then performs a series of operations to send it down to the ASIC, the main process of which is as follows:
sequenceDiagram
    autonumber
    participant K as Linux Kernel
    box purple bgp容器
    participant Z as zebra
    participant FPM as fpmsyncd
    end
    box darkred database容器
    participant R as Redis
    end
    box darkblue swss容器
    participant OA as orchagent
    end
    box darkgreen syncd容器
    participant SD as syncd
    end
    participant A as ASIC

    K->>FPM: 内核路由变更时通过Netlink发送通知
    Z->>FPM: 通过FPM接口和Netlink<br/>消息格式发送路由变更通知

    FPM->>R: 通过ProducerStateTable<br/>将路由变更信息写入<br/>APPL_DB

    R->>OA: 通过ConsumerStateTable<br/>接收路由变更信息

    OA->>OA: 处理路由变更信息<br/>生成SAI路由对象
    OA->>SD: 通过ProducerTable<br/>或者ZMQ将SAI路由对象<br/>发给syncd

    SD->>R: 接收SAI路由对象,写入ASIC_DB
    SD->>A: 通过SAI接口<br/>配置ASIC
fpmsyncd更新Redis中的路由配置
First, let's look at the source. fpmsyncd starts listening for FPM and Netlink events when it starts up, and is used to receive routing change messages:
// File: src/sonic-swss/fpmsyncd/fpmsyncd.cpp
int main(int argc, char **argv)
{
    ...

    DBConnector db("APPL_DB", 0);
    RedisPipeline pipeline(&db);
    RouteSync sync(&pipeline);

    // Register netlink message handler
    NetLink netlink;
    netlink.registerGroup(RTNLGRP_LINK);

    NetDispatcher::getInstance().registerMessageHandler(RTM_NEWROUTE, &sync);
    NetDispatcher::getInstance().registerMessageHandler(RTM_DELROUTE, &sync);
    NetDispatcher::getInstance().registerMessageHandler(RTM_NEWLINK, &sync);
    NetDispatcher::getInstance().registerMessageHandler(RTM_DELLINK, &sync);

    rtnl_route_read_protocol_names(DefaultRtProtoPath);
    ...

    while (true) {
        try {
            // Launching FPM server and wait for zebra to connect.
            FpmLink fpm(&sync);
            ...

            fpm.accept();
            ...
        } catch (FpmLink::FpmConnectionClosedException &e) {
            // If connection is closed, keep retrying until it succeeds, before handling any other events.
            cout << "Connection lost, reconnecting..." << endl;
        }
        ...
    }
}
这样,所有的路由变更消息都会以Netlink的形式发送给RouteSync,其中EVPN Type 5必须以原始消息的形式进行处理,所以会发送给onMsgRaw,其他的消息都会统一的发给处理Netlink的onMsg回调:(关于Netlink如何接收和处理消息,请移步4.1.2 Netlink)
// File: src/sonic-swss/fpmsyncd/fpmlink.cpp
// Called from: FpmLink::readData()
void FpmLink::processFpmMessage(fpm_msg_hdr_t* hdr)
{
    size_t msg_len = fpm_msg_len(hdr);
    nlmsghdr *nl_hdr = (nlmsghdr *)fpm_msg_data(hdr);
    ...

    /* Read all netlink messages inside FPM message */
    for (; NLMSG_OK (nl_hdr, msg_len); nl_hdr = NLMSG_NEXT(nl_hdr, msg_len))
    {
        /*
         * EVPN Type5 Add Routes need to be process in Raw mode as they contain
         * RMAC, VLAN and L3VNI information.
         * Where as all other route will be using rtnl api to extract information
         * from the netlink msg.
         */
        bool isRaw = isRawProcessing(nl_hdr);

        nl_msg *msg = nlmsg_convert(nl_hdr);
        ...
        nlmsg_set_proto(msg, NETLINK_ROUTE);

        if (isRaw) {
            /* EVPN Type5 Add route processing */
            /* This will call into onRawMsg() */
            processRawMsg(nl_hdr);
        } else {
            /* This will call into onMsg() */
            NetDispatcher::getInstance().onNetlinkMessage(msg);
        }

        nlmsg_free(msg);
    }
}

void FpmLink::processRawMsg(struct nlmsghdr *h)
{
    m_routesync->onMsgRaw(h);
};
Then, after RouteSync receives the route change message, it will determine and distribute it in onMsg and onMsgRaw:
// File: src/sonic-swss/fpmsyncd/routesync.cpp
void RouteSync::onMsgRaw(struct nlmsghdr *h)
{
    if ((h->nlmsg_type != RTM_NEWROUTE) && (h->nlmsg_type != RTM_DELROUTE))
        return;
    ...
    onEvpnRouteMsg(h, len);
}

void RouteSync::onMsg(int nlmsg_type, struct nl_object *obj)
{
    // Refill Netlink cache here
    ...

    struct rtnl_route *route_obj = (struct rtnl_route *)obj;
    auto family = rtnl_route_get_family(route_obj);
    if (family == AF_MPLS) {
        onLabelRouteMsg(nlmsg_type, obj);
        return;
    }
    ...

    unsigned int master_index = rtnl_route_get_table(route_obj);
    char master_name[IFNAMSIZ] = {0};
    if (master_index) {
        /* If the master device name starts with VNET_PREFIX, it is a VNET route.
        The VNET name is exactly the name of the associated master device. */
        getIfName(master_index, master_name, IFNAMSIZ);
        if (string(master_name).find(VNET_PREFIX) == 0) {
            onVnetRouteMsg(nlmsg_type, obj, string(master_name));
        }

        /* Otherwise, it is a regular route (include VRF route). */
        else {
            onRouteMsg(nlmsg_type, obj, master_name);
        }
    } else {
        onRouteMsg(nlmsg_type, obj, NULL);
    }
}
From the code above, we can see that there will be four different route processing entries here, and these different routes will be eventually written to different Tables in APPL_DB via their respective [ProducerStateTable](. /4-2-2-redis-messaging-layer.html#producerstatetable--consumerstatetable) to different Tables in APPL_DB:
| 路由类型 | 处理函数 | Table |
|---|---|---|
| MPLS | onLabelRouteMsg | LABLE_ROUTE_TABLE |
| Vnet VxLan Tunnel Route | onVnetRouteMsg | VNET_ROUTE_TUNNEL_TABLE |
| 其他Vnet路由 | onVnetRouteMsg | VNET_ROUTE_TABLE |
| EVPN Type 5 | onEvpnRouteMsg | ROUTE_TABLE |
| 普通路由 | onRouteMsg | ROUTE_TABLE |
Here is an example of ordinary routing, the implementation of other functions is different, but the main idea is the same: the
// File: src/sonic-swss/fpmsyncd/routesync.cpp
void RouteSync::onRouteMsg(int nlmsg_type, struct nl_object *obj, char *vrf)
{
    // Parse route info from nl_object here.
    ...

    // Get nexthop lists
    string gw_list;
    string intf_list;
    string mpls_list;
    getNextHopList(route_obj, gw_list, mpls_list, intf_list);
    ...

    // Build route info here, including protocol, interface, next hops, MPLS, weights etc.
    vector<FieldValueTuple> fvVector;
    FieldValueTuple proto("protocol", proto_str);
    FieldValueTuple gw("nexthop", gw_list);
    ...

    fvVector.push_back(proto);
    fvVector.push_back(gw);
    ...

    // Push to ROUTE_TABLE via ProducerStateTable.
    m_routeTable.set(destipprefix, fvVector);
    SWSS_LOG_DEBUG("RouteTable set msg: %s %s %s %s", destipprefix, gw_list.c_str(), intf_list.c_str(), mpls_list.c_str());
    ...
}
orchagent处理路由配置变化
Next, this routing information comes to the orchagent. when the orchagent starts, it creates VNetRouteOrch and RouteOrch objects, which are used to listen to and process Vnet-related routes and EVPN/general routes, respectively:
// File: src/sonic-swss/orchagent/orchdaemon.cpp
bool OrchDaemon::init()
{
    ...

    vector<string> vnet_tables = { APP_VNET_RT_TABLE_NAME, APP_VNET_RT_TUNNEL_TABLE_NAME };
    VNetRouteOrch *vnet_rt_orch = new VNetRouteOrch(m_applDb, vnet_tables, vnet_orch);
    ...

    const int routeorch_pri = 5;
    vector<table_name_with_pri_t> route_tables = {
        { APP_ROUTE_TABLE_NAME,        routeorch_pri },
        { APP_LABEL_ROUTE_TABLE_NAME,  routeorch_pri }
    };
    gRouteOrch = new RouteOrch(m_applDb, route_tables, gSwitchOrch, gNeighOrch, gIntfsOrch, vrf_orch, gFgNhgOrch, gSrv6Orch);
    ...
}
The message processing entry for all Orch objects is doTask, here RouteOrch and VNetRouteOrch are no exception, here we take RouteOrch as an example to see how it handles route changes.
从RouteOrch上,我们可以真切的感受到为什么这些类被命名为Orch。RouteOrch有2500多行,其中会有和很多其他Orch的交互,以及各种各样的细节…… 代码是相对难读,请大家读的时候一定保持耐心。
RouteOrch has a few points to note when processing routing messages:
- 从上面
init函数,我们可以看到RouteOrch不仅会管理普通路由,还会管理MPLS路由,这两种路由的处理逻辑是不一样的,所以在下面的代码中,为了简化,我们只展示普通路由的处理逻辑。 - 因为
ProducerStateTable在传递和接受消息的时候都是批量传输的,所以,RouteOrch在处理消息的时候,也是批量处理的。为了支持批量处理,RouteOrch会借用EntityBulker<sai_route_api_t> gRouteBulker将需要改动的SAI路由对象缓存起来,然后在doTask()函数的最后,一次性将这些路由对象的改动应用到SAI中。 - 路由的操作会需要很多其他的信息,比如每个Port的状态,每个Neighbor的状态,每个VRF的状态等等。为了获取这些信息,
RouteOrch会与其他的Orch对象进行交互,比如PortOrch,NeighOrch,VRFOrch等等。
// File: src/sonic-swss/orchagent/routeorch.cpp
void RouteOrch::doTask(Consumer& consumer)
{
    // Calling PortOrch to make sure all ports are ready before processing route messages.
    if (!gPortsOrch->allPortsReady()) { return; }

    // Call doLabelTask() instead, if the incoming messages are from MPLS messages. Otherwise, move on as regular routes.
    ...

    /* Default handling is for ROUTE_TABLE (regular routes) */
    auto it = consumer.m_toSync.begin();
    while (it != consumer.m_toSync.end()) {
        // Add or remove routes with a route bulker
        while (it != consumer.m_toSync.end())
        {
            KeyOpFieldsValuesTuple t = it->second;

            // Parse route operation from the incoming message here.
            string key = kfvKey(t);
            string op = kfvOp(t);
            ...

            // resync application:
            // - When routeorch receives 'resync' message (key = "resync", op = "SET"), it marks all current routes as dirty
            //   and waits for 'resync complete' message. For all newly received routes, if they match current dirty routes,
            //   it unmarks them dirty.
            // - After receiving 'resync complete' (key = "resync", op != "SET") message, it creates all newly added routes
            //   and removes all dirty routes.
            ...

            // Parsing VRF and IP prefix from the incoming message here.
            ...

            // Process regular route operations.
            if (op == SET_COMMAND)
            {
                // Parse and validate route attributes from the incoming message here.
                string ips;
                string aliases;
                ...

                // If the nexthop_group is empty, create the next hop group key based on the IPs and aliases.
                // Otherwise, get the key from the NhgOrch. The result will be stored in the "nhg" variable below.
                NextHopGroupKey& nhg = ctx.nhg;
                ...
                if (nhg_index.empty())
                {
                    // Here the nexthop_group is empty, so we create the next hop group key based on the IPs and aliases.
                    ...

                    string nhg_str = "";
                    if (blackhole) {
                        nhg = NextHopGroupKey();
                    } else if (srv6_nh == true) {
                        ...
                        nhg = NextHopGroupKey(nhg_str, overlay_nh, srv6_nh);
                    } else if (overlay_nh == false) {
                        ...
                        nhg = NextHopGroupKey(nhg_str, weights);
                    } else {
                        ...
                        nhg = NextHopGroupKey(nhg_str, overlay_nh, srv6_nh);
                    }
                }
                else
                {
                    // Here we have a nexthop_group, so we get the key from the NhgOrch.
                    const NhgBase& nh_group = getNhg(nhg_index);
                    nhg = nh_group.getNhgKey();
                    ...
                }
                ...

                // Now we start to create the SAI route entry.
                if (nhg.getSize() == 1 && nhg.hasIntfNextHop())
                {
                    // Skip certain routes, such as not valid, directly routes to tun0, linklocal or multicast routes, etc.
                    ...

                    // Create SAI route entry in addRoute function.
                    if (addRoute(ctx, nhg)) it = consumer.m_toSync.erase(it);
                    else it++;
                }

                /*
                 * Check if the route does not exist or needs to be updated or
                 * if the route is using a temporary next hop group owned by
                 * NhgOrch.
                 */
                else if (m_syncdRoutes.find(vrf_id) == m_syncdRoutes.end() ||
                    m_syncdRoutes.at(vrf_id).find(ip_prefix) == m_syncdRoutes.at(vrf_id).end() ||
                    m_syncdRoutes.at(vrf_id).at(ip_prefix) != RouteNhg(nhg, ctx.nhg_index) ||
                    gRouteBulker.bulk_entry_pending_removal(route_entry) ||
                    ctx.using_temp_nhg)
                {
                    if (addRoute(ctx, nhg)) it = consumer.m_toSync.erase(it);
                    else it++;
                }
                ...
            }
            // Handle other ops, like DEL_COMMAND for route deletion, etc.
            ...
        }

        // Flush the route bulker, so routes will be written to syncd and ASIC
        gRouteBulker.flush();

        // Go through the bulker results.
        // Handle SAI failures, update neighbors, counters, send notifications in add/removeRoutePost functions.
        ...

        /* Remove next hop group if the reference count decreases to zero */
        ...
    }
}
After parsing the route operation, RouteOrch will call the addRoute or removeRoute functions to create or remove routes. Here is an example of adding a route addRoute to continue the analysis. Its logic is divided into several main parts:
- 从NeighOrch中获取下一跳信息,并检查下一跳是否真的可用。
- 如果是新路由,或者是重新添加正在等待删除的路由,那么就会创建一个新的SAI路由对象
- 如果是已有的路由,那么就更新已有的SAI路由对象
// File: src/sonic-swss/orchagent/routeorch.cpp
bool RouteOrch::addRoute(RouteBulkContext& ctx, const NextHopGroupKey &nextHops)
{
    // Get nexthop information from NeighOrch.
    // We also need to check PortOrch for inband port, IntfsOrch to ensure the related interface is created and etc.
    ...

    // Start to sync the SAI route entry.
    sai_route_entry_t route_entry;
    route_entry.vr_id = vrf_id;
    route_entry.switch_id = gSwitchId;
    copy(route_entry.destination, ipPrefix);

    sai_attribute_t route_attr;
    auto& object_statuses = ctx.object_statuses;

    // Create a new route entry in this case.
    //
    // In case the entry is already pending removal in the bulk, it would be removed from m_syncdRoutes during the bulk call.
    // Therefore, such entries need to be re-created rather than set attribute.
    if (it_route == m_syncdRoutes.at(vrf_id).end() || gRouteBulker.bulk_entry_pending_removal(route_entry)) {
        if (blackhole) {
            route_attr.id = SAI_ROUTE_ENTRY_ATTR_PACKET_ACTION;
            route_attr.value.s32 = SAI_PACKET_ACTION_DROP;
        } else {
            route_attr.id = SAI_ROUTE_ENTRY_ATTR_NEXT_HOP_ID;
            route_attr.value.oid = next_hop_id;
        }

        /* Default SAI_ROUTE_ATTR_PACKET_ACTION is SAI_PACKET_ACTION_FORWARD */
        object_statuses.emplace_back();
        sai_status_t status = gRouteBulker.create_entry(&object_statuses.back(), &route_entry, 1, &route_attr);
        if (status == SAI_STATUS_ITEM_ALREADY_EXISTS) {
            return false;
        }
    }

    // Update existing route entry in this case.
    else {
        // Set the packet action to forward when there was no next hop (dropped) and not pointing to blackhole.
        if (it_route->second.nhg_key.getSize() == 0 && !blackhole) {
            route_attr.id = SAI_ROUTE_ENTRY_ATTR_PACKET_ACTION;
            route_attr.value.s32 = SAI_PACKET_ACTION_FORWARD;

            object_statuses.emplace_back();
            gRouteBulker.set_entry_attribute(&object_statuses.back(), &route_entry, &route_attr);
        }

        // Only 1 case is listed here as an example. Other cases are handled with similar logic by calling set_entry_attributes as well.
        ...
    }
    ...
}
After all the routes have been created and set up, RouteOrch calls gRouteBulker.flush() to write all the routes to the ASIC_DB. The flush() function is simply a function that processes all requests in batches, by default 1000 per batch, this is defined in the OrchDaemon and passed in via the constructor:
// File: src/sonic-swss/orchagent/orchdaemon.cpp
#define DEFAULT_MAX_BULK_SIZE 1000
size_t gMaxBulkSize = DEFAULT_MAX_BULK_SIZE;

// File: src/sonic-swss/orchagent/bulker.h
template <typename T>
class EntityBulker
{
public:
    using Ts = SaiBulkerTraits<T>;
    using Te = typename Ts::entry_t;
    ...

    void flush()
    {
        // Bulk remove entries
        if (!removing_entries.empty()) {
            // Split into batches of max_bulk_size, then call flush. Similar to creating_entries, so details are omitted.
            std::vector<Te> rs;
            ...
            flush_removing_entries(rs);
            removing_entries.clear();
        }

        // Bulk create entries
        if (!creating_entries.empty()) {
            // Split into batches of max_bulk_size, then call flush_creating_entries to call SAI batch create API to create
            // the objects in batch.
            std::vector<Te> rs;
            std::vector<sai_attribute_t const*> tss;
            std::vector<uint32_t> cs;

            for (auto const& i: creating_entries) {
                sai_object_id_t *pid = std::get<0>(i);
                auto const& attrs = std::get<1>(i);
                if (*pid == SAI_NULL_OBJECT_ID) {
                    rs.push_back(pid);
                    tss.push_back(attrs.data());
                    cs.push_back((uint32_t)attrs.size());

                    // Batch create here.
                    if (rs.size() >= max_bulk_size) {
                        flush_creating_entries(rs, tss, cs);
                    }
                }
            }

            flush_creating_entries(rs, tss, cs);
            creating_entries.clear();
        }

        // Bulk update existing entries
        if (!setting_entries.empty()) {
            // Split into batches of max_bulk_size, then call flush. Similar to creating_entries, so details are omitted.
            std::vector<Te> rs;
            std::vector<sai_attribute_t> ts;
            std::vector<sai_status_t*> status_vector;
            ...
            flush_setting_entries(rs, ts, status_vector);
            setting_entries.clear();
        }
    }

    sai_status_t flush_creating_entries(
        _Inout_ std::vector<Te> &rs,
        _Inout_ std::vector<sai_attribute_t const*> &tss,
        _Inout_ std::vector<uint32_t> &cs)
    {
        ...

        // Call SAI bulk create API
        size_t count = rs.size();
        std::vector<sai_status_t> statuses(count);
        sai_status_t status = (*create_entries)((uint32_t)count, rs.data(), cs.data(), tss.data()
            , SAI_BULK_OP_ERROR_MODE_IGNORE_ERROR, statuses.data());

        // Set results back to input entries and clean up the batch below.
        for (size_t ir = 0; ir < count; ir++) {
            auto& entry = rs[ir];
            sai_status_t *object_status = creating_entries[entry].second;
            if (object_status) {
                *object_status = statuses[ir];
            }
        }

        rs.clear(); tss.clear(); cs.clear();
        return status;
    }

    // flush_removing_entries and flush_setting_entries are similar to flush_creating_entries, so we omit them here.
    ...
};
orchagent中的SAI对象转发
Careful partners must have found a strange place, here EntityBulker how to look like in a direct call to the SAI API it? Aren't they supposed to be called in syncd? If we trace the SAI API object passed into EntityBulker, we will even find that sai_route_api_t is the SAI interface, and there is SAI initialization code in orchagent, as follows:
// File: src/sonic-sairedis/debian/libsaivs-dev/usr/include/sai/sairoute.h
/**
 * @brief Router entry methods table retrieved with sai_api_query()
 */
typedef struct _sai_route_api_t
{
    sai_create_route_entry_fn                   create_route_entry;
    sai_remove_route_entry_fn                   remove_route_entry;
    sai_set_route_entry_attribute_fn            set_route_entry_attribute;
    sai_get_route_entry_attribute_fn            get_route_entry_attribute;

    sai_bulk_create_route_entry_fn              create_route_entries;
    sai_bulk_remove_route_entry_fn              remove_route_entries;
    sai_bulk_set_route_entry_attribute_fn       set_route_entries_attribute;
    sai_bulk_get_route_entry_attribute_fn       get_route_entries_attribute;
} sai_route_api_t;

// File: src/sonic-swss/orchagent/saihelper.cpp
void initSaiApi()
{
    SWSS_LOG_ENTER();

    if (ifstream(CONTEXT_CFG_FILE))
    {
        SWSS_LOG_NOTICE("Context config file %s exists", CONTEXT_CFG_FILE);
        gProfileMap[SAI_REDIS_KEY_CONTEXT_CONFIG] = CONTEXT_CFG_FILE;
    }

    sai_api_initialize(0, (const sai_service_method_table_t *)&test_services);
    sai_api_query(SAI_API_SWITCH,               (void **)&sai_switch_api);
    ...
    sai_api_query(SAI_API_NEIGHBOR,             (void **)&sai_neighbor_api);
    sai_api_query(SAI_API_NEXT_HOP,             (void **)&sai_next_hop_api);
    sai_api_query(SAI_API_NEXT_HOP_GROUP,       (void **)&sai_next_hop_group_api);
    sai_api_query(SAI_API_ROUTE,                (void **)&sai_route_api);
    ...

    sai_log_set(SAI_API_SWITCH,                 SAI_LOG_LEVEL_NOTICE);
    ...
    sai_log_set(SAI_API_NEIGHBOR,               SAI_LOG_LEVEL_NOTICE);
    sai_log_set(SAI_API_NEXT_HOP,               SAI_LOG_LEVEL_NOTICE);
    sai_log_set(SAI_API_NEXT_HOP_GROUP,         SAI_LOG_LEVEL_NOTICE);
    sai_log_set(SAI_API_ROUTE,                  SAI_LOG_LEVEL_NOTICE);
    ...
}
I believe you will feel very confused when you see this code for the first time. But don't worry, this is actually the forwarding mechanism of SAI objects in orchagent.
The proxy-stub pattern must be familiar to the RPC partners will not be unfamiliar to the proxy-stub pattern -- the use of a unified interface to define the communication between the two sides to call the interface, the caller to achieve serialization and send, and then the receiver to achieve the reception, deserialization and distribution. The SONiC approach is similar: use the SAI API itself as a unified interface, and implement the serialization and sending functions for orchagent to call, and then implement the receiving, deserialization and distribution functions in syncd.
Here, the sender is called ClientSai, and the implementation is in src/sonic-sairedis/lib/ClientSai.*. And the serialization and deserialization implementation is in the SAI metadata: src/sonic-sairedis/meta/sai_serialize.h:
// File: src/sonic-sairedis/lib/ClientSai.h
namespace sairedis
{
    class ClientSai:
        public sairedis::SaiInterface
    {
        ...
    };
}

// File: src/sonic-sairedis/meta/sai_serialize.h
// Serialize
std::string sai_serialize_route_entry(_In_ const sai_route_entry_t &route_entry);
...

// Deserialize
void sai_deserialize_route_entry(_In_ const std::string& s, _In_ sai_route_entry_t &route_entry);
...
orchagent goes to link libsairedis at compile time, thus enabling serialization and sending of SAI objects when calling the SAI API:
# File: src/sonic-swss/orchagent/Makefile.am
orchagent_LDADD = $(LDFLAGS_ASAN) -lnl-3 -lnl-route-3 -lpthread -lsairedis -lsaimeta -lsaimetadata -lswsscommon -lzmq
We use Bulk Create as an example here to see how ClientSai implements serialization and sends:
// File: src/sonic-sairedis/lib/ClientSai.cpp
sai_status_t ClientSai::bulkCreate(
        _In_ sai_object_type_t object_type,
        _In_ sai_object_id_t switch_id,
        _In_ uint32_t object_count,
        _In_ const uint32_t *attr_count,
        _In_ const sai_attribute_t **attr_list,
        _In_ sai_bulk_op_error_mode_t mode,
        _Out_ sai_object_id_t *object_id,
        _Out_ sai_status_t *object_statuses)
{
    MUTEX();
    REDIS_CHECK_API_INITIALIZED();

    std::vector<std::string> serialized_object_ids;

    // Server is responsible for generate new OID but for that we need switch ID
    // to be sent to server as well, so instead of sending empty oids we will
    // send switch IDs
    for (uint32_t idx = 0; idx < object_count; idx++) {
        serialized_object_ids.emplace_back(sai_serialize_object_id(switch_id));
    }
    auto status = bulkCreate(object_type, serialized_object_ids, attr_count, attr_list, mode, object_statuses);

    // Since user requested create, OID value was created remotely and it was returned in m_lastCreateOids
    for (uint32_t idx = 0; idx < object_count; idx++) {
        if (object_statuses[idx] == SAI_STATUS_SUCCESS) {
            object_id[idx] = m_lastCreateOids.at(idx);
        } else {
            object_id[idx] = SAI_NULL_OBJECT_ID;
        }
    }

    return status;
}

sai_status_t ClientSai::bulkCreate(
        _In_ sai_object_type_t object_type,
        _In_ const std::vector<std::string> &serialized_object_ids,
        _In_ const uint32_t *attr_count,
        _In_ const sai_attribute_t **attr_list,
        _In_ sai_bulk_op_error_mode_t mode,
        _Inout_ sai_status_t *object_statuses)
{
    ...

    // Calling SAI serialize APIs to serialize all objects
    std::string str_object_type = sai_serialize_object_type(object_type);
    std::vector<swss::FieldValueTuple> entries;
    for (size_t idx = 0; idx < serialized_object_ids.size(); ++idx) {
        auto entry = SaiAttributeList::serialize_attr_list(object_type, attr_count[idx], attr_list[idx], false);
        if (entry.empty()) {
            swss::FieldValueTuple null("NULL", "NULL");
            entry.push_back(null);
        }

        std::string str_attr = Globals::joinFieldValues(entry);
        swss::FieldValueTuple fvtNoStatus(serialized_object_ids[idx] , str_attr);
        entries.push_back(fvtNoStatus);
    }
    std::string key = str_object_type + ":" + std::to_string(entries.size());

    // Send to syncd via the communication channel.
    m_communicationChannel->set(key, entries, REDIS_ASIC_STATE_COMMAND_BULK_CREATE);

    // Wait for response from syncd.
    return waitForBulkResponse(SAI_COMMON_API_BULK_CREATE, (uint32_t)serialized_object_ids.size(), object_statuses);
}
Eventually, ClientSai will call m_communicationChannel->set() to send the serialized SAI object to syncd. And this Channel, before version 202106, was the Redis-based ProducerTable. This Channel has been changed to ZMQ since version 202111, probably due to efficiency considerations.
// File: https://github.com/sonic-net/sonic-sairedis/blob/202106/lib/inc/RedisChannel.h
class RedisChannel: public Channel
{
    ...

    /**
      * @brief Asic state channel.
      *
      * Used to sent commands like create/remove/set/get to syncd.
      */
    std::shared_ptr<swss::ProducerTable>  m_asicState;

    ...
};

// File: src/sonic-sairedis/lib/ClientSai.cpp
sai_status_t ClientSai::initialize(
        _In_ uint64_t flags,
        _In_ const sai_service_method_table_t *service_method_table)
{
    ...

    m_communicationChannel = std::make_shared<ZeroMQChannel>(
            cc->m_zmqEndpoint,
            cc->m_zmqNtfEndpoint,
            std::bind(&ClientSai::handleNotification, this, _1, _2, _3));

    m_apiInitialized = true;

    return SAI_STATUS_SUCCESS;
}
For more information about the method of process communication, you can refer to [Inter-process communication mechanism] described in Chapter 4 (. /4-2-2-redis-messaging-layer.html).
syncd更新ASIC
Finally, when the SAI object is generated and sent to syncd, syncd will receive it, process it, update ASIC_DB, and finally update ASIC. /5-1-syncd-sai-workflow.html) in detail, so we won't repeat it here, you can move to check it out.
参考资料
- SONiC Architecture
- Github repo: sonic-swss
- Github repo: sonic-swss-common
- Github repo: sonic-frr
- Github repo: sonic-utilities
- Github repo: sonic-sairedis
- RFC 4271: A Border Gateway Protocol 4 (BGP-4)
- FRRouting
- FRRouting - BGP
- FRRouting - FPM
- Understanding EVPN Pure Type 5 Routes